As I learn to use the Phaser framework to make simple browser-based games, I figured I would chronicle my adventures and hopefully help others out.
“Why a web web server?” As it turns out, when most browsers run a page as a local file, it locks down access to many other files, which we need for our games. To read more about this, see this article.
To properly serve these files, we can use any number of existing web server software, but we will write a simple one using the Express framework in Node.js. In the future, we can modify this simple server to receive information back from our game to do things like control hardware and *gasp* make multiplayer games.
Install Node.js
Navigate to the Node.js download page and choose the installer for your operating system. Run it, and accept all the defaults to install Node.js on your computer.
If you are using Linux, most package managers can install it for your. For Debian, try apt-get install nodejs npm . For other distros, see this page.
If you are weird like me and enjoy the Linux command line but work in Windows, I highly recommend installing Git Bash through the Windows git installer. We’ll need to use git later, as GitHub allows us to host our projects for free. All of my command line screenshots will be from Git Bash.
Install a Text Editor
For these simple programs, we’ll use a basic text editor to write our code. If you haven’t already, install the text editor of your choice. You can use Notepad, but I’ll make a few recommendations for programming-focused editors:
- Windows: Notepad++
- OS X: Sublime Text
- Linux: gedit (most GNOME-based flavors come with this)
Directory Structure
Create a folder named Games in a place where you like to keep your projects (e.g. My Documents/Projects). In Games, create another folder named HelloWorld.

The goal is to create a web server that lives in Games. Whenever we want to test a game, we run the server with Node.js and pass it the folder (as an argument) of the desired web site (e.g. “HelloWorld”).
A web site, in a practical sense, is just a collection of files on a computer that get served to a client upon request. For us, each project folder under Games will be its own site, and we just point our simple server to that folder in order to host the site.
Install Express.js
Express.js is a web application framework made for doing, well, lots of web stuff in Node.js. For our purposes, we are going to use it to make a simple web server that just serves files when asked (via HTTP requests). We could write our own server using the http module, but Express.js just makes things easier.
Open up a command prompt (e.g. Git Bash), navigate to your Games directory, and install Express.
cd <PATH_TO_PROJECTS>/Games
npm install express
You might notice that this creates a directory named node_modules in Games. This is where Node.js modules, like Express, are stored.
When you execute node and it attempts to load a module (i.e. through the require() instruction), Node.js first looks in the current directory for a folder named node_modules. If a module with the name in require() is not found, it begins to work its way up directories looking for node_modules. If the module is not found at all, the require() command will throw an error, and your program will fail.
Write the Server Code
Open up your text editor and copy in the code:
/**
 * Simple web server based on
 * http://expressjs.com/en/starter/hello-world.html
 *
 * Prerequisites:
 *  - Node
 *  - Express (npm install express)
 *
 * To use, save as a file (e.g. SimpleServer.js) and run with:
 *  node SimpleServer.js /PATH/TO/WWW/
 */

// Parameters
var sitePath = process.argv[2] || ".";
var port = 4242;

// Libraries
var express = require('express');
var app = express();

// Request logging
app.use(function(req, res, next) {
    console.log(req.url);
    next();
});

// Start server
console.log(sitePath);
console.log("Starting server in: " + __dirname + '/' + sitePath);
app.use(express.static(__dirname + '/' + sitePath));
app.listen(port, function() {
    console.log("Server running at: http://localhost:" + port)
});
That’s right, in about 15 lines of actual code, we have a functioning web server. Neat. In all honesty, though, Express is doing most of the heavy lifting for us.
Save the file as SimpleServer.js in the Games directory.
Create a Simple Web Site
Our site will be a single page with a title and some text in the body. In later parts, we will add a Canvas element and begin using Phaser to create games.
Create a new text document in your editor and copy in the following:
<!DOCTYPE HTML>
<html>
<head>
<meta charset="utf-8" />
<title>My Page</title>
</head>
<body>
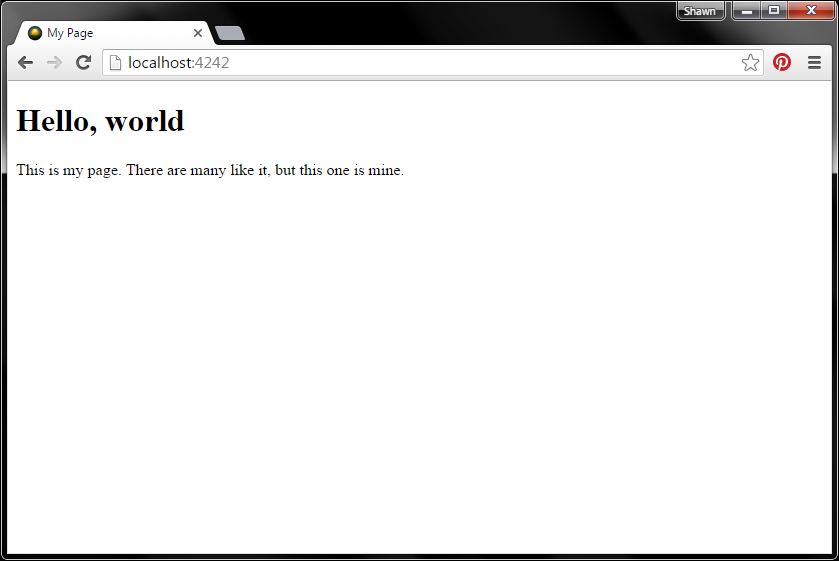
<h1>Hello, world</h1>
<p>This is my page. There are many like it, but this one is mine.</p>
</body>
</html>
Save it as index.html in Games/HelloWorld. At this point, your directory structure in <PATH_TO_PROJECTS>/Games should look like this:

Run the Server
In your command prompt, navigate to the Games directory and run the server, specifying the HelloWorld directory as the root for your web site.
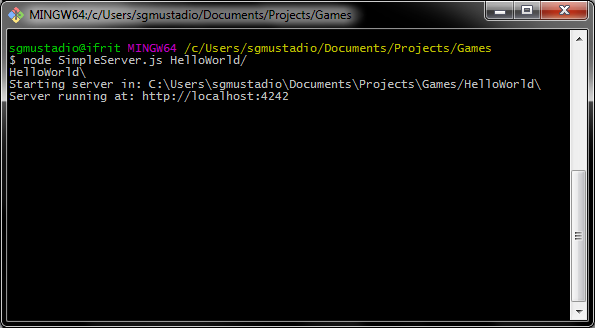
cd <PATH_TO_PROJECTS>/Games
node SimpleServer.js HelloWorld/
If all goes well, you should see a note appear in the console that the server is running at http://localhost:4242.
Open up a web browser and navigate to http://localhost:4242. You should see your page.
If you look at the console, you’ll see that a ‘/’ has appeared.

This means that a client requested the website’s root directory (‘/’). The server responded by sending index.html as a result, which is the default file for most websites. In this case, the root directory is HelloWorld, as we specified when we started the server.
Conclusion
We did not even touch Phaser in this part. Crazy, I know, but we needed to create a basic structure for hosting our games before we can even make them. Such are the joys of browser-based games.
If you aren’t familiar with HTML, now is a good time to play with the web page, index.html. We won’t actually do too much in HTML, but it’s good to be familiar with how tags, loading files from source, and a little bit of CSS work. Geek Champ has a great getting started with HTML tutorial.
When you are ready, continue to Part 2.
I am curious on how you should make phaser + multiplayer, when will you make the next part?
Apologies – your comment got flagged as spam for some reason. Part 2 and 3 are out: https://shawnhymel.com/1190/getting-started-with-phaser-part-2-drawing-text/. Time permitting, I would like to dig into doing multiplayer as well.
when is the rest of dis guide comin out?
Apologies – your comment got flagged as spam for some reason. Part 2 is now up: https://shawnhymel.com/1190/getting-started-with-phaser-part-2-drawing-text/.