WebSockets is an incredibly useful protocol that lets you send data to and from a server over TCP without the need for HTTP. Importantly, it lets you push data from the server to a client (e.g. a browser) without needing to make a request. This can be very handy for things like browser-based multiplayer games. I wanted to play around with it for embedded systems to see if I could get low-latency communication between a microcontroller and a computer. Specifically, I wanted the microcontroller to act as a server that supported a connection from a browser (e.g. PC or phone).
Thankfully, GitHub user Links2004 has created an Arduino WebSockets library, which makes testing WebSockets easy. To show it in action, I put together a video where I test the WebSockets library by creating an echo server and test it with a Python script.
https://dl.espressif.com/dl/package_esp32_index.json
#include <WiFi.h>
#include <WebSocketsServer.h>

// Constants
const char* ssid = "MySSID";
const char* password = "MyPassword";

// Globals
WebSocketsServer webSocket = WebSocketsServer(80);

// Called when receiving any WebSocket message
void onWebSocketEvent(uint8_t num,
                      WStype_t type,
                      uint8_t * payload,
                      size_t length) {

  // Figure out the type of WebSocket event
  switch(type) {

    // Client has disconnected
    case WStype_DISCONNECTED:
      Serial.printf("[%u] Disconnected!\n", num);
      break;

    // New client has connected
    case WStype_CONNECTED:
      {
        IPAddress ip = webSocket.remoteIP(num);
        Serial.printf("[%u] Connection from ", num);
        Serial.println(ip.toString());
      }
      break;

    // Echo text message back to client
    case WStype_TEXT:
      Serial.printf("[%u] Text: %s\n", num, payload);
      webSocket.sendTXT(num, payload);
      break;

    // For everything else: do nothing
    case WStype_BIN:
    case WStype_ERROR:
    case WStype_FRAGMENT_TEXT_START:
    case WStype_FRAGMENT_BIN_START:
    case WStype_FRAGMENT:
    case WStype_FRAGMENT_FIN:
    default:
      break;
  }
}

void setup() {

  // Start Serial port
  Serial.begin(115200);

  // Connect to access point
  Serial.println("Connecting");
  WiFi.begin(ssid, password);
  while ( WiFi.status() != WL_CONNECTED ) {
    delay(500);
    Serial.print(".");
  }

  // Print our IP address
  Serial.println("Connected!");
  Serial.print("My IP address: ");
  Serial.println(WiFi.localIP());

  // Start WebSocket server and assign callback
  webSocket.begin();
  webSocket.onEvent(onWebSocketEvent);
}

void loop() {

  // Look for and handle WebSocket data
  webSocket.loop();
}
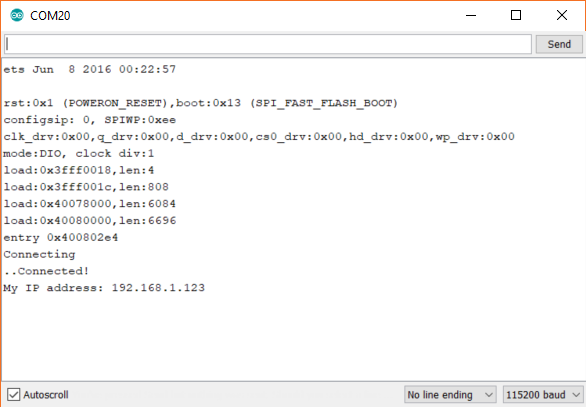
Select your ESP32 board and COM port. Upload the program, and open a serial monitor. Your ESP32 should connect to your wireless network and print out its IP address. Copy down the IP address, as we’ll need it in the next part.
Make sure you have Python installed on your computer. Open a terminal and enter the following command:
pip install websocket-client
This will install a WebSocket client package that we can use to test our server with. In a new text document, enter the following Python code (change the IP address to match the address obtained from the Arduino serial console):
import websocket

# Connect to WebSocket server
ws = websocket.WebSocket()
ws.connect("ws://192.168.1.123")
print("Connected to WebSocket server")

# Ask the user for some input and transmit it
str = input("Say something: ")
ws.send(str)

# Wait for server to respond and print it
result = ws.recv()
print("Received: " + result)

# Gracefully close WebSocket connection
ws.close()
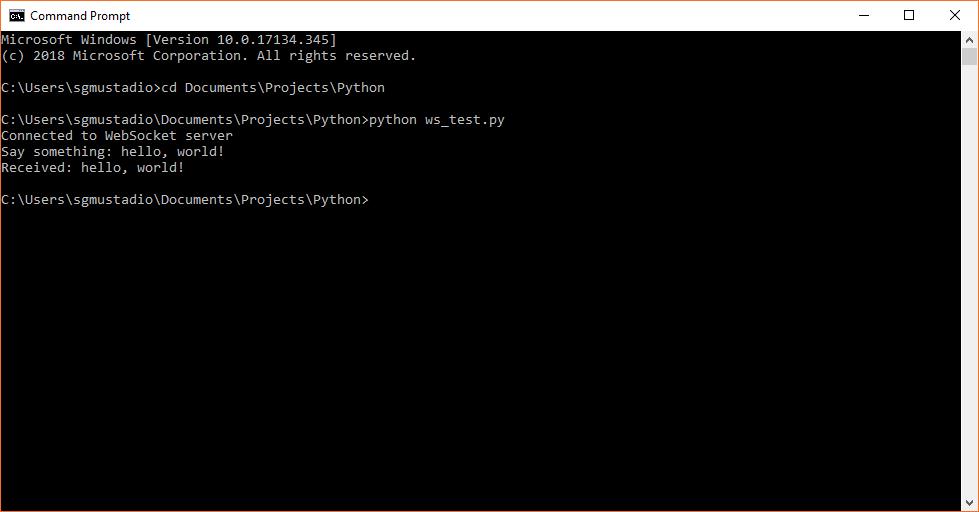
Make sure your computer is on the same network as your ESP32. With the WebSocket server still running, run your Python script:
python ws_test.py
This should connect to the WebSocket server and ask for some input. Enter in some text, press enter, and you should see your message echoed back to you.
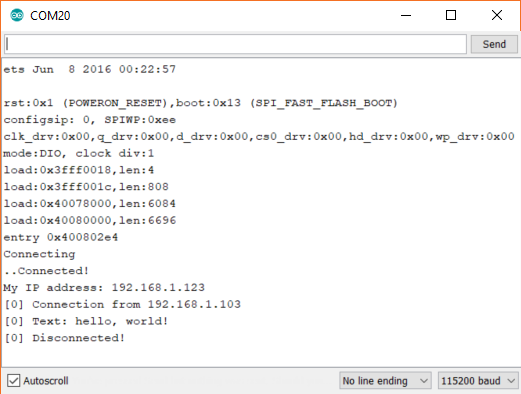
If you look at the Arduino serial console, you should see that a WebSocket client has connected, sent a message, and then disconnected.
I’m hoping to use WebSockets as a way to transmit data between a browser and an Arduino in an upcoming project. Hopefully, the latency is low enough that controls and displays can be updated quickly enough (for human needs).
[Update 9/9/2019] I’ve taken this a step further and turned the ESP32 into a full web server while still using WebSockets to control hardware. You can see the tutorial for that here: How to Create a Web Server (with WebSockets) Using an ESP32 in Arduino
Great tutorial and love your work! I am starting to learn about web sockets. I will like to use them to send the data of my temperature sensor live to my phone in a simple webpage. Will you make a following tutorial with a webpage? Thanks!
Thank you! I’m working on exactly that: the ESP32 hosts a webpage that allows for direct control of connected hardware 🙂
Really very good !
Could you give us an example where we have web pages hosted on SPPIF of ESP32 and HTML files containing SVG graphics? These graphic elements would do both reading and recording on digital, analog and DAC ports.
It would be something like this, with your didactics the material would look much better 🙂
https://www.youtube.com/watch?v=PWacko54V-c
Whoa, that’s really cool. I haven’t been working with the ESP32 for a while (this project is on hold as I make something else with the ATtiny85), but I’ll definitely keep the SVG hosting idea in mind. Thank you!
I just uploaded this example to a gist: https://gist.github.com/ShawnHymel/3d124f79aee95fb274876f491a91dcf4 No full write-up yet, but it does use SPIFFS to load an HTML file to the ESP32, which acts as an access point. Hopefully, it can work as a starting point for you.
Hi, interesting example but where is the css file?
CSS is not needed for basic HTML (you only need it if you want to organize your page or site’s formatting).
Awesome,
How can i create an HTML5 webpage & append the received data ?
I have not gotten around to doing a write-up for it, but here is an example of using the ESP32 as an access point to host a simple webpage (index.html): https://gist.github.com/ShawnHymel/3d124f79aee95fb274876f491a91dcf4. Note that you will need to install SPIFFS and use it to upload index.html to the filesystem on the ESP32.
I know it’s not HTML5 nor appending data, but it should hopefully work as a starting point for you. You can use WebSockets to send data from the Arduino to the browser and update variables in the HTML, which append to a log, update a graph, etc.
How do i make my server to stay connected. Why does it disconnect after receiving a text! Pls help
The WebSocket should stay connected (in theory) so long as you don’t call ws.close() from the client or exit the Python program. If you put
# Ask the user for some input and transmit it
str = input("Say something: ")
ws.send(str)
result = ws.recv()
print("Received: " + result)
in a loop, does the websocket stay open?
Hi Shawn,
Could you please update the sketch example from the top the page? It doesn’t compile with WebSocket Library version 2.1.4 :(.
T
It worked for me with 2.1.4. What error are you getting?
Hi, I love this vid!
Unfortunately, i have been working with a D1 and could not get it running.
(error compiling for the d1)
Do you have an idea how to get that running on a D1?
Anyway, a esp32 is ordered;-)
Keep going!
I don’t have any experience with the D1, sorry! Can you get it running a simple blink program first?
Hi,
Have implemented your files, but it seems they are not complete..
I get following error :
ws = websocket.WebSocket()
TypeError: __init__() takes exactly 4 arguments (1 given)
How can this be solved ?
best regards
Ludo
I just checked–it still works for me. What version of Python and websockets are you using? I’m on Python 3.7.1 and WebSocket 0.56.0.
Yes, same here, running Linux
corv-pete: cat ./wh3080_recvr.py
import websocket
# Connect to WebSocket server
ws = websocket.WebSocket()
ws.connect(“ws://192.168.1.123”)
print(“Connected to WebSocket server”)
# Ask the user for some input and transmit it
str = input(“Say something: “)
ws.send(str)
# Wait for server to respond and print it
result = ws.recv()
print(“Received: ” + result)
# Gracefully close WebSocket connection
ws.close()
~~~~~~~~~~~~~~~~~~~~~~~~~~~~~~
corv-pete: python ./wh3080_recvr.py <<<<<< —- python 2.7.13
Traceback (most recent call last):
File "./wh3080_recvr.py", line 4, in
ws = websocket.WebSocket()
TypeError: __init__() takes exactly 4 arguments (1 given)
or:
corv-pete: python3 ./wh3080_recvr.py <<<—— note python3
Traceback (most recent call last):
File "./wh3080_recvr.py", line 4, in
ws = websocket.WebSocket()
TypeError: __init__() missing 3 required positional arguments: ‘environ’, ‘socket’, and ‘rfile’
What version of WebSockets are you using? It worked for me with v0.56.0.
I had this same issue with a different project and found that I had the wrong websocket library installed. I had used pip install websocket, which didn’t work with code similar to this example. I uninstalled it and then used pip install websocket-client which is the same as instructed in this post, and it worked. Hopefully this helps someone.
Good to know, thank you!
Hi Shawn,
Thanks for the great tutorial. Can you please help me send sensor data other than the simple text response, like digital or analog inputs, etc.
I’m not sure what kind of sensor data you are planning to use. Most data is sent in string or binary form, so it’s on you to program the receiver to interpret, store, or display that data.
HI, thanks for the tutorial, can I ask how to connect to ESP32 websocket server outside the local nettwork?
It should work outside of your network, but you’ll need to use the right IP address (your public IP address) and set up your router to do port forwarding to get to the correct device within your local network.
An example of use: :
https://robotzero.one/esp32-cam-rc-car/
Awesome, thanks for sharing that!
Hi Shawn – I’ve got this demo sketch to compile and load. I can conn to the AP and in my browser goto 192.168.4.1 but only get a white screen on my Android phone.
There is a /data/index.html file.
In Ard IDE, Tools, ESP Data Upload I get:
esptool.py v2.6
Serial port COM4
Traceback (most recent call last):
File “esptool.py”, line 2959, in
File “esptool.py”, line 2952, in _main
File “esptool.py”, line 2652, in main
File “esptool.py”, line 222, in __init__
File “site-packages\serial\__init__.py”, line 88, in serial_for_url
File “site-packages\serial\serialwin32.py”, line 62, in open
serial.serialutil.SerialException: could not open port ‘COM4’: WindowsError(5, ‘Access is denied.’)
Failed to execute script esptool
SPIFFS Upload failed!
My target is a ESP32 Dev module which requires that I exerecise the Boot and EN buttons to upload, but that doesn’t seem to work for SPIFFS.
I did try a SPIFFS test prog from another site and it ran ok, but I’ve still got something screwed up.
Thanks
Barry
additional:
The IDE Serial Monitor shows:
[192.168.4.2] HTTP GET request of /
[192.168.4.2] HTTP GET request of /
[192.168.4.2] HTTP GET request of /index.html
[192.168.4.2] HTTP GET request of /index.html
My phone shows “Not found”
SOLVED – I had to close the Serial Monitor and then it uploaded!!!
HI SHAWN!!
Thank you for this tutorial!
I just want to ask if you updated the part of a simple webpage that receives and sends data to the esp. I am working on that but I am facing some problems in the Java Script (I:e how to receive and save data from the webpage to esp (on click)).
this causes my esp to just keep boot looping