A few months ago, I created a video showing how to use WebSockets with an ESP32. WebSockets have proven to be very fast (relatively speaking) at controlling hardware over WiFi. They still rely on TCP, but they have little overhead, so the latency is much less than other methods (e.g. using separate web pages). However, I’ve had a few requests to show how to implement a web server on the ESP32. So, this tutorial will cover exactly that (but I’m still keeping WebSockets, because they’re cool).
If you like your tutorials in video format, here you go:
Overview
Rather than just host a simple web page, we’re going to build on the WebSocket idea. Let’s have our ESP32 be an access point (AP) and host a web page. When a browser requests that page, the ESP32 will serve it. As soon as the page loads, the client will immediately make a WebSocket connection back to the ESP32. That allows us to have fast control of our hardware connected to the ESP32.
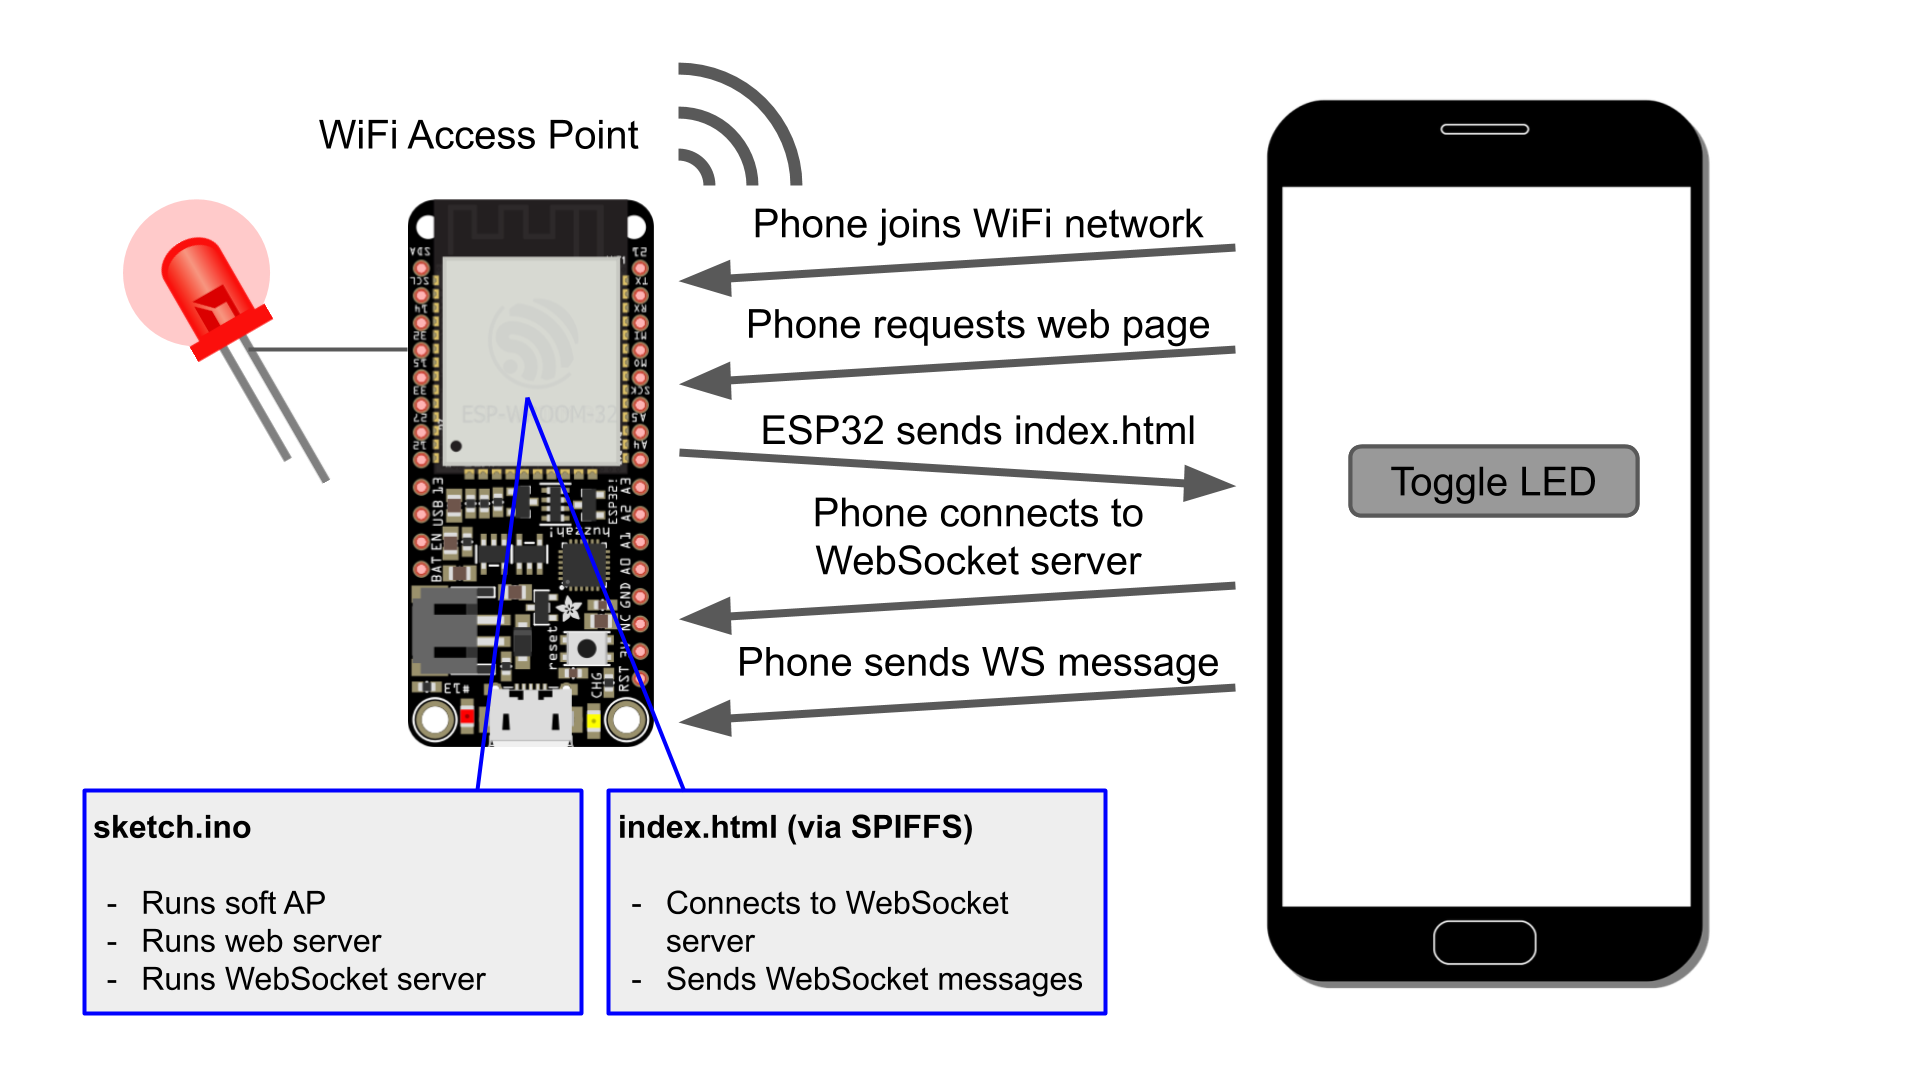
The WebSocket connection is two-way. Whenever the page loads, it first inquires about the state of the LED from the ESP32. If the LED is on, the page will update a circle (fill in red) to reflect that. The circle on the page will be black if the LED is off. Then, whenever a user presses the “Toggle LED” button, the client will send a WebSocket packet to the ESP32, telling it to toggle the LED. This packet is followed by another request asking about the LED state so that the client can keep the browser updated with the state of the LED.
Hardware Hookup
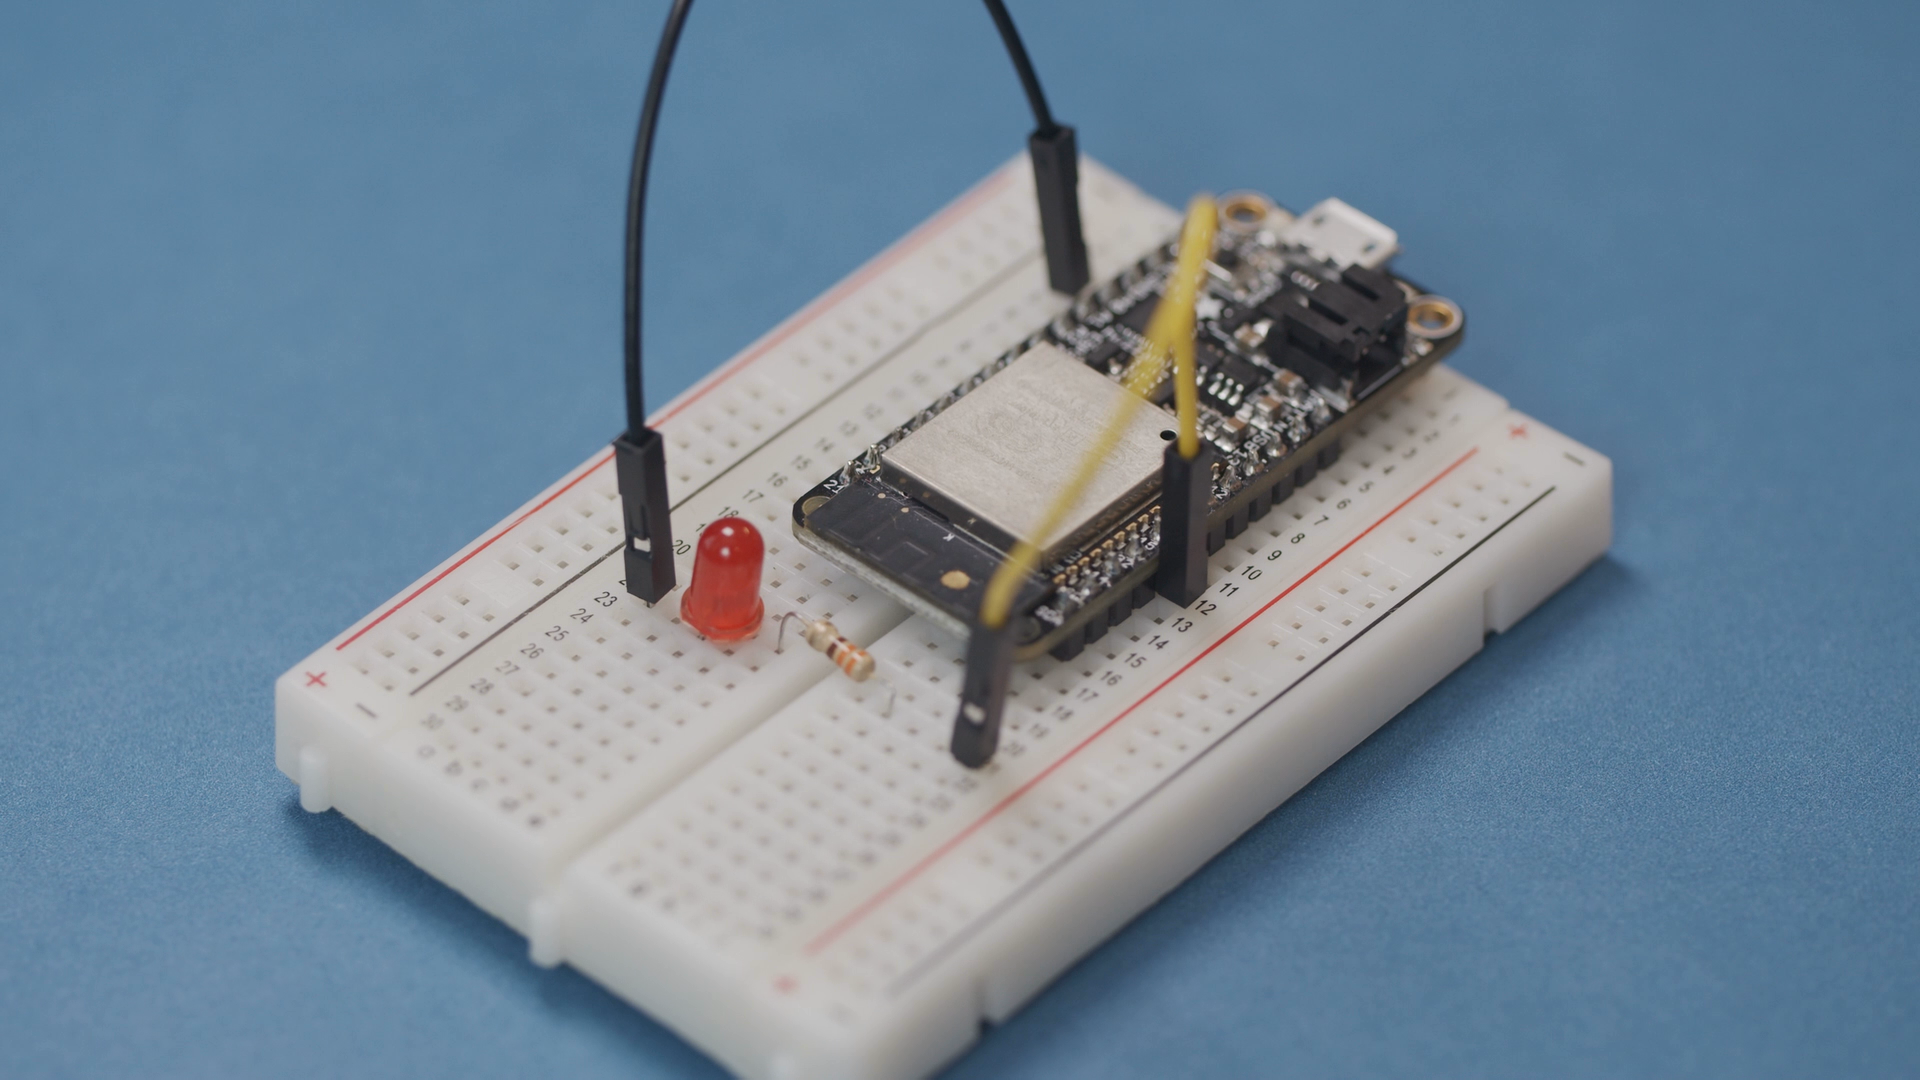
Connect an LED to pin 15 of your ESP32 (don’t forget a limiting resistor! Something like 330Ω should work). Note that I’m using an Adafruit Feather HUZZAH32, so your pin numbering might be different.
Install SPIFFS Plugin
An ESP32 with an attached flash storage chip, like our HUZZAH32, can be configured to hold files, much like a mass storage device. However, it uses a very basic file system (there are no folders–files are just stored in a flat structure). This file system is known as the “Serial Peripheral Interface Flash File System” (SPIFFS). You can read more about SPIFFS here.
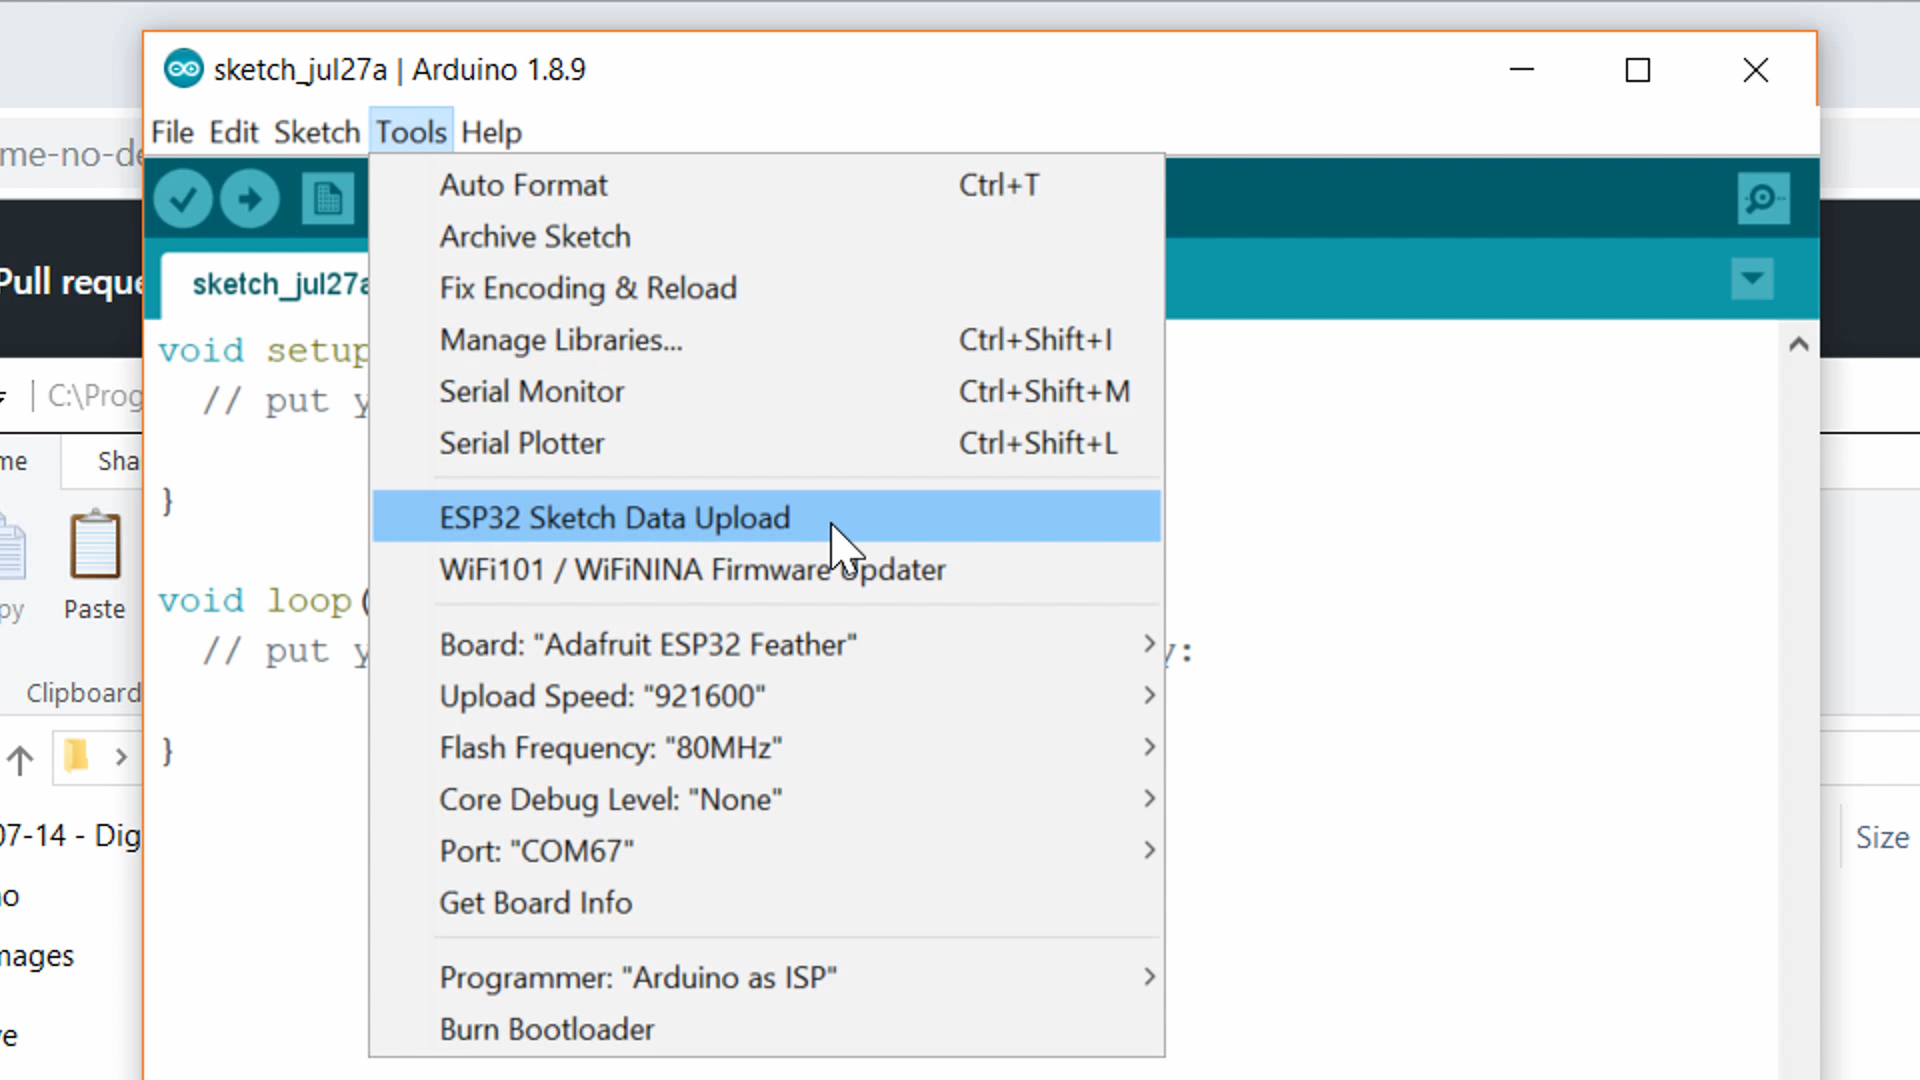
We need to use a special program to upload files over SPI. Head to https://github.com/me-no-dev/arduino-esp32fs-plugin and follow the instructions to install the Arduino plugin. Once done, restart Arduino, and you should see the option ESP32 Sketch Data Upload in the Tools menu.
Install Arduino Libraries
Make sure you have the ESP32 board definition installed for your particular board. If you’re using a board that’s supported by the Espressif Arduino board manager (such as the Adafruit HUZZAH32), you can follow the directions here.
Download the .zip files for the following libraries and install them in Arduino.
Arduino Code
Enter the following code into a new Arduino sketch. Take note of the SSID and password–we’ll need these to connect our phone/computer to the ESP32’s AP.
#include <WiFi.h>
#include <SPIFFS.h>
#include <ESPAsyncWebServer.h>
#include <WebSocketsServer.h>

// Constants
const char *ssid = "ESP32-AP";
const char *password =  "LetMeInPlz";
const char *msg_toggle_led = "toggleLED";
const char *msg_get_led = "getLEDState";
const int dns_port = 53;
const int http_port = 80;
const int ws_port = 1337;
const int led_pin = 15;

// Globals
AsyncWebServer server(80);
WebSocketsServer webSocket = WebSocketsServer(1337);
char msg_buf[10];
int led_state = 0;

/***********************************************************
 * Functions
 */

// Callback: receiving any WebSocket message
void onWebSocketEvent(uint8_t client_num,
                      WStype_t type,
                      uint8_t * payload,
                      size_t length) {

  // Figure out the type of WebSocket event
  switch(type) {

    // Client has disconnected
    case WStype_DISCONNECTED:
      Serial.printf("[%u] Disconnected!\n", client_num);
      break;

    // New client has connected
    case WStype_CONNECTED:
      {
        IPAddress ip = webSocket.remoteIP(client_num);
        Serial.printf("[%u] Connection from ", client_num);
        Serial.println(ip.toString());
      }
      break;

    // Handle text messages from client
    case WStype_TEXT:

      // Print out raw message
      Serial.printf("[%u] Received text: %s\n", client_num, payload);

      // Toggle LED
      if ( strcmp((char *)payload, "toggleLED") == 0 ) {
        led_state = led_state ? 0 : 1;
        Serial.printf("Toggling LED to %u\n", led_state);
        digitalWrite(led_pin, led_state);

      // Report the state of the LED
      } else if ( strcmp((char *)payload, "getLEDState") == 0 ) {
        sprintf(msg_buf, "%d", led_state);
        Serial.printf("Sending to [%u]: %s\n", client_num, msg_buf);
        webSocket.sendTXT(client_num, msg_buf);

      // Message not recognized
      } else {
        Serial.println("[%u] Message not recognized");
      }
      break;

    // For everything else: do nothing
    case WStype_BIN:
    case WStype_ERROR:
    case WStype_FRAGMENT_TEXT_START:
    case WStype_FRAGMENT_BIN_START:
    case WStype_FRAGMENT:
    case WStype_FRAGMENT_FIN:
    default:
      break;
  }
}

// Callback: send homepage
void onIndexRequest(AsyncWebServerRequest *request) {
  IPAddress remote_ip = request->client()->remoteIP();
  Serial.println("[" + remote_ip.toString() +
                  "] HTTP GET request of " + request->url());
  request->send(SPIFFS, "/index.html", "text/html");
}

// Callback: send style sheet
void onCSSRequest(AsyncWebServerRequest *request) {
  IPAddress remote_ip = request->client()->remoteIP();
  Serial.println("[" + remote_ip.toString() +
                  "] HTTP GET request of " + request->url());
  request->send(SPIFFS, "/style.css", "text/css");
}

// Callback: send 404 if requested file does not exist
void onPageNotFound(AsyncWebServerRequest *request) {
  IPAddress remote_ip = request->client()->remoteIP();
  Serial.println("[" + remote_ip.toString() +
                  "] HTTP GET request of " + request->url());
  request->send(404, "text/plain", "Not found");
}

/***********************************************************
 * Main
 */

void setup() {
  // Init LED and turn off
  pinMode(led_pin, OUTPUT);
  digitalWrite(led_pin, LOW);

  // Start Serial port
  Serial.begin(115200);

  // Make sure we can read the file system
  if( !SPIFFS.begin()){
    Serial.println("Error mounting SPIFFS");
    while(1);
  }

  // Start access point
  WiFi.softAP(ssid, password);

  // Print our IP address
  Serial.println();
  Serial.println("AP running");
  Serial.print("My IP address: ");
  Serial.println(WiFi.softAPIP());

  // On HTTP request for root, provide index.html file
  server.on("/", HTTP_GET, onIndexRequest);

  // On HTTP request for style sheet, provide style.css
  server.on("/style.css", HTTP_GET, onCSSRequest);

  // Handle requests for pages that do not exist
  server.onNotFound(onPageNotFound);

  // Start web server
  server.begin();

  // Start WebSocket server and assign callback
  webSocket.begin();
  webSocket.onEvent(onWebSocketEvent);

}

void loop() {

  // Look for and handle WebSocket data
  webSocket.loop();
}
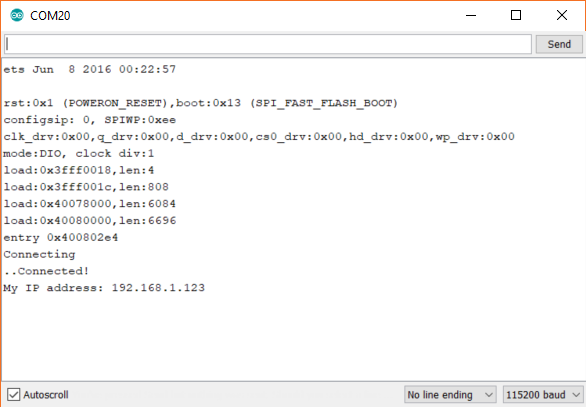
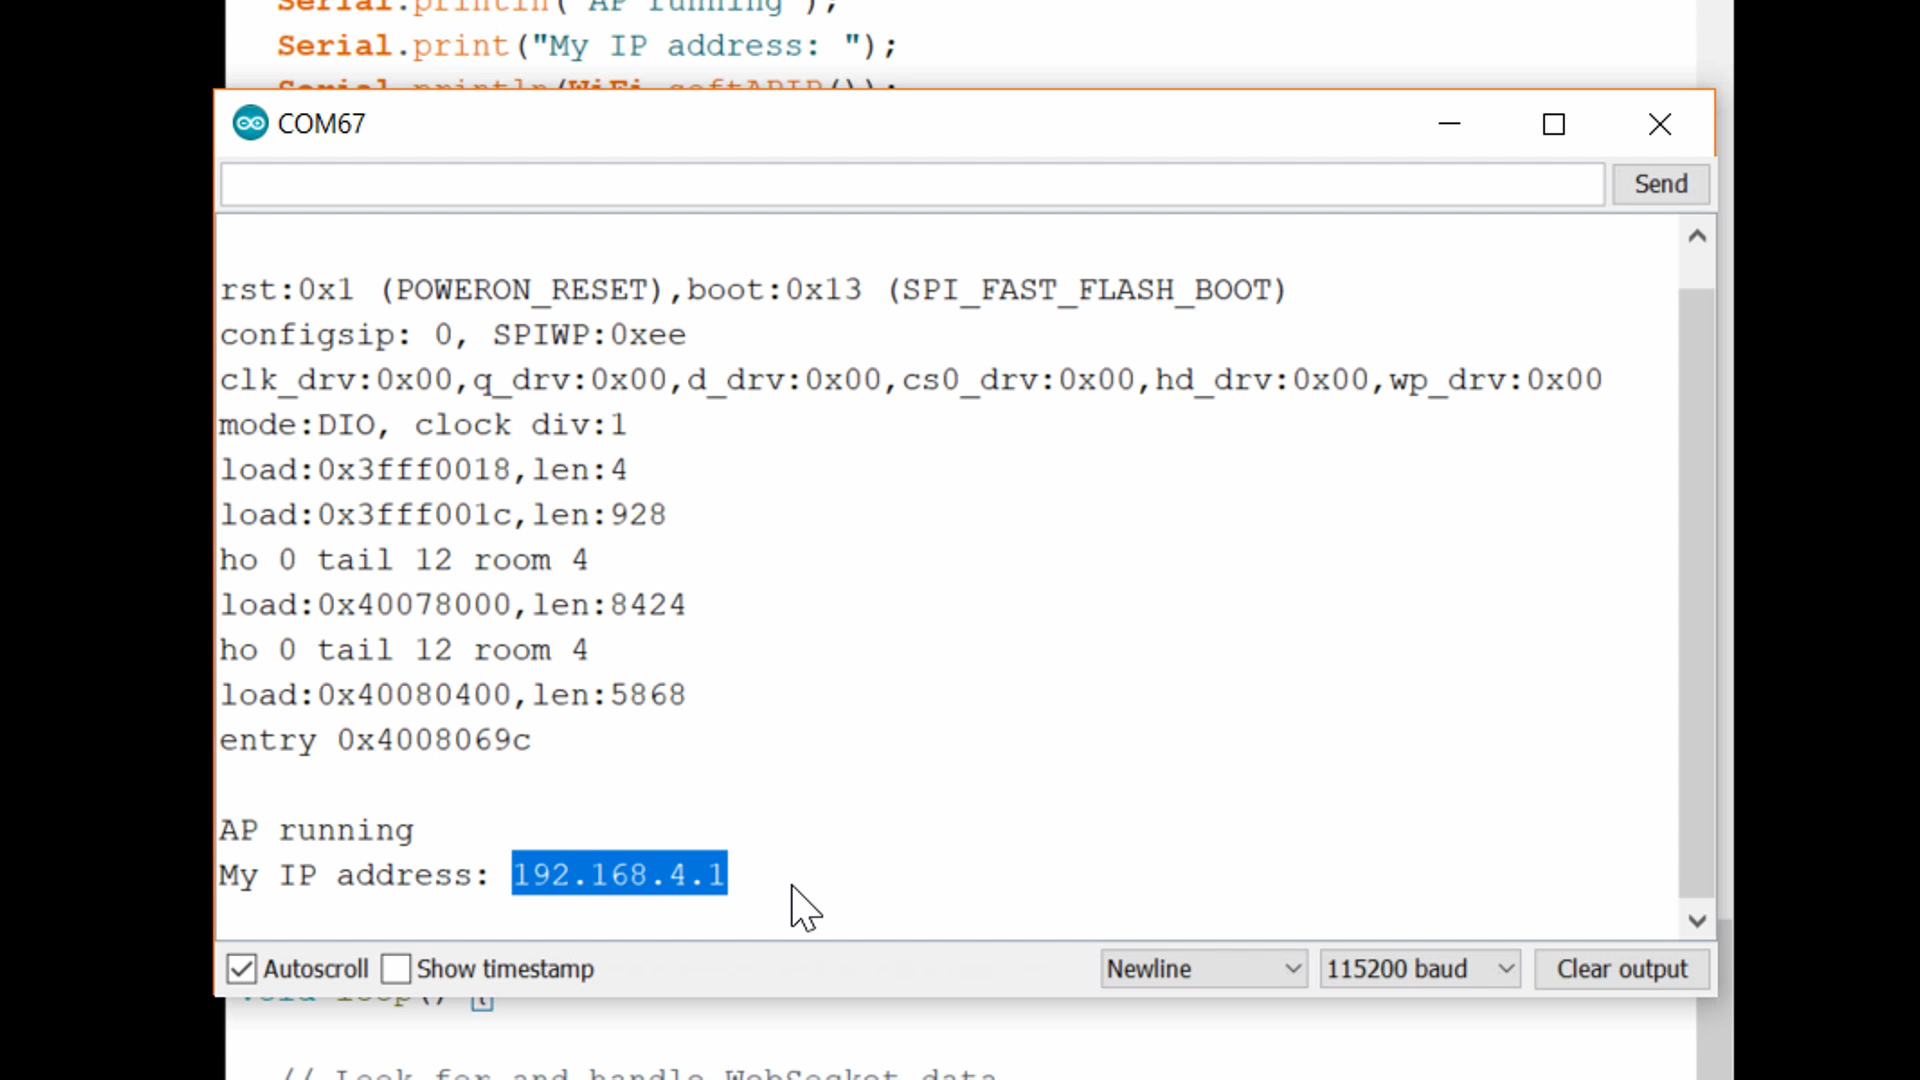
Save your code (we’ll need the Arduino directory structure for SPIFFS in an upcoming step). I’ll give my program a name like “esp32_websocket_host.” Upload the program to your ESP32 and open a serial console with a baud rate of 115200. You should see the IP address of the ESP32 printed to the screen. When you run the Arduino soft access point software on the ESP32, the default IP address is 192.168.4.1.
Web Page Code
Let’s write a simple web page! Like most modern pages, it will contain a mixture of HTML and JavaScript. We leave out CSS, but you’re welcome to create your own .css file, if you wish to make the page look a little nicer. If you look back up in the Arduino code, you’ll see that we have a function to serve up a .css file. However, we will not be making a .css file for the sake of simplicity in this tutorial.
For SPIFFS to work, we need to put the files we wish to upload to the ESP32 in a folder named data/ inside the Arduino project directory:
esp32_websocket_host
 |_ esp32_websocket_host.ino
 |_ data
     |_ index.html
In Arduino, click Sketch > Show Sketch Folder to navigate to your project directory. Create a folder named data and create a new file named index.html inside that new folder. Open index.html with your favorite editor.
In index.html, paste the following code:
<!DOCTYPE html>
<meta charset="utf-8" />
<title>WebSocket Test</title>

<script language="javascript" type="text/javascript">

var url = "ws://192.168.4.1:1337/";
var output;
var button;
var canvas;
var context;

// This is called when the page finishes loading
function init() {

    // Assign page elements to variables
    button = document.getElementById("toggleButton");
    output = document.getElementById("output");
    canvas = document.getElementById("led");

    // Draw circle in canvas
    context = canvas.getContext("2d");
    context.arc(25, 25, 15, 0, Math.PI * 2, false);
    context.lineWidth = 3;
    context.strokeStyle = "black";
    context.stroke();
    context.fillStyle = "black";
    context.fill();

    // Connect to WebSocket server
    wsConnect(url);
}

// Call this to connect to the WebSocket server
function wsConnect(url) {

    // Connect to WebSocket server
    websocket = new WebSocket(url);

    // Assign callbacks
    websocket.onopen = function(evt) { onOpen(evt) };
    websocket.onclose = function(evt) { onClose(evt) };
    websocket.onmessage = function(evt) { onMessage(evt) };
    websocket.onerror = function(evt) { onError(evt) };
}

// Called when a WebSocket connection is established with the server
function onOpen(evt) {

    // Log connection state
    console.log("Connected");

    // Enable button
    button.disabled = false;

    // Get the current state of the LED
    doSend("getLEDState");
}

// Called when the WebSocket connection is closed
function onClose(evt) {

    // Log disconnection state
    console.log("Disconnected");

    // Disable button
    button.disabled = true;

    // Try to reconnect after a few seconds
    setTimeout(function() { wsConnect(url) }, 2000);
}

// Called when a message is received from the server
function onMessage(evt) {

    // Print out our received message
    console.log("Received: " + evt.data);

    // Update circle graphic with LED state
    switch(evt.data) {
        case "0":
            console.log("LED is off");
            context.fillStyle = "black";
            context.fill();
            break;
        case "1":
            console.log("LED is on");
            context.fillStyle = "red";
            context.fill();
            break;
        default:
            break;
    }
}

// Called when a WebSocket error occurs
function onError(evt) {
    console.log("ERROR: " + evt.data);
}

// Sends a message to the server (and prints it to the console)
function doSend(message) {
    console.log("Sending: " + message);
    websocket.send(message);
}

// Called whenever the HTML button is pressed
function onPress() {
    doSend("toggleLED");
    doSend("getLEDState");
}

// Call the init function as soon as the page loads
window.addEventListener("load", init, false);

</script>

<h2>LED Control</h2>

<table>
    <tr>
        <td><button id="toggleButton" onclick="onPress()" disabled>Toggle LED</button></td>
        <td><canvas id="led" width="50" height="50"></canvas></td>
    </tr>
</table>
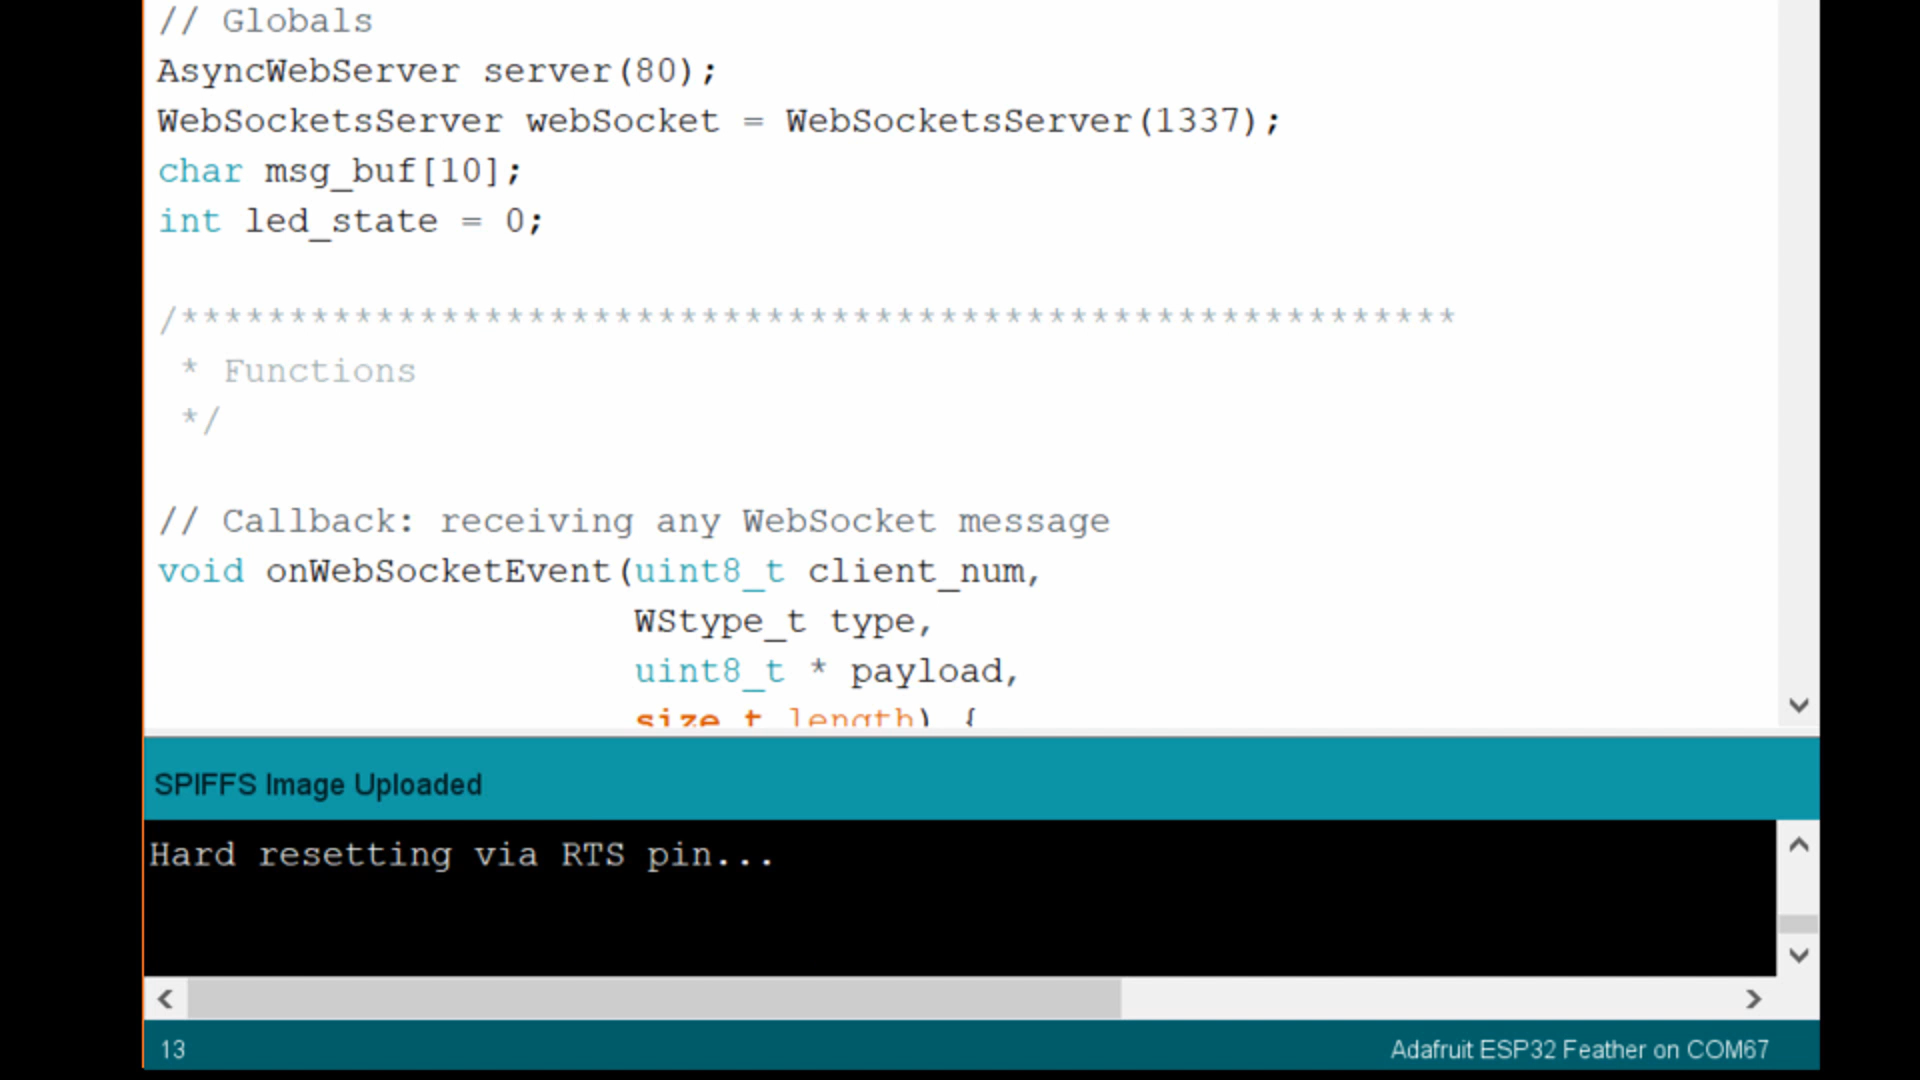
Save this file. With your ESP32 plugged into your computer, open Arduino and click Tools > ESP32 Sketch Data Upload. Wait a moment, and all the files in the data/ folder (well, just the 1 file, index.html, for this example) should be uploaded to the ESP32.
Run It!
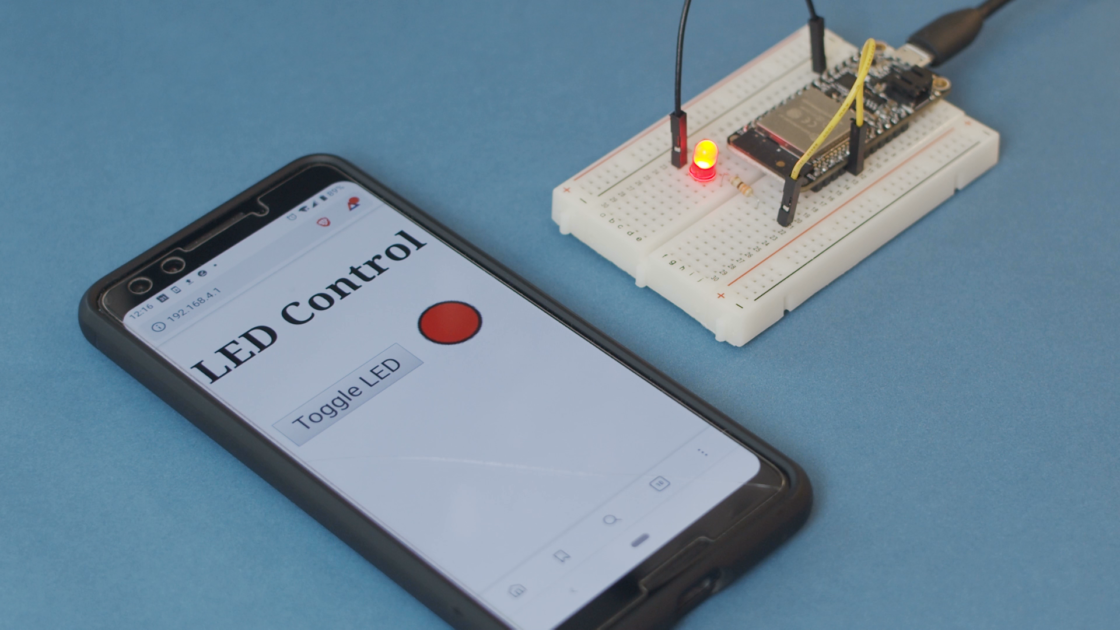
With the index.html file uploaded and the Arduino code running, you should be able to connect to the ESP32’s access point. Using your phone or computer, search for open WiFi access points and connect to the one named ESP32-AP. When asked for a password, enter LetMeInPlz (or whatever you set the AP password to in the Arduino code).
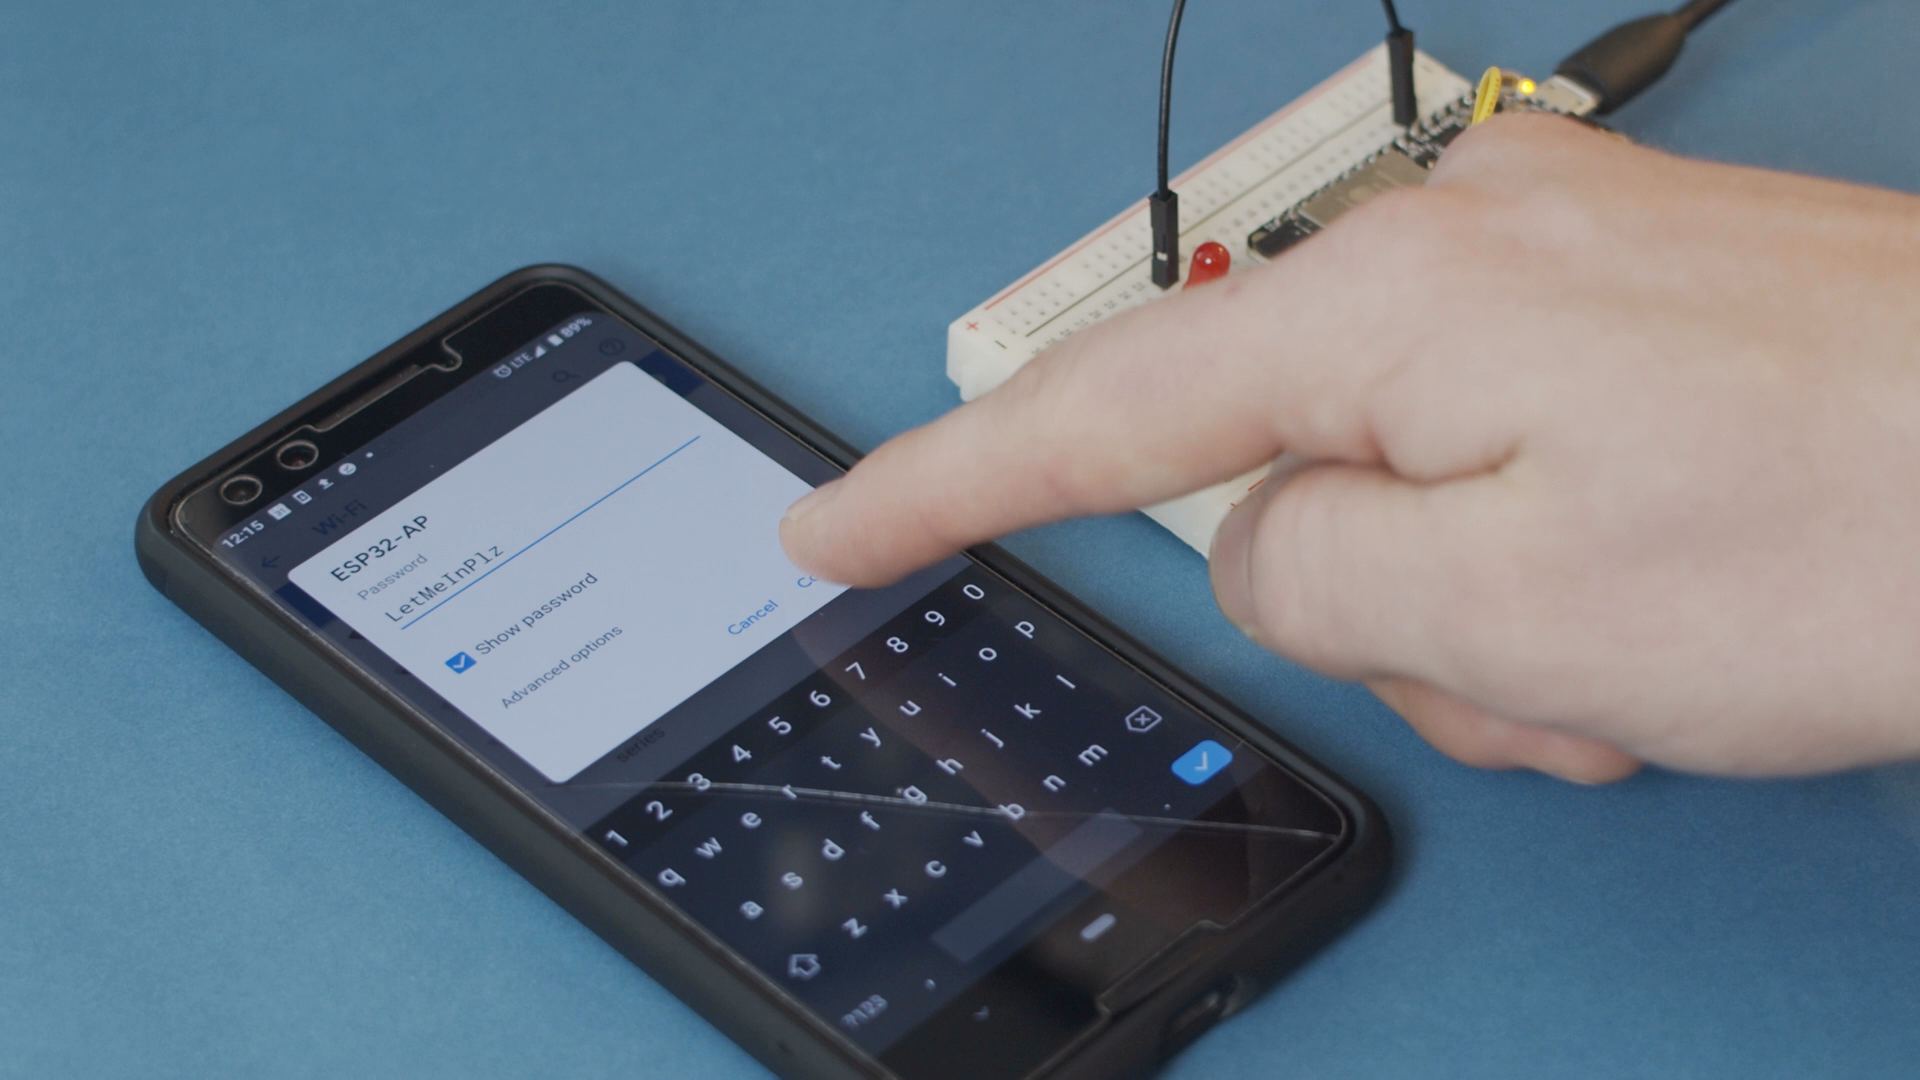
Since we are not running a captive portal, we will need to specifically browse to the IP address of the ESP32. Open a browser and enter 192.168.4.1 (or whatever you discovered the IP address of the ESP32 to be). You should be served the index.html page from the ESP32, which looks like a button and a circle. Zoom in, if needed (as we’re not doing any fancy formatting or CSS here).
Press the Toggle LED button, and you should see the LED connected to the ESP32 flicker to life. The circle on the page should also turn red to denote the state of the LED.

Going Further
Feel free to use this as the basis for your next Internet-controlled hardware project. I suppose it fits in the category of “IoT,” and WebSockets can be super useful for controlling hardware with much less latency than many other methods. You can also use them to get fast updates, if you wish to create a custom dashboard showing sensor data.