This tutorial will show you how to install the Raspberry Pi Pico toolchain on Windows 10 for C and C++ development.
Raspberry Pi has a fantastic getting started guide for the Pico that covers installation steps for the major operating systems. On Linux (specifically, most flavors of Debian), you can run a single script that will install everything for you. On macOS, you need to use Homebrew to install the toolchain, which is only a few commands in the terminal.
Windows, however, is a different story. Installing the toolchain is an arduous process, requiring multiple programs and manually modifying the Windows Path. The Raspberry Pi Pico getting started guide shows you how to do this, but I have issues with two parts: you need to install Build Tools for Visual Studio (around 6 GB) and you must run VS Code from within a Developer Command Prompt every time.
This guide walks you through an alternative way of installing the C/C++ toolchain for the Pico, using MinGW in place of the Build Tools for Visual Studio. Note that this guide is meant for intermediate/advanced users; it assumes you have some familiarity with environment variables in Windows and CMake.
Important! There are a lot of steps in this guide, and missing one will likely cause things to fail down the road. Take your time, and slowly perform each step in order. I recommend setting aside around 2 hours to complete the setup. If something does not work, return to earlier sections to ensure you performed each step correctly. Don’t ignore errors! Something that did not install correctly likely means the tool won’t work later.
[Update Sep 27, 2024] This guide still technically works if you use Windows Command Prompt to run CMake and Make. If you use Git Bash, you’ll likely get the error: mingw32-make[2]: *** [CMakeFiles\blink.dir\build.make:1341: blink.elf] Error -1073741819. I have not yet figured out how to solve this issue. As an alternative, you might want to try the official Raspberry Pi Pico VS Code plugin: https://github.com/raspberrypi/pico-vscode.
Table of Contents
Directory Setup
With the exception of CMake and Python, we will want all of our tools and SDK files to exist in one folder on Windows. This setup will make it easy to configure the Path and find things later on.
Create a folder named VSARM in the top level of your C drive.
In C:\VSARM, create the following folders:
- C:\VSARM\armcc
- C:\VSARM\lib
- C:\VSARM\mingw
- C:\VSARM\sdk
Note that this directory structure is similar to how you might set up other Arm compiler tools and SDKs (such as this STM32 toolchain setup). You should be able to keep all of your Arm development tools in the VSARM directory and have them coexist with other tools and SDKs.
We use these short, one-word folder names to keep paths short and to avoid spaces. Some Unix/Linux tools (that have been ported to Windows) do not work well with paths that have spaces in them.
Install GNU Arm Embedded Toolchain
The GNU Arm Embedded Toolchain contains the Arm GCC compiler that we need to compile C and C++ code for the RP2040.
Head to the GNU Arm Embedded Toolchain download page and download the latest installer for Windows. For me, this was gcc-arm-none-eabi-10-2020-q4-major-win32.exe.
[Update Apr 19, 2022] I have verified that Arm GNU Embedded Toolchain 11.2-2022.02 works.
[Update Sep 27, 2024] The Arm GNU Toolchain download page has moved here. Download the AArch32 bare-metal target (arm-none-eabi) executable (.exe) for your operating system (Windows host in this case). I have verified that this guide still works with arm-gnu-toolchain-13.3.rel1-mingw-w64-i686-arm-none-eabi.exe.
Run the installer. When asked, change the installation location to C:\VSARM\armcc. It will auto-fill the destination directory to the name of the current toolchain release.
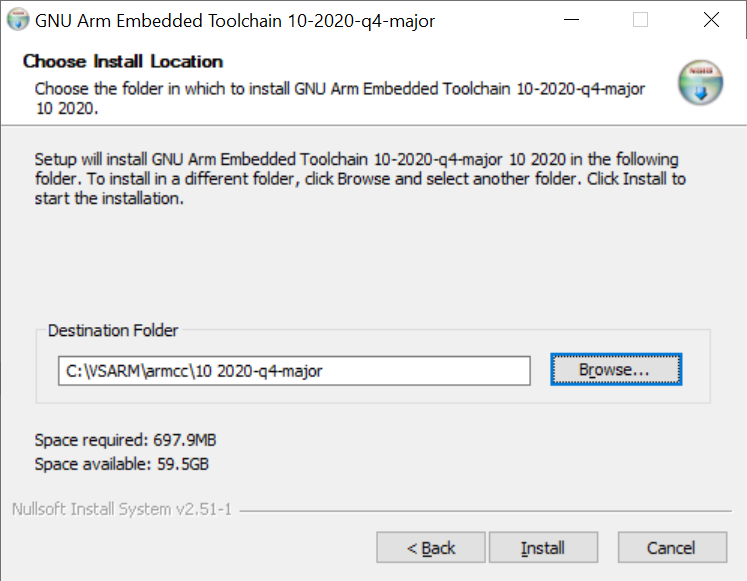
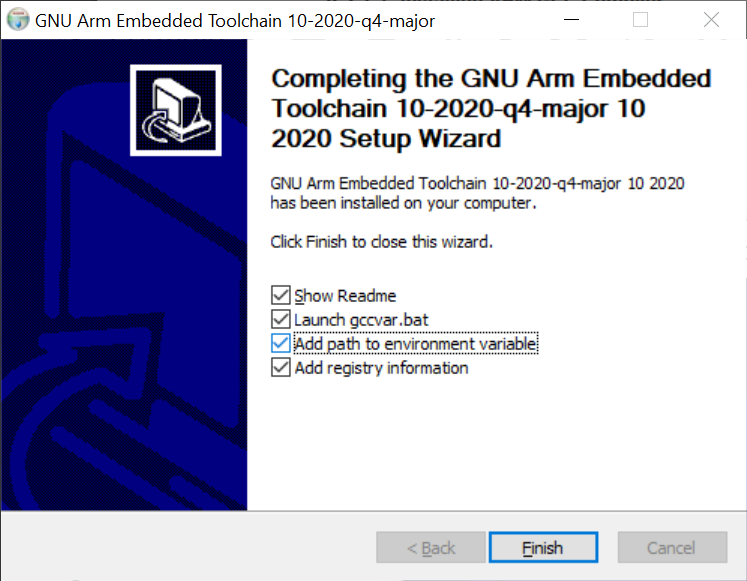
Continue with the installation process. When it is complete, select the option to Add path to environment variable.
At this point, you should be able to call any of the Arm compiler tools in a new command prompt, such as arm-none-eabi-gcc.exe.
Install MinGW-w64 GCC Tools
MinGW (short for Minimalist GNU for Windows) is a collection of open-source utilities, such as compilers and linkers, that allow us to build applications for Windows.
When we build Pico projects, we need to compile the elf2uf2 and pioasm tools from source. These tools run on our computer (not the target RP2040 microcontroller), and we need a native compiler and linker. The original Getting Started guide has us install Build Tools for Visual Studio to get a Windows compiler (cl.exe), linker (link.exe), and make tool (nmake.exe). We’re going to use the open-source GNU suite (e.g. gcc, ld, make) for Windows instead.
[Update Apr 19, 2022] Note: at this time, the MinGW (.exe) installer appears to be broken. You will likely see the error message “The file has been downloaded incorrectly!” As a result, I have updated the portion below to download only the MinGW-W64 GCC files (tested with v8.1.0), as that’s all we need to compile Pico programs (this no longer applies, as I have updated the instructions–see Sep 27, 2024 update).
[Update Sep 27, 2024] The SourceForge files have been reorganized, and you can no longer find the pre-compiled binaries for Windows (at least for newer versions of MinGW). As a result, I have updated the instructions below to show how to work with the latest version of MinGW (14.2.0 at the time of writing).
Head to https://github.com/niXman/mingw-builds-binaries/releases, which hosts the latest, pre-compiled binaries for MinGW. Download the x86_64-X.X.X-release-win32-seh-ucrt-rt_vY-revZ.7z (where X.X.X, Y, and Z are the respective release, version, and revision numbers). This was tested with: x86_64-14.2.0-release-win32-seh-ucrt-rt_v12-rev0.7z.
Unzip the file into the C:\VSARM\mingw directory. Windows 11 should be able to handle .7z files natively now. If not, you can download the 7-zip utility. Uncheck the named unzip directory so that when everything unzips, you should have C:\VSARM\mingw\mingw64.
When it’s done, open a Windows Command Prompt and enter the following into the terminal:
echo mingw32-make %* > C:\VSARM\mingw\mingw64\bin\make.bat
This creates a wrapper batch file that will call the mingw32-make tool whenever you type make into a Windows terminal. We will update the Windows Path to find all of the tools in mingw64\bin (along with this .bat file) in a later step.
Install CMake
CMake is a tool that helps you automate the build process of programs. It does not build/compile (like Make does), but rather, it can generate the directory structures and files needed for any build system (Make, Qt Creator, Ninja, etc.). The Raspberry Pi Pico SDK relies on CMake to help create these build files.
Head to the download page on CMake’s site.
Important! There is a bug in CMake version 3.20 (at the time of writing). On the second run of make or nmake (after running cmake), the process will fail. If you’re using nmake, you’ll get an error like fatal error U1033: syntax error : ':' unexpected, or if you’re using mingw32-make, something like *** multiple target patterns. Stop. To prevent this, install CMake version 3.19. Future versions of CMake may fix this bug, but for now, know that version 3.19 worked for me.
[Update Apr 19, 2022] I have verified that CMake 3.23.1 now works. The bug has been fixed.
Download the latest installer for Windows (cmake-3.30.4-win64-x64.msi as of Sep 27, 2024).
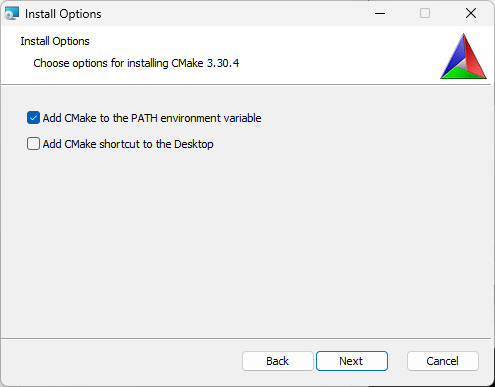
Run the installer and accept the user license. On Install Options, select Add CMake to the PATH environment variable.
Continue the installation process, accepting all the defaults. Note that this will install CMake to C:\Program Files\CMake, which is fine, as it will be used as a system-wide tool (not just for VSARM projects).
Install Python
The Pico SDK relies on Python to script and automate some of the build functions.
Important! At the time of writing, the Pico SDK recommends Python version 3.9. I do not know if other versions will work.
[Update Apr 19, 2022] I have verified that Python 3.10.2 works.
[Update Sep 27, 2024] I have verified that Python 3.12.6 works.
Head to the downloads page on the Python site. Download the latest Python 3.9 (or 3.10) installer.
Run the installer. On the first screen, make sure that Install launcher for all users (recommended) is checked and check Add Python to PATH.
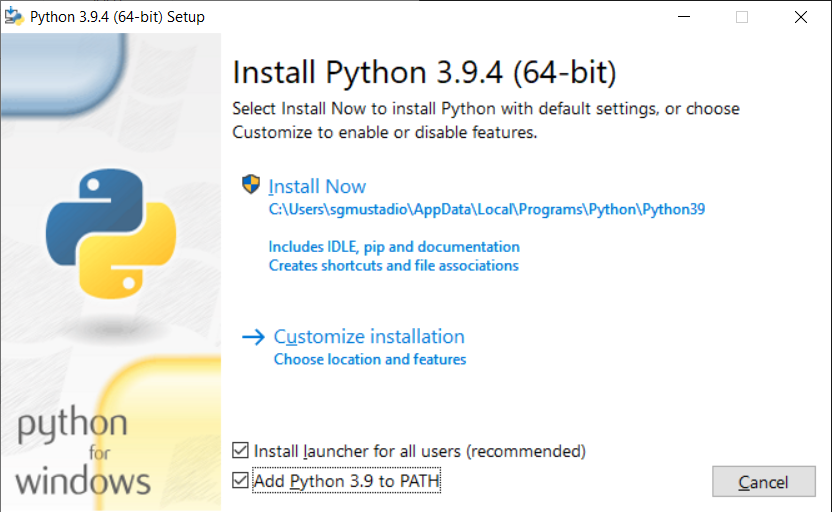
Click Install Now and wait while it installs Python.
At the end of the installation process, select the option to disable the path length limit.
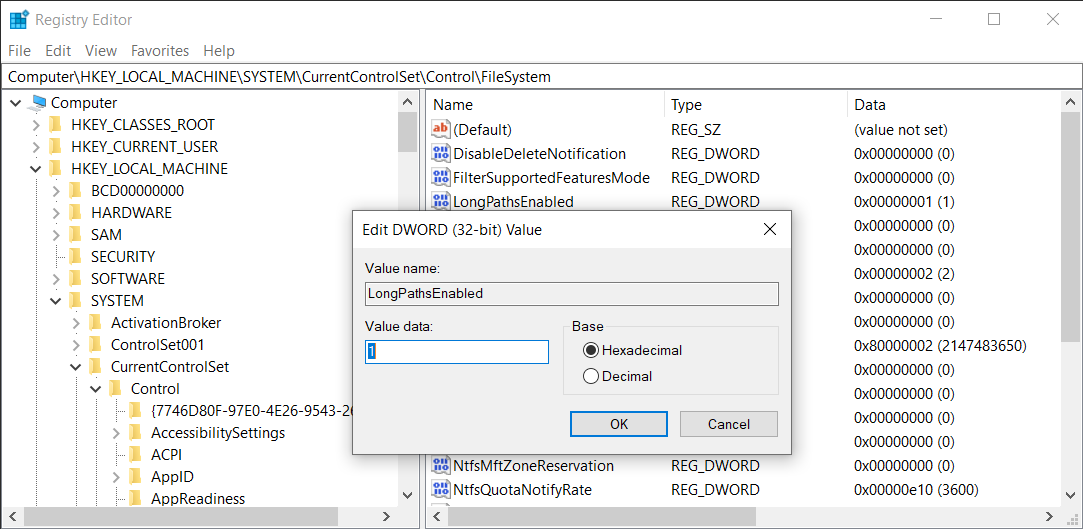
Important! If you were not asked to disable the MAX_PATH length limit, you will want to make sure that long paths are enabled. The Pico SDK (and many other SDKs) often have long, nested folders, resulting in pathnames that exceed the original Windows limit (260 characters).
To enable long paths, search for regedit in the Windows search bar and run the Registry Editor program. Navigate to Computer\HKEY_LOCAL_MACHINE\SYSTEM\CurrentControlSet\Control\FileSystem and add an entry (if one is not already there) for LongPathsEnabled. Change Value data to 1 and Base to Hexadecimal.
Here is a full guide if you need help modifying the registry to disable the pathname limit.
Install Git
Git makes downloading the Pico SDK much easier, and the Windows version comes with Git Bash, which is a super useful shell. We can change the shell in VS Code to Git Bash so that the command line works just like in Linux. Note that you will need Git installed (with or without Git Bash), as some of the CMake commands require it when configuring a project.
Head to the Git SCM download page and download the latest installer for Windows (e.g. 32-bit Git for Windows Setup).
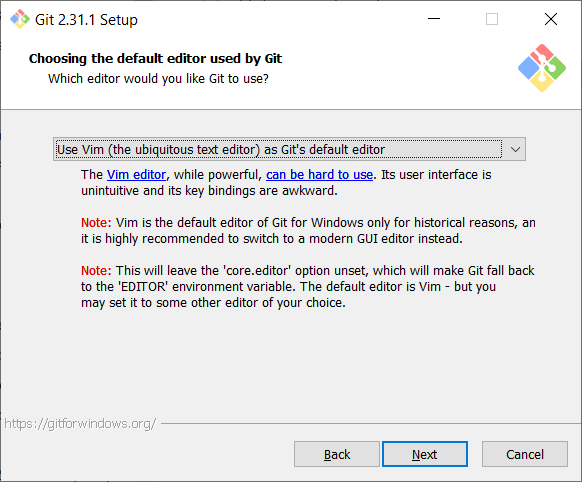
Run the installer. When you get to the screen asking you to choose a default editor, feel free to pick whatever you want. I kept vim because I know it (barely) well enough to edit git comments.
Continue the installation process, accepting all the defaults.
Download Pico SDK and Examples
The Pico SDK conains a collection of tools and libraries used to make developing on the Pico (and RP2040) much easier. We can also download a set of C/C++ examples that are useful demonstrations of how to use the SDK.
To start, create a new folder named pico in C:\VSARM\sdk.
While you could download the .zip versions of the SDK and examples repositories, it’s much easier to use git. There are nested submodules that you would need to download from other repositories, but one command in Git Bash takes care of that for us.
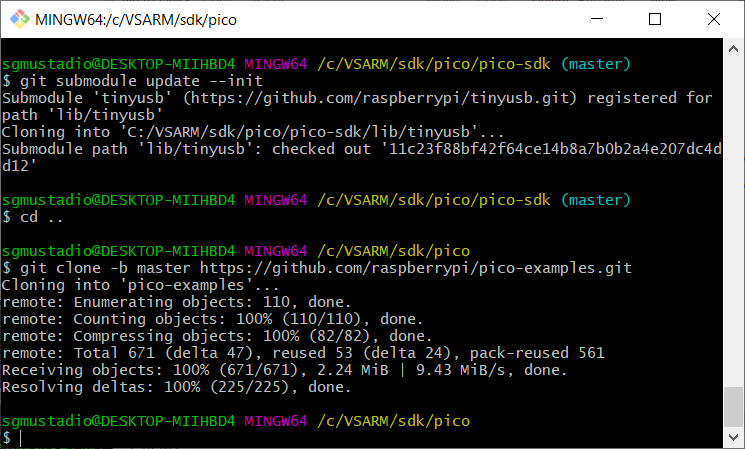
Open Git Bash and enter the following commands.
cd /c/VSARM/sdk/pico
git clone -b master https://github.com/raspberrypi/pico-sdk.git
cd pico-sdk
git submodule update --init
cd ..
git clone -b master https://github.com/raspberrypi/pico-examples.git
At this point, you should have all of the necessary build tools, SDK, and examples installed to start developing programs for the Raspberry Pi Pico and RP2040.
Update Environment Variables
Some of the tools we installed automatically updated the Windows environment variables (specifically, the Path). However, a few (like MinGW and the SDK) did not. We need to update the environment variables so that the shell and various build tools know where to find things in our filesystem.
In the Windows search bar, enter env. Click on Edit the system environment variables.
In that window, click on Environment Variables…
Under User variables for <username>, select Path and click Edit.
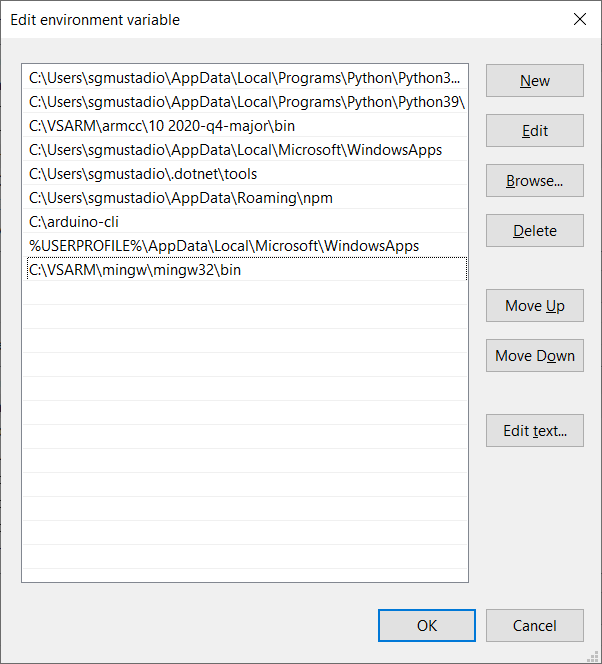
Add C:\VSARM\mingw\mingw64\bin as a new entry. This will allow us to use things like gcc and ld to build C and C++ programs for Windows.
Make sure you see the following entries listed:
- C:\VSARM\armcc\<release version>\bin
- C:\VSARM\mingw\mingw64\bin
You might see an entry for Python3x (e.g. Python39 or Python312) if you chose to install Python for the current user (as I did).
Click OK to exit the user Path window.
Under User variables for <username>, click New… and add the following entry:
- Variable name: PICO_SDK_PATH
- Variable value: C:\VSARM\sdk\pico\pico-sdk
Click OK to save the environment variable. At this point, your User Variables should have an updated Path as well as PICO_SDK_PATH variables.
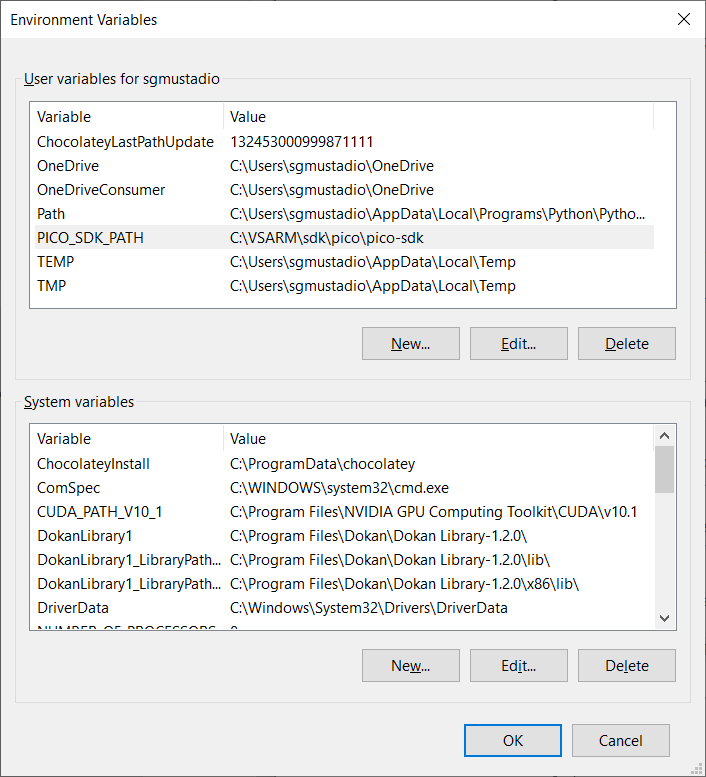
Under System variables, select Path and click Edit. Check to make sure you see the following entries (add them if you do not see them):
- C:\Program Files\CMake\bin
- C:\Program Files\Git\cmd
These entries should have been automatically added to your system-wide Path when you ran their installers. You might also see an entry for Python39 (or Python312) if you chose to install Python for all users.
Click OK on all 3 of the open windows to close them and save changes.
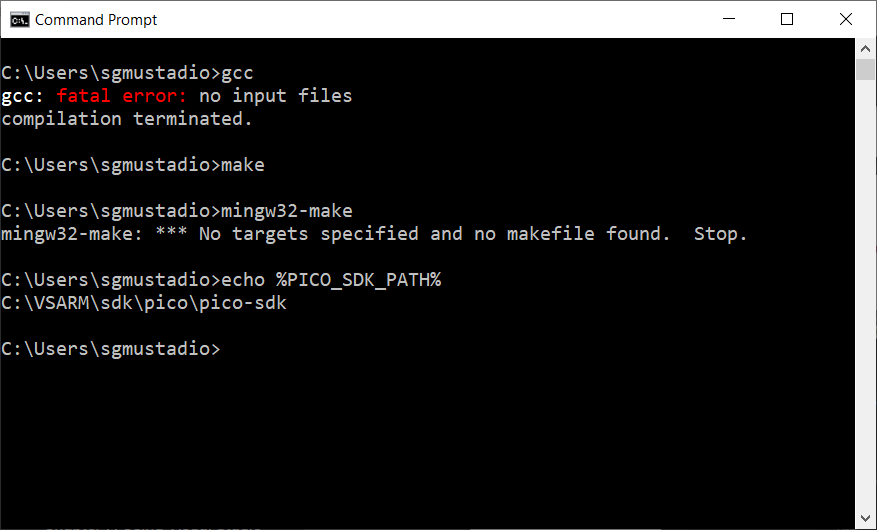
At this point, you should be able to open a commend prompt and enter commands like gcc, make, and echo %PICO_SDK_PATH% to make sure the environment variables were set correctly.
Install VS Code
Visual Studio Code (VS Code) is a great, cross-platform text editor that offers highly configurable plugins. With the right plugins, you can essentially turn VS Code into a full-fledged integrated development environment (IDE) with step-through debugging! I’ll only show the basics for now so you can get your VS Code on Windows to act like VS Code on other operating systems when working with the Pico.
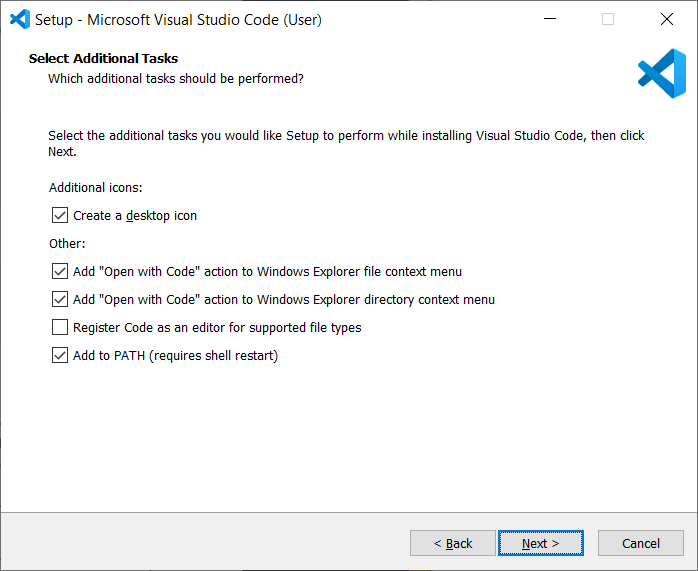
Head to code.visualstudio.com and download the latest release for Windows.
Run the installer and accept all of the defaults. You’re welcome to create a desktop icon and add “Open with Code” to the Windows Explorer context menu. I like to enable these options, but they’re not necessary.
When the installer is done, it’s time to test building a program for the Pico.
Build Blink Example
You should be able to build Pico code from any command prompt at this point. However, we’re going to do so in VS Code to show how it might be done during development.
Open VS Code. Click Terminal > New Terminal. The default terminal that opens is likely Windows PowerShell. I recommend changing this to Git Bash (or WSL) by clicking on the drop-down menu and selecting New Git Bash.
Just like we did with the make.bat file (for Windows terminals), I recommend creating an alias for mingw32-make.exe in Git Bash. Enter the following commands (you will only need to do this once):
echo "alias make=mingw32-make.exe" >> ~/.bashrc
source ~/.bashrc
Build the blink example by entering the following commands into your terminal:
cd /c/VSARM/sdk/pico/pico-examples/
mkdir build
cd build
cmake -G "MinGW Makefiles" ..
cd blink
make
Important! Any time you call CMake from a terminal like this, you will need to specify “MinGW Makefiles” as the build system generator (-G option).
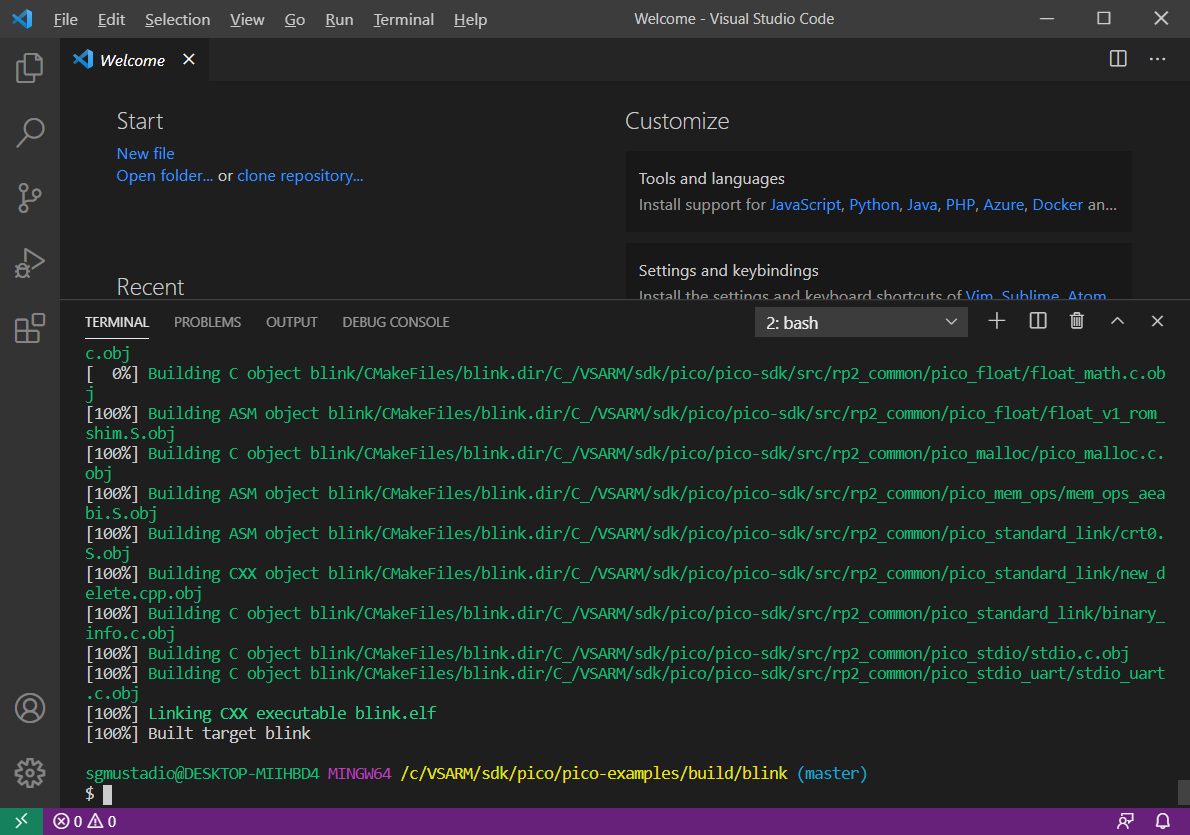
This should build the blink example and generate the .elf, .hex, and .uf2 binary files. We can easily upload the .uf2 file to our Pico without any special tools.
Put the Pico board into bootloader mode (press and hold the BOOTSEL button while plugging a USB cable into the Pico).
Find which drive letter the RPI-RP2 drive is mounted to (e.g. it was G: for me). Enter the following into Git Bash (change the drive letter as necessary):
cp blink.uf2 /g/
Your Pico board should be blinking away!
I hope this has helped you get started using the Raspberry Pi Pico SDK on Windows! I personally found that relying on MinGW for the compiler tools was easier than using Build Tools for Visual Studio.
From here, you can set up VS Code any way you like with various plugins like CMake Tools. I did not cover setting up debugging and other tools (picotool, gdb, OpenOCD, etc.), which are topics for another time. For now, I recommend referring to the Pico C/C++ Getting Started Guide to see how to configure those tools in VS Code.
Happy hacking!
[Update May 23, 2021] Since posting this, I have made a video (for Digi-Key) that shows you how to use VS Code plugins for one-click CMake and building. You can see that video here.
Excellent documentation.
Excellent.
Is this process suitable for windows 10, x86, 32 bit
Pc.
Can you please confirm if it will work on a 32 bit windows 10 pc ?
I don’t have a 32-bit version of Windows to try, but I have to imagine it will work. Just make sure you install the 32-bit version of the tools.
thank you for detailed explanation…
Excellent guide, very detailed and love the screenshots. You must have spent an age writing this guide, so many thanks for your hard work.
Like many, I had no success following the “Getting Started with Raspberry Pi Pico” guide for Windows but with your instructions I have succeeded!
Hello and thank you for this documentation. Using the VS-Code and Cmake-Tools tools reduces the use of the command windows and therefore the risk of errors! It’s a shame to use Windows tools like those of a Linux! There is Simpler in VS-Code and CMake parameters to use CCG automatically, which is not the case here. Maybe in another videos?
Yes, I cover using plugins for one-click CMake and building in this video: https://www.youtube.com/watch?v=B5rQSoOmR5w. This post was made mostly as a supplement to that video, as setting up the toolchain in Windows is such a pain 🙂
Just want to say that this was exactly what I needed! Awesome job, especially with the details and the screenshots.
I’m glad to hear it helped!
is there a reason to prefer mingw on window rather then wsl? it seems that setup instructions for the linux work fine under the wsl. the only thing – i could not build picotool, because the script could not find libusb. otherwise, i’ve compiled blink pretty easily, and uploaded it in regular way from my windows laptop.
Thanks Shawn. After couple installation rounds I finally managed to compile and load blink.uf2 on my picoboard. I got this error : “bash: $’\377\376alias’: command not found” when I opened Git Bash from Desktop. I had to clean all files from my home direcotory. Yes I had previous VSCode installations and others too before starting your project. But now everything works fine and I am going to proceed with your tutorials.
Hi, How did you fix the error “bash: $’\377\376alias’: command not found”?
What did you click in order to clean files from the home directory? (Im new to all this.)
Thanks!
If either of you two managed to get a solution to this I’d be very thankful!
I have also this error message : “bash: $’\377\376alias” . I have reinstalled VSCODE and try to delete all settings before ( code folder) but I have still the same error;
How can I solve this issue ? What other parameters or settings I have to delete to clean other VSCODE install I have to do ?
I resolve a problem with 377/376 symbols by changing codepage to UTF-8 (in Notepad++ in my case). Good luck..
I resolve a problem with 377/376 symbols by changing codepage to UTF-8 (in Notepad++ in my case). Good luck..
Thank you. It is very helpful and clear.
I cant find make only mingw32-make.exe after the path configuration
Did you create an alias for make as shown in the “Build Blink Example” section?
It works… this is the first tutorial that works for me. Thanks!
Thank you – this worked for me.
Wanted to put a comment on here — my make was dying on the elf2uf2 step of the makefile. If the same thing is happening to you, you will get a code ‘-1073741511’ in this scenario.
The fix was a direct copy of the mingw32 libstdc++-6.dll into the created build/elf2uf2 directory, alongside elf2uf2.exe
There was a silent dll failure buried in there, which will open up a dialog only if you run the tool on its own whiel this error is present.. This is a fairly mature system. I don’t know which libstdc++-6.dll it was /trying/ to use, but the quickest way to get rid of it is to move the library into that same location.
Thank you for pointing this out!
The thing that worked for me was to insure that the path to the MinGW bin directory was in my system Path variable (ie. C:\VSARM\mingw\minggw64\bin).
Very helpful. I had two issues.
One was the “Error -1073741511” issue Zoot mentioned above and his fix worked. I think I ended up copying libstdc++-6.dll to C:\VSARM\sdk\pico\pico-examples\build\ .
The other issue was setting up VS Code to run git bash in the terminal. Apparently, the “new” version of VS Code I’m running (2022-05-17718…) has changed that method and the instructions above no longer work. I fumbled around with a couple of suggestions on stackoverflow and gave up.
The chain runs fine by launching git bash directly from start menu and typing make.
I’m happy. You got me to a place that works after trying several other site instructions. I think it’s a mistake for the RPi Foundation to make so much effort getting the Pico SDK instructions tied around the Pi, especially with the total lack of Pi’s in the market now.
Thanks!
You can find which version of libstdc++-6.dll is being used by just typing “libstdc++-6.dll” into a command prompt and the path will show up in the title bar of a dialog box that says “This file does not have an app associated…”. For me, it was something I didn’t need in my PATH, so I just removed it.
I also ran into the Error -1073741511 issue. I wasn’t happy having to copy the libstdc++-6.dll into every build directory, and found an alternative solution. I added the following line into my .bashrc file:
export PATH=”C:\VSARM\mingw64\bin”:$PATH
(Change to point to your mingw bin folder).
Now it finds the libstdc++-6.dll on my path before any other versions in my git bash terminal windows.
This solved the libstdcc++-6.dll issue. I tried the copying across above but all that happened is it started complaining about more missing dlls. Adding this to my path meant they were all found.
Hi, your tutorial is very useful, but I need some more… I have problem with “Sparkfun MicroMod Input and Display” witch is running by RP2040 – I can’t activate display in this set. Can I send you my code in C to veryfication?
I don’t have that board, so I won’t be able to help. Your best bet would be to ask for help from SparkFun on the product page (https://www.sparkfun.com/products/16985) or the forums (https://forum.sparkfun.com/).
Have followed your tutorial to the letter, but with VS Code already previously installed. When I try to build the ‘blink’ example, I get the following error:
mingw32-make[2]: *** [blink\CMakeFiles\blink.dir\build.make:812: blink/blink.elf] Error -1073741511
mingw32-make[2]: *** Deleting file ‘blink/blink.elf’
mingw32-make[1]: *** [CMakeFiles\Makefile2:3723: blink/CMakeFiles/blink.dir/all] Error 2
mingw32-make: *** [Makefile:90: all] Error 2
Any ideas what the problem could be?
I’m not sure…I haven’t seen that error before. The only thing I could find (according to this: https://musescore.org/en/node/273340) would be to maybe double-check your PATH names.
I just noticed a comment from someone else with the same issue. Here’s the proposed fix:
“The fix was a direct copy of the mingw32 libstdc++-6.dll into the created build/elf2uf2 directory, alongside elf2uf2.exe”
Aha! Perfect! Thank you – that fixes the issue, I can build the examples now. Thanks for an excellent tutorial too. 🙂
This worked for me too. Had a few problems locating libstdc++-6.ddl but found it under C:\VSARM\mingw\mingw64\x86_64-w64-mingw32\lib32. I also had a few problems with the sourceforge installer as it currently doesn’t work and presents me with the message “the file has been downloaded incorrectly”. This is why the path to this file is slightly different as I has to find a workaround by downloading the x86_64-posix-sjlj archive from https://sourceforge.net/projects/mingw-w64/files/mingw-w64/
Hi Shawn,
Many thanks for the explanation. Learned from it.
An alternative when you want to de Arduino development on windows for the Pi Pico you could consider start using the VsCode / PlatformIO. This combination does also support the Pi Pico. All toolchain stuff is done for you by PlatformIO.
Kind regards, Luc Looman
A little rectification needed on my Rely.
Indeed installing and running blink example in win10/vscode/platformio worked very quick.
Unfortuneatly this is a Arduino-mbed implementation which means you can not use the full Pico C++ SDK.
There is hope it will be supported soon with earlephilhower/arduino-pico.
Hi Shawn,
Please could help to fix this issue:
$ cmake -G “MinGW Makefiles” ..
bash: cmake: command not found
Thank you
It looks like cmake is not in your system PATH. When you installed CMake (https://cmake.org/download/), did you click the option to “Add CMake to system PATH for all users”? If not, check to make sure “C:\Program Files\CMake\bin” is included in the Path variable under Environment Variables > System Variables.
It works now after I installed the last version of cmake-3.21.1-windows-x86_64.msi.
My Pico is blinking Thank you.
Glad to hear it works! And it’s good to know that it seems CMake 3.21 fixed the syntax error bug.
Hi Shawn!
After executing “cmake -G “MinGW Makefiles” ..” in Git Bash Terminal of VS Code I get CMake Error:
“Using PICO_SDK_PATH from environment (‘ C:\VSARM\sdk\pico\pico-sdk’)
CMake Error at pico_sdk_import.cmake:52 (message):
Directory ‘C:/VSARM/sdk/pico/pico-examples/build/
C:/VSARM/sdk/pico/pico-sdk’ not found
Call Stack (most recent call first):
CMakeLists.txt:4 (include)
— Configuring incomplete, errors occurred!”
This path is existing and I can see it in explorer….
Thank you!
I can’t seem to replicate this issue. Could you tell me the output of the following commands (from, say, Git Bash):
echo $PICO_SDK_PATHls $PICO_SDK_PATH
cmake --version
Hi Shawn!
After executing “cmake -G “MinGW Makefiles” ..” in Bash in VS Code I recieve an error:
CMake Error at pico_sdk_import.cmake:52 (message):
Directory ‘C:/VSARM/sdk/pico/pico-examples/build/
C:/VSARM/sdk/pico/pico-sdk’ not found
Call Stack (most recent call first):
CMakeLists.txt:4 (include)
— Configuring incomplete, errors occurred
This directory exists and I can open it in explorer…
Thank you!
Thank you Shawn for the guide to this toolchain! Now I’m able to compile and build my pico c++ programs.
Something wierd though (this might be to another version of VS code) I was not able to select Bash in VS Code in the terminal selection. After shoe horning Bash as a default terminal and was running make, I got the error that mingw32-make.exe was not present. Then I realized that when I was using the windows command prompt as the terminal, than the make was working perfectly. Wieard, but then I decided not to think more about it… just running make in the windows command prompt.
The link to “ming-w64” is broken.
…..Head to the downloads page on the Mingw-w64 project site, and go to the Mingw-w64 Builds page for Windows: http://mingw-w64.org/doku.php/download/mingw-builds.
Fixed. Thanks!
Is this the correct MinGW , https://sourceforge.net/projects/mingw-w64/files/Toolchains%20targetting%20Win32/Personal%20Builds/mingw-builds/installer/mingw-w64-install.exe/download
Yes, I believe that is the correct one. It looks like they changed the installer slightly, but if you go through the steps, it should install ming-w64 as shown in the tutorial.
The tutorial works for me, I am having an issue with an older win7 machine.
Hi guys, I got this issue after calling make:
mingw32-make[2]: *** [pico-sdk\src\rp2_common\boot_stage2\CMakeFiles\bs2_default_padded_checksummed_asm.dir\build.make:72: pico-sdk/src/rp2_common/boot_stage2/bs2_default_padded_checksummed.S] Error 1
mingw32-make[1]: *** [CMakeFiles\Makefile2:4091: pico-sdk/src/rp2_common/boot_stage2/CMakeFiles/bs2_default_padded_checksummed_asm.dir/all] Error 2
mingw32-make: *** [Makefile:90: all] Error 2
I tried copy of the mingw32 libstdc++-6.dll into the created build/elf2uf2 directory, alongside elf2uf2.exe but it won’t help :(. Any idea?
Thank you, it is really helpful for the installing!
But there is a problem, the build is already complete but when I was trying to flash it to rp2040, it didnt blink. Can you help me?
I’m not sure why it’s not blinking for you. Are you seeing any errors? Did you copy the .uf2 file? Can you verify that the LED will blink using other methods (e.g. MicroPython)?
Thanks a lot – great tutorial!!
Two comments:
1. In section “installing Mingw”, where you say “head to the downloads page on the Mingw-w64 project site, and go to the Mingw-w64 Builds page for Windows”, your link is broken – link text is correct, but link URL is a placeholder:
https://www.mingw-w64.org/downloads/#mingw-builds
2. For me, when I opened terminal in VScode for the first time, it couldn’t find cmake, even though it was already installed and Path was properly configured – typing cmake in Git Bash I launched from WIndows menu worked, but Git Bash inside VScode didn’t. However, after I relaunched VScode, deleted Git Bash terminal in VScode and launched it again, everything worked. Apparently VScode didn’t read all env variables on first launch…
Thanks for the heads up! I really don’t know why the link didn’t take in WordPress…I updated it, and it should work now. That’s weird about VSCode not reading the environment variables, but good to know about needing to relaunch it.
Thank you for the excellent guide
Everything works
Only one note that I’d add
echo mingw32-make %* > C:\VSARM\mingw\mingw32\bin\make.bat
This line created make.bat with utf-16 encoding on my machine. Which windows did not like. Updated it to utf-8 with notepad++. And that made it work
You’re a lifesaver! This is so much better than the toolchain in the Pico user guide (which was giving me opaque build errors)
Thank you very much, I’ve been struggling for days trying to use the extensions in VScode, your method worked seamlessly!
For some reason “GIT BASH” is not available in the terminal. I’ve removed VS code and followed your method.
Hi there, I know you spent a ton of time making this page and being thorough in showing every aspect of what needed to be done to get these tools up and working. I just wanted to say THANK YOU. You saved me earlier this week when I needed to compile some files for my Raspberry Pi Pico– I was completely lost, and quite frustrated that 95% of everything written online not only assumes familiarity with Linux, but assumes you are running Linux. As a Windows user, I was lost. This page is now bookmarked because it’s one of the best how-to write-ups I’ve ever seen online. Again, thank you!
Glad it helped! I ran into the same issue–there was very little information on how to set up the build environment for the Pico on Windows.
Jan 12 2022
I’ve made it to the step where visual studio code is installed. When visual studio code first runs, I encounter a dialog box as follows:
“Unable to determine what CMake generator to use. Please install or configure a preferred generator, or update settings.json, your Kit configuration or PATH variable.”
In a command prompt, cmake can be started:
Microsoft Windows [Version 10.0.19044.1415]
(c) Microsoft Corporation. All rights reserved.
C:\Users\user>cmake
Usage
cmake [options]
cmake [options]
cmake [options] -S -B
In the user’s path environment variable, the following value is set:
C:\Program Files\CMake\bin
Would be very grateful for advice as to how to proceed.
Thank you!
Dave
I have not seen that error yet. Maybe something in this thread can help? https://github.com/microsoft/vscode-cmake-tools/issues/880
Thank you Hymel.
However, I needed to restart my computer twice, for some reason I guess, the environmental variables didn’t apply immediately.
Shawn, thank you for acknowledging my post about “Unable to determine what CMake generator to use. Please install or configure a preferred generator, or update settings.json, your Kit configuration or PATH variable.”
I was able to resolve this by uninstalling visual studio code, and then (important) removing two directories which had retained state information from visual studio code. I then re-installed visual studio code and the start-up error messages were not present.
I continued in the installation procedure to this point:
echo “alias make=mingw32-make.exe” >> ~/.bashrc
source ~/.bashrc
The command “source ~/.bashrc” returns the following error:
$ source ~/.bashrc
bash: alias: alias: not found
I continued past this error without resolution.
I was able to complete the rest of the demonstration resulting in a working “blink LED” example.
1. Do you have any idea how I could fix “source ~/.bashrc” so it completes?
2. Can the selection of bash be made in permanent or persistent in visual studio code? Each time it starts power shell, but I can then switch to bash. I would prefer bash permanently.
Thank you again. After many hours this week with failed installation attempts using (apparently untested) documentation from raspberry pi foundation, your procedure produced my first end-to-end working result.
Hi Dave,
1. Check the spelling and syntax of your alias command with `$ cat ~/.bashrc` Make sure that alias is spelled correctly, and that there are no spaces around the equals sign (see here for more info: https://askubuntu.com/questions/391518/bash-alias-alias-not-found).
2. You can make Git Bash the default terminal. Press `F1` and type “Terminal: Select Default Profile.” From the drop-down list, select Git Bash to be your default terminal. You can see screenshots of this done here: https://stackoverflow.com/questions/44435697/vscode-change-default-terminal
Hope that helps!
Hi, I get the following error . Any suggestions for remediation ?
***
CMake Warning at D:/users/vivek/work/RPi-PICO/projects/pico-sdk/cmake/preload/toolchains/find_compiler.cmake:22 (message
):
PICO_TOOLCHAIN_PATH specified (D:\”Program Files (x86)\GNU Tools ARM
Embedded\10 2021.10″\bin), but arm-none-eabi-gcc not found there
…
CMake Error at D:/users/vivek/work/RPi-PICO/projects/pico-sdk/cmake/preload/toolchains/find_compiler.cmake:28 (message)
Compiler ‘arm-none-eabi-gcc’ not found, you can specify search path with
“PICO_TOOLCHAIN_PATH”.
***
Hi I encountered the same issue. The solution forme was to add another System variable:
Name :PICO_TOOLCHAIN_PATH
Path: C:\VSARM\armcc\102021.10\bin (or wherever you put your gcc)
C:\VSARM\sdk\pico\pico-sdk\cmake\pico_pre_load_toolchain.cmake looks for the variable PICO_TOOLCHAIN_PATH in the system variables (line 2)
Therefore you only have to define it
Best regards
Oke
Hello I am getting same issue that you have given solution to but there I do not found any gcc.exe that can be run. Are you sure this setup have any gcc compiler?
Fantastic tutorial! I’m so looking forward to this working, but I get the following error….
CMake Error at C:/Program Files/CMake/share/cmake-3.22/Modules/CMakeTestCCompiler.cmake:69 (message):
The C compiler
“C:/build/17.0/arm/sysroots/i686-nilrtsdk-mingw32/usr/libexec/arm-nilrt-linux-gnueabi/gcc/arm-nilrt-linux-gnueabi/4.9.2/gcc.exe”
is not able to compile a simple test program.
I’ve followed you instructions and all went well up to the point of compiling blink… any help appreciated 🤞
Thanks for the tutorial!!! I have a question that I still can’t solve, how can I set in visual code a different RP2040 based board, such as the adafruit feather or custom board.
I have a development based on RP2040 and I would like to integrate some headers with the definitions of some pins.
Thank you very much.
It appears that there is a very recent issue with the Ming-w online installer. The error says “The file has been downloaded incorrectly!” It seems to be very recent and many have commented on Source Forge. Is there any solutions/ways around this?
Hi,
I followed the answer from this post: https://stackoverflow.com/questions/46455927/mingw-w64-installer-the-file-has-been-downloaded-incorrectly. Apparently, there’s a problem with the installer.
Download the MinGW archive from https://sourceforge.net/projects/mingw-w64/files/mingw-w64/. I downloaded the one named “x86_64-posix-sjlj”. Extract the file and copy the folder to the mingw folder created inside VSARM. Worked for me.
Also, make sure to change mingw32 to mingw64 when following the instructions, if that’s the version you downloaded.
This Worked for me MingGw 64 was a problem, had to do same and use “x86_64-posix-sjlj”. also and changing the path as such, path was a problem in test and rebooting changed that for sdk example dir. blink and the path for mingw32. Using the new version ? just confused me. blink worked. moving forward to other and RTOS.
more BEER.
This workaround worked for me. Only had one more minor setback after this while running make for the blink example. I was prompted with the following error:
mingw32-make[2]: *** [blink\CMakeFiles\blink.dir\build.make:812: blink/blink.elf] Error -1073741511
mingw32-make[2]: *** Deleting file ‘blink/blink.elf’
mingw32-make[1]: *** [CMakeFiles\Makefile2:3723: blink/CMakeFiles/blink.dir/all] Error 2
mingw32-make: *** [Makefile:90: all] Error 2
This was solved after I included a file called libstdc++-6.ddl (which, among another few directories, can be found in C:\VSARM\mingw\mingw64\x86_64-w64-mingw32\lib32) into the build/elf2uf2 folder.
Thanks for the tutorial, I now have a blinky pico !
Just a heads-up, I had to type “make.bat” on windows, for some reason just typing “make” resulted in nothing and had me chasing around my PATH variable.
Hello,
I have question. I would like write permamently program on my RP2040.
I wrote code in circuitpython. I need RP2040 which when it will be plug in to computer, It send data from RP2040 to computer by UART.
How Can I do it?
I think it’s the same work as https://www.youtube.com/watch?v=IMZUZuytt7o , but in circuitpython and to RP20404.
Hi shawn, may you help me with this issue? after writing this comand on VS code ” cmake -G “MinGW Makefiles” ..” terminal appears the following error
$ cmake -G “MinGW Makefiles” ..
CMake Error at pico_sdk_import.cmake:44 (message):
SDK location was not specified. Please set PICO_SDK_PATH or set
PICO_SDK_FETCH_FROM_GIT to on to fetch from git.
Call Stack (most recent call first):
CMakeLists.txt:4 (include)
— Configuring incomplete, errors occurred!
I have this same issue and it seems that this has not been addressed yet.
Any suggestions?
Hi Juan and Kelju,
Please run the following:
echo $PICO_SDK_PATH
If you do not see anything printed, it means you did not set PICO_SDK_PATH in your environment variables. That needs to be set to run cmake with the Pico SDK.
Hey Shawn
Followed your tutorial… all worked seemlessly but as i try to run the command (cmake -G “MinGW Makefiles” ..) i get these errors:
CMake Error: CMAKE_C_COMPILER not set, after EnableLanguage
CMake Error: CMAKE_CXX_COMPILER not set, after EnableLanguage
CMake Error: CMAKE_ASM_COMPILER not set, after EnableLanguage
— Configuring incomplete, errors occurred!
do you know what the problem could be?
best regards
Nino
H’ Shawn\
I tracked and used step that you mentioned. I get error about below. Could you please help me
[cmake] PICO_SDK_PATH is C:/Pico/pico-sdk
[cmake] PICO platform is rp2040.
[cmake] CMake Error at CMakeLists.txt:8 (project):
[cmake] Running
[cmake]
[cmake] ‘nmake’ ‘-?’
[cmake]
[cmake] failed with:
[cmake]
[cmake] The system cannot find the file specified
[cmake]
[cmake]
[cmake] — Configuring incomplete, errors occurred!
[cmake] See also “C:/Pico/blink/build/CMakeFiles/CMakeOutput.log”.
my cmakelists.txt
# Set minimum required version of CMake
cmake_minimum_required(VERSION 3.12)
# Include build functions from Pico SDK
include($ENV{PICO_SDK_PATH}/external/pico_sdk_import.cmake)
# Set name of project (as PROJECT_NAME) and C/C++ standards
project(blink C CXX ASM)
set(CMAKE_C_STANDARD 11)
set(CMAKE_CXX_STANDARD 17)
# Creates a pico-sdk subdirectory in our project for the libraries
pico_sdk_init()
# Tell CMake where to find the executable source file
add_executable(${PROJECT_NAME}
main.c
)
# Create map/bin/hex/uf2 files
pico_add_extra_outputs(${PROJECT_NAME})
# Link to pico_stdlib (gpio, time, etc. functions)
target_link_libraries(${PROJECT_NAME}
pico_stdlib
)
# Enable usb output, disable uart output
pico_enable_stdio_usb(${PROJECT_NAME} 1)
pico_enable_stdio_uart(${PROJECT_NAME} 0)
H’ Shawn,
I followed and aplyed step that you mentioned. I get error about below. Could you please help me
[cmake] PICO_SDK_PATH is C:/Pico/pico-sdk
[cmake] PICO platform is rp2040.
[cmake] CMake Error at CMakeLists.txt:8 (project):
[cmake] Running
[cmake]
[cmake] ‘nmake’ ‘-?’
[cmake]
[cmake] failed with:
[cmake]
[cmake] The system cannot find the file specified
[cmake]
[cmake]
[cmake] — Configuring incomplete, errors occurred!
[cmake] See also “C:/Pico/blink/build/CMakeFiles/CMakeOutput.log”.
my cmakelists.txt
# Set minimum required version of CMake
cmake_minimum_required(VERSION 3.12)
# Include build functions from Pico SDK
include($ENV{PICO_SDK_PATH}/external/pico_sdk_import.cmake)
# Set name of project (as PROJECT_NAME) and C/C++ standards
project(blink C CXX ASM)
set(CMAKE_C_STANDARD 11)
set(CMAKE_CXX_STANDARD 17)
# Creates a pico-sdk subdirectory in our project for the libraries
pico_sdk_init()
# Tell CMake where to find the executable source file
add_executable(${PROJECT_NAME}
main.c
)
# Create map/bin/hex/uf2 files
pico_add_extra_outputs(${PROJECT_NAME})
# Link to pico_stdlib (gpio, time, etc. functions)
target_link_libraries(${PROJECT_NAME}
pico_stdlib
)
# Enable usb output, disable uart output
pico_enable_stdio_usb(${PROJECT_NAME} 1)
pico_enable_stdio_uart(${PROJECT_NAME} 0)
To fix this error:
mingw32-make[2]: *** [blink\CMakeFiles\blink.dir\build.make:812: blink/blink.elf] Error -1073741511
mingw32-make[2]: *** Deleting file ‘blink/blink.elf’
mingw32-make[1]: *** [CMakeFiles\Makefile2:3723: blink/CMakeFiles/blink.dir/all] Error 2
mingw32-make: *** [Makefile:90: all] Error 2
I had to download “x86_64-8.1.0-release-posix-seh-rt_v6-rev0” (instead of i686-8.1.0-release-posix-dwarf-rt_v6-rev0) and unpack it in “C:\VSARM\mingw”. There you will have a folder called “mingw64”. You either set the environment variable to “C:\VSARM\mingw\mingw64\bin”, or keep it as is “C:\VSARM\mingw\mingw32\bin” but rename unpacked folder to mingw32 (a hack !)
It took me many days before I found a solution. Thanks God !
You will need to append the following line to your ./.vscode/settings.json file:
“cmake.generator”: “MinGW Makefiles”,
I tested arm-non-eabi-gdb.exe of the latest version Arm GNU Embedded Toolchain 11.2-2022.02 and it doesn’t work.
I have no problem on gdb with Arm GNU Embedded Toolchain 10.3-2021.10.
Thanks a bunch!! Excellent document!
Hi
Very good tutorial, I did like it… But I couldn’t succeed in trying it.
Here is the the error output I get:
moham@DESKTOP-OTSLFLL MINGW64 /c/VSARM/sdk/pico/pico-examples (master)
$ cd build
moham@DESKTOP-OTSLFLL MINGW64 /c/VSARM/sdk/pico/pico-examples/build (master)
$ cmake -G “MinGW Makefiles” ..
PICO_SDK_PATH is C:/VSARM/sdk/pico/pico-sdk
PICO platform is rp2040.
PICO target board is pico.
Using board configuration from C:/VSARM/sdk/pico/pico-sdk/src/boards/include/boards/pico.h
TinyUSB available at C:/VSARM/sdk/pico/pico-sdk/lib/tinyusb/src/portable/raspberrypi/rp2040; enabling build support for USB.
— Configuring done
— Generating done
— Build files have been written to: C:/VSARM/sdk/pico/pico-examples/build
moham@DESKTOP-OTSLFLL MINGW64 /c/VSARM/sdk/pico/pico-examples/build (master)
$ cd blink
moham@DESKTOP-OTSLFLL MINGW64 /c/VSARM/sdk/pico/pico-examples/build/blink (master)
$ make
process_begin: CreateProcess(C:\Users\moham\AppData\Local\Temp\make2468-1.bat, C:\Users\moham\AppData\Local\Temp\make2468-1.bat, …) failed.
make (e=2): The system cannot find the file specified.
mingw32-make: *** [Makefile:1211: cmake_check_build_system] Error 2
moham@DESKTOP-OTSLFLL MINGW64 /c/VSARM/sdk/pico/pico-examples/build/blink (master)
$
Of course the folders structure and the variables environment are set as described by you.
Any advice on the issue?
Hi Mohamed,
It looks like your system cannot find mingw32-make. I recommend checking that C:\VSARM\mingw\mingw32\bin is on your PATH environment variable and that there is a mingw32-make.exe file in that directory.
I deleted the mingw path from user and saved the path in system variables
then restarted the system and it started working and making the build files
I moved the path of mingw from user variables to system variables’
then I restarted my system
and ‘make’ started working
With the current (3.23.1, as of May 2022) version of CMake, on Win10, I had to add
cmake_policy(SET CMP0057 NEW)
at the top of my CMakeLists.txt file to get it to work.
Hope this might help others….
Hi Shawn,
thanks for the great detailed tutorial.
I have an problem. After typing typing the last command or step with “make” into the git bash terminal of VS i get the following message:
@user_pc /c/VSARM/sdk/pico/pico-examples/build/blink $ make
bash: make: command not found
Do you have an idea whats wrong with this? I followed every step from your tutorial, I think.
Would be greatful if you help me here out
This is likely because you did not create make.bat in C:\VSARM\mingw\mingw32\bin or you forgot to put C:\VSARM\mingw\mingw32\bin on your PATH in environment variables. You might want to try the “make” command in other terminals to see if Windows really does see it on your path.
Hey Shawn, Then I misunderstood this step:
Enter the following commands (you will only need to do this once):
echo “alias make=mingw32-make.exe” >> ~/.bashrc
source ~/.bashrc
Started directly with next steps
What have I to do if I want to add a new project into th pico-examples folder? I created a folder into the pico-examples folder. But git bash cant find the folder.
bash: cd: test: No such file or directory
Hi Shawn,
followed this step and the RP2040 build system is functional.
Tx for the info.
Hello.
I followed these directions, and things up to and including the “cmake” command worked fine.
But then when I tried to run “make”, I got the following:
Sorry! Clicked Submit too soon!)
Again, up to and including running cmake worked fine.
But the output of make is
undefined reference to ‘_exit’
(And lots more undefined reference linker errors, to things like: _exit, _fstat, _open, _sbrk, “kill, _getpid, _unlink, _write, …)
I would appreciate any help with this!
Thanks.
Marty
I tried to post the entire output of the make command, but the website says:
Not Acceptable!
An appropriate representation of the requested resource could not be found on this server. This error was generated by Mod_Security.
How do I get past this??
Marty
I think WordPress comments limit the number of characters (I don’t know the exact amount). You can always put your code or debug info in gist.github.com or pastebin.com and provide the link in your comment.
My guess for the error is that you have a path error somewhere (see this thread: https://forums.raspberrypi.com/viewtopic.php?p=1994291). Check to make sure that the C:\VSARM\sdk\pico\pico-sdk exists and that you initialized all the submodules.
Has anyone seen this error when building the blink example after setting up the tools per above?
In file included from D:\VSARM\sdk\pico\pico-sdk\tools\elf2uf2\main.cpp:14:
D:/VSARM/sdk/pico/pico-sdk/src/common/boot_uf2/include/boot/uf2.h:44: error: expected constructor, destructor, or type conversion before ‘(‘ token
In file included from D:\VSARM\sdk\pico\pico-sdk\tools\elf2uf2\main.cpp:15:
D:\VSARM\sdk\pico\pico-sdk\tools\elf2uf2\elf.h:60:7: warning: no newline at end of file
Those are the first 2 errors in a long list of errors when doing the make step. Just not sure where to go from here.
This does not work.
Thanks Shawn, I tested this on Windows 11 on (July 1 2022), it worked great!
Having a weird issue I can’t seem to resolve it. During Make I get:
Scanning dependencies of target bs2_default
[ 0%] Linking ASM executable bs2_default.elf
arm-none-eabi-gcc.exe: error: nosys.specs: No such file or directory
mingw32-make[2]: *** [pico-sdk\src\rp2_common\boot_stage2\CMakeFiles\bs2_default.dir\build.make:96: pico-sdk/src/rp2_common/boot_stage2/bs2_default.elf] Error 1
mingw32-make[1]: *** [CMakeFiles\Makefile2:4216: pico-sdk/src/rp2_common/boot_stage2/CMakeFiles/bs2_default.dir/all] Error 2
mingw32-make: *** [Makefile:90: all] Error 2
Do you expect this to work using Cygwin?
I followed basically the same steps, but there are a couple changes:
It complains about “MinGW Makefiles” not existing so I used “Unix Makefiles” instead.
Now, make is failing and telling me:
Scanning dependencies of target bs2_default
[ 0%] Building ASM object pico-sdk/src/rp2_common/boot_stage2/CMakeFiles/bs2_default.dir/compile_time_choice.S.obj
cc1.exe: fatal error: /cygdrive/c/VSARM/pico-sdk/src/rp2_common/boot_stage2/comp
ile_time_choice.S: No such file or directory
I have confirmed that compile_time_choice.S does exist at the stated path. Any ideas?
Failed in the step of “make” in the Blink example. Somehow, it uses cl.exe to compile. Please help.
GBXXET1@SVP-LDGVST0F3 MINGW64 ~
$ cd /c/VSARM/sdk/pico/pico-examples/
GBXXET1@SVP-LDGVST0F3 MINGW64 /c/VSARM/sdk/pico/pico-examples (master)
$ mkdir build
GBXXET1@SVP-LDGVST0F3 MINGW64 /c/VSARM/sdk/pico/pico-examples (master)
$ cd build
GBXXET1@SVP-LDGVST0F3 MINGW64 /c/VSARM/sdk/pico/pico-examples/build (master)
$ cmake -G “MinGW Makefiles” ..
Using PICO_SDK_PATH from environment (‘C:\VSARM\sdk\pico\pico-sdk’)
PICO_SDK_PATH is C:/VSARM/sdk/pico/pico-sdk
Defaulting PICO_PLATFORM to rp2040 since not specified.
Defaulting PICO platform compiler to pico_arm_gcc since not specified.
— Defaulting build type to ‘Release’ since not specified.
PICO compiler is pico_arm_gcc
— The C compiler identification is GNU 11.2.1
— The CXX compiler identification is GNU 11.2.1
— The ASM compiler identification is GNU
— Found assembler: C:/VSARM/armcc/11.2 2022.02/bin/arm-none-eabi-gcc.exe
Build type is Release
Defaulting PICO target board to pico since not specified.
Using board configuration from C:/VSARM/sdk/pico/pico-sdk/src/boards/include/boards/pico.h
— Found Python3: C:/Program Files/Python310/python3.exe (found version “3.10.6”) found components: Interpreter
TinyUSB available at C:/VSARM/sdk/pico/pico-sdk/lib/tinyusb/src/portable/raspberrypi/rp2040; enabling build support for USB.
cyw43-driver available at C:/VSARM/sdk/pico/pico-sdk/lib/cyw43-driver
lwIP available at C:/VSARM/sdk/pico/pico-sdk/lib/lwip
— Configuring done
— Generating done
— Build files have been written to: C:/VSARM/sdk/pico/pico-examples/build
GBXXET1@SVP-LDGVST0F3 MINGW64 /c/VSARM/sdk/pico/pico-examples/build (master)
$ cd blink
GBXXET1@SVP-LDGVST0F3 MINGW64 /c/VSARM/sdk/pico/pico-examples/build/blink (master)
$ make
[ 0%] Creating directories for ‘ELF2UF2Build’
[ 0%] No download step for ‘ELF2UF2Build’
[ 0%] No update step for ‘ELF2UF2Build’
[ 0%] No patch step for ‘ELF2UF2Build’
[ 0%] Performing configure step for ‘ELF2UF2Build’
— The C compiler identification is MSVC 19.32.31332.0
— The CXX compiler identification is MSVC 19.32.31332.0
— Detecting C compiler ABI info
— Detecting C compiler ABI info – failed
— Check for working C compiler: C:/Program Files/Microsoft Visual Studio/2022/Community/VC/Tools/MSVC/14.32.31326/bin/Hostx64/x64/cl.exe
— Check for working C compiler: C:/Program Files/Microsoft Visual Studio/2022/Community/VC/Tools/MSVC/14.32.31326/bin/Hostx64/x64/cl.exe – broken
CMake Error at C:/Program Files/CMake/share/cmake-3.24/Modules/CMakeTestCCompiler.cmake:69 (message):
The C compiler
“C:/Program Files/Microsoft Visual Studio/2022/Community/VC/Tools/MSVC/14.32.31326/bin/Hostx64/x64/cl.exe”
is not able to compile a simple test program.
It fails with the following output:
Change Dir: C:/VSARM/sdk/pico/pico-examples/build/elf2uf2/CMakeFiles/CMakeTmp
Run Build Command(s):C:/VSARM/mingw/mingw32/bin/mingw32-make.exe -f Makefile cmTC_188ce/fast && mingw32-make.exe[3]: Entering directory ‘C:/VSARM/sdk/pico/pico-examples/build/elf2uf2/CMakeFiles/CMakeTmp’
C:/VSARM/mingw/mingw32/bin/mingw32-make.exe -f CMakeFiles\cmTC_188ce.dir\build.make CMakeFiles/cmTC_188ce.dir/build
mingw32-make.exe[4]: Entering directory ‘C:/VSARM/sdk/pico/pico-examples/build/elf2uf2/CMakeFiles/CMakeTmp’
Building C object CMakeFiles/cmTC_188ce.dir/testCCompiler.c.obj
“C:\Program Files\CMake\bin\cmake.exe” -E cmake_cl_compile_depends –dep-file=CMakeFiles\cmTC_188ce.dir\testCCompiler.c.obj.d –working-dir=C:\VSARM\sdk\pico\pico-examples\build\elf2uf2\CMakeFiles\CMakeTmp –filter-prefix=”Note: including file: ” — C:\PROGRA~1\MICROS~4\2022\COMMUN~1\VC\Tools\MSVC\1432~1.313\bin\Hostx64\x64\cl.exe /nologo /DWIN32 /D_WINDOWS /W3 /MDd /Zi /Ob0 /Od /RTC1 /showIncludes /FoCMakeFiles\cmTC_188ce.dir\testCCompiler.c.obj /FdCMakeFiles\cmTC_188ce.dir/ /FS -c C:\VSARM\sdk\pico\pico-examples\build\elf2uf2\CMakeFiles\CMakeTmp\testCCompiler.c
testCCompiler.c
Linking C executable cmTC_188ce.exe
“C:\Program Files\CMake\bin\cmake.exe” -E cmake_link_script CMakeFiles\cmTC_188ce.dir\link.txt –verbose=1
“C:\Program Files\CMake\bin\cmake.exe” -E vs_link_exe –intdir=CMakeFiles\cmTC_188ce.dir –rc=rc –mt=CMAKE_MT-NOTFOUND –manifests — C:\PROGRA~1\MICROS~4\2022\COMMUN~1\VC\Tools\MSVC\1432~1.313\bin\Hostx64\x64\link.exe /nologo @CMakeFiles\cmTC_188ce.dir\objects1.rsp /out:cmTC_188ce.exe /implib:cmTC_188ce.lib /pdb:C:\VSARM\sdk\pico\pico-examples\build\elf2uf2\CMakeFiles\CMakeTmp\cmTC_188ce.pdb /version:0.0 /machine:x64 /debug /INCREMENTAL /subsystem:console kernel32.lib user32.lib gdi32.lib winspool.lib shell32.lib ole32.lib oleaut32.lib uuid.lib comdlg32.lib advapi32.lib
RC Pass 1: command “rc /fo CMakeFiles\cmTC_188ce.dir/manifest.res CMakeFiles\cmTC_188ce.dir/manifest.rc” failed (exit code 0) with the following output:
The system cannot find the file specifiedmingw32-make.exe[4]: *** [CMakeFiles\cmTC_188ce.dir\build.make:100: cmTC_188ce.exe] Error -1
mingw32-make.exe[4]: Leaving directory ‘C:/VSARM/sdk/pico/pico-examples/build/elf2uf2/CMakeFiles/CMakeTmp’
mingw32-make.exe[3]: *** [Makefile:126: cmTC_188ce/fast] Error 2
mingw32-make.exe[3]: Leaving directory ‘C:/VSARM/sdk/pico/pico-examples/build/elf2uf2/CMakeFiles/CMakeTmp’
CMake will not be able to correctly generate this project.
Call Stack (most recent call first):
CMakeLists.txt:2 (project)
— Configuring incomplete, errors occurred!
See also “C:/VSARM/sdk/pico/pico-examples/build/elf2uf2/CMakeFiles/CMakeOutput.log”.
See also “C:/VSARM/sdk/pico/pico-examples/build/elf2uf2/CMakeFiles/CMakeError.log”.
mingw32-make[2]: *** [blink\CMakeFiles\ELF2UF2Build.dir\build.make:90: blink/elf2uf2/src/ELF2UF2Build-stamp/ELF2UF2Build-configure] Error 1
mingw32-make[1]: *** [CMakeFiles\Makefile2:4399: blink/CMakeFiles/ELF2UF2Build.dir/all] Error 2
mingw32-make: *** [Makefile:90: all] Error 2
Hey I am getting an error that says my compilers couldn’t be located but they are installed correctly and have been put in the path correctly. Any advice on getting them to work properly?
Thank you for the nice post! It works for me now after numerous trials. It is very important to delete whatever under PICO directory if you have not setup the right path and failed the trial first time.
gcc-arm-none-eabi-10-2020-q4-major-win32.exe.” is Signed for Windows 10 and later”. What about the Windows 8 (not8.1 just 8)?
Hello Shawn, I’ve followed all the steps but when I type “make” command in the bash terminal, it says
‘C:/Program’ is not recognized as an in internal or external command, operable program or bash file.
mingw32-make:* [Makefile:90 :all] Error 1
I ran into this same issue, and after a lot of trial and error I discovered it happened if I tried to run make from a Powershell command prompt, but it does not happen if you run make from a git bash command prompt. I don’t understand why, but you should be able to get things to compile using a git bash terminal window.
Thank you for this article.. I am using MS Windows 11 Pro. To see the value of PICO_SDK_PATH, inside a terminal window (which in fact is Powershell) I had to use the command: ‘echo $env:PICO_SDK_PATH’ because the command ‘echo %PICO_SDK_PATH%’ exactly did what the latter command ordered: the result was: ‘PICO_SDK_PATH’.
I have at least 7 differrent make.exe files on my computer. When I open a command prompt and type ‘make’ it choses a wrong one. How can I fix this without messing up other installed software?
Is using a virtual machine a solution?
If you update your path to have the mingw bin directory as the first item if should find the make.bat file created in the steps about before any other make.exe on your system. See my comment above where I do this to solve the error caused by the wrong libstdc++-6.dll as that change should also solve your multiple make.exe files issue.
Setting up my dev environment again today on a different PC, I tried the arm-gnu-toolchain-11.3.rel1-mingw-w64-i686-arm-none-eabi release and confirm it did NOT work for me. I reverted to the gcc-arm-11.2-2022.02-mingw-w64-i686-arm-none-eabi release and everything is working fine. I am using the mingw64 release x86_64-8.1.0-release-posix-sjlj-rt_v6-rev0
What an absolute horror to install a working development environment in Windows, let alone trying to install a debugger. Thanks very much for the detailed information, but I still get errors even after my 3rd try to make it work. My system is probably cluttered with junk from earlier attempts.
When I run ‘make’, I get this error (just like Buli):
— Check for working C compiler: C:/Program Files/Microsoft Visual Studio/2022/Community/VC/Tools/MSVC/14.32.31326/bin/Hostx86/x86/cl.exe – broken
*silently crying in a corner*
I keep getting bash: cmake: command not found . I’ve reinstalled cmake and made sure to add CMake to the system PATH for all users. make.bat is in C:\VSARM\mingw\mingw32\bin. I’ve tried reinstalling and installing an earlier version that you or others said worked for them.
It worked when I tried the the next day. lol however I have a Pico W that does not respond im assuming this is because they have different ports associated with the led?
I’m having the same problem as reported above…
$ cmake -G “MinGW Makefiles” ..
CMake Error at pico_sdk_import.cmake:63 (message):
Directory ‘C:/VSARM/sdk/pico/pico-examples/build/
C:/VSARM/sdk/pico/pico-sdk’ not found
Call Stack (most recent call first):
CMakeLists.txt:4 (include)
— Configuring incomplete, errors occurred!
It must be something simple…
$ echo $PICO_SDK_PATH
C:\VSARM\sdk\pico\pico-sdk\
$ ls $PICO_SDK_PATH
cmake/ CONTRIBUTING.md external/ LICENSE.TXT pico_sdk_version.cmake src/ tools/
CMakeLists.txt docs/ lib/ pico_sdk_init.cmake README.md test/
$ cmake –version
cmake version 3.24.1
CMake suite maintained and supported by Kitware (kitware.com/cmake).
Seem to have got past the cmake stage.
I noticed there was a CMakeCache.txt in the build directory.
I nuked the build directory; recreated it and it now works.
Thank you, this fixed the issue for me as well
Thanks you very much.
This article made my life very easy. I tried and it worked in the first attempt itself
Thanks you very much.
I tried and it worked in the first attempt itself
Thank you for the guide. For me it works till I try to enter this command “source ~/.bashrc”. When I enter that command it gives me this error “bash: $’\377\376alias’: command not found” After that nothing works and I can’t get it to compile the example.
Thank You for the fine instructions, they are very helpful and well written.
I think I have a problem with VS Code setup.
I can go thru all the steps and compile my project just fine.
When I restart VS Code and go to my build dir, and type “make”, I get this error:
– Configuring incomplete, errors occurred!
mingw32-make: *** [Makefile:2063: cmake_check_build_system] Error 1
If I delete my build dir and start from the beginning, it all works.
Is there something in VS settings that needs to be fixed?
Thanks
By the end, Cmake gets me something, but make is not defined. I get the same issue with gcc but I can do the full arm-none-eabi-gcc (getting the expected no input file error). I try to build the example but it complains there’s no CMakeLists.txt. The paths appear all correct though. I don’t see missing any step, but does something need to be aliased? I’m not very good with command lines tools.
Sorry, I’m actually getting:
$ cmake -G “MinGW Makefiles” ..
Using PICO_SDK_PATH from environment (‘C:\VSARM\sdk\pico\pico-sdk’)
PICO_SDK_PATH is C:/VSARM/sdk/pico/pico-sdk
Defaulting PICO_PLATFORM to rp2040 since not specified.
Defaulting PICO platform compiler to pico_arm_gcc since not specified.
— Defaulting build type to ‘Release’ since not specified.
PICO compiler is pico_arm_gcc
CMake Error: CMake was unable to find a build program corresponding to “MinGW Makefiles”. CMAKE_MAKE_PROGRAM is not set. You probably need to select a different build tool.
— Configuring incomplete, errors occurred!
I’m getting the same error.
From the CMakeCache.txt file, it states that
//Install path prefix, prepended onto install directories.
CMAKE_INSTALL_PREFIX:PATH=C:/Program Files (x86)/pico_examples
–but there is no pico_examples folder
//The directory containing a CMake configuration file for pico-sdk-tools.
pico-sdk-tools_DIR:PATH=C:/Program Files/Raspberry Pi/Pico SDK v1.5.0/pico-sdk-tools
–there is no pico-sdk-tools from your setup, have to install from other installer
when I do : cmake -G “MinGW Makefiles” ..
Skipping TinyUSB dual examples, as TinyUSB hw/mcu/raspberry_pi/Pico-PIO-USB submodule unavailable
I got the above skipping message. Is it an error? I have tried the recommendation from https://github.com/raspberrypi/tinyusb/blob/pico/docs/getting_started.md but the problem still persist, Any suggestion?. I have installed the tinyusb in C:\VSARM\sdk\pico\pico-examples\build
Hi, i have successfully run the blink code with the help of your tutorial, but i am facing some problems with adding the library. i used this github library for LoRa communication
( https://github.com/akshayabali/pico-lora/tree/master )
I have follow some steps to add the library
1. git clone https://github.com/akshayabali/pico-lora.git
2. cd ./pico-lora
3. mkdir build
4. cd build
5. cmake ..
6. make
after these we i get some errors like,
— Building for: NMake Makefiles
Using PICO_SDK_PATH from environment (‘C:\VSARM\sdk\pico\pico-sdk’)
PICO_SDK_PATH is C:/VSARM/sdk/pico/pico-sdk
Defaulting PICO_PLATFORM to rp2040 since not specified.
Defaulting PICO platform compiler to pico_arm_gcc since not specified.
— Defaulting build type to ‘Release’ since not specified.
PICO compiler is pico_arm_gcc
CMake Error at CMakeLists.txt:6 (project):
Running
‘nmake’ ‘-?’
failed with:
The system cannot find the file specified
— Configuring incomplete, errors occurred!
Please provide some solutions
Hello Shawn, great video! As a relatively new computer nerd it was very helpful. I am however getting stuck on trying to get the ‘make’ section work. I have triple checked my path variables and still have had no luck. When I use the cmake -G it says it finds the GNU version but then when I type the make command in the blink file it says the C compiler identification is unkown and the cxx compiler identification giving me an error 2.
I declared a new variable in the username variables with the name PICO_SDK_PATH with the value right value, but whenever I type echo %PICO_SDK_PATH% the output is: %PICO_SDK_PATH%
cmake doesn’t work for me somehow, could that be the reason?
Hello, Thank you for providing tutorials and videos.
I don’t have pico-example files.
Where did it go wrong?
User@DESKTOP-IJNCDRC MINGW64 /c/Users/User
$ echo “alias make=mingw32-make.exe” >> ~/.bashrc
User@DESKTOP-IJNCDRC MINGW64 /c/Users/User
$ source ~/.bashrc
User@DESKTOP-IJNCDRC MINGW64 /c/Users/User
$ cd /c/VSARM/sdk/pico/pico-examples/
bash: cd: /c/VSARM/sdk/pico/pico-examples/: No such file or directory
User@DESKTOP-IJNCDRC MINGW64 /c/Users/User
$ cd /c/VSARM/sdk/pico/docs/pico-examples/
bash: cd: /c/VSARM/sdk/pico/docs/pico-examples/: No such file or directory
Note: wanted to chime in here in case someone else experiences the same problem. I also received mingw32-make[2]: *** Error -1073741511 when running the make command. Here is the solution so you don’t have to copy libstdc++-6.dll into your project build directory everytime:
1. Go to your environment variables, add a specific environment variable for the path to libstdc++-6.dll. For me this was:
name: MINGW64_BIN
value: C:\VSARM\mingw\mingw64\bin
2. go to your CMakeLists.txt and add the following line near the top of the file (this copies the dll into your build directory):
file(COPY $ENV{MINGW64_BIN}/libstdc++-6.dll
DESTINATION ${CMAKE_CURRENT_BINARY_DIR})
3. In VSCode, at the terminal prompt, add this line to your .bashrc script:
export MINGW64_BIN=C:/VSARM/mingw/mingw64/bin
4. restart VSCode and you should be code to go. redo the cmake command and the make command and it should build succesfully
In Case anyone like me is having trouble with both CMake and make not being found as commands I rectified this by first downloading chocolaty and then doing choco install CMake from an admin terminal. Next I got the error of make not being recognised as a command and that is because the exe file was saved as mingw32-make
I am having an issue when I do that last step on “make” in the pico\pico-examples\build\blink
I am getting an error about a file in pico-sdk\lib\mbedtls\library\platform_until.c:96:13
It says “implicit declaration of function ‘gmtime_s’ did you mean ‘gmtime’?”
I did change it but still had errors. So I thought to reach out.
What should I do?
Always concise and on target, thanks Shawn.
Were you able to bypass this build issue? “[blink\CMakeFiles\blink.dir\build.make:989: blink/blink.elf] Error -1073741511”
Hi! I have followed your method for setting up build chain, but at the end I can’t load generated .uf2 file into my raspberry pi pico. When I tried to flash example blink.uf2 from their official website, then it works. I also noticed that the size of generated example blink file is only 14KB, which is significantly less than the original example blink.uf2 where the size is 98KB. Anyone facing similar issue?
Shawn —
Your keeping this up-to-date is very much appreciated. I have seen so much out-of-date information on the web lately that I feel like the web is becoming a global waste can of worthless material. Thanks for this bright spot on the web!
I worked with ‘Raspberry Pi Pico (RP2040)’ in the way you showed without any problem. I created a proper uf2 file and uploaded it to ‘Raspberry Pi Pico (RP2040)’. But now when I started working with ‘Raspberry Pi Pico 2 (RP2350)’, I uploaded the uf2 file created for ‘Raspberry Pi Pico (RP2040)’ to ‘Raspberry Pi Pico 2 (RP2350)’. But that uf2 file is not working in ‘Raspberry Pi Pico 2 (RP2350)’. It would be very beneficial if you show me how to create uf2 for ‘Raspberry Pi Pico 2’ very soon.
I have not played with the RP2350 yet. From what I can tell, you need to pass `-DPICO_PLATFORM=rp2350` to CMake to set the RP2350 as the target:
cmake -G "MinGW Makefiles" -DPICO_PLATFORM=rp2350 ..
See here for more info: https://github.com/raspberrypi/pico-examples?tab=readme-ov-file#rp2350-instructions
add this for #include “pico/stdlib.h” error
${env:PICO_SDK_PATH}/**
I followed all instructions at the end when tried to build using Git bash inside VS terminal, it throws this error. Please help
$ cmake -G “MinGW Makefiles” ..
CMake Error: Could not create named generator MinGW Makefiles
Hi Ben,
This seems to be a known issue with VS Code. I recommend using the Git Bash terminal outside of VS Code or setting:
"cmake.cmakePath": "C:\\Program Files\\CMake\\bin\\cmake.exe"in settings.json to see if that helps. Please see this post for more troubleshooting help: https://github.com/microsoft/vscode-cmake-tools/issues/2506
Thankyou so much for clear explaniation
This is all well and good but seems to only work from VSCode terminal.
This setup does not appear to be compatible with the CMake VSCode extension, not to mention being compatible with the PICO extension, which has its own set of problems.
Even from terminal, trying to compile a project with Mongoose generates error that uint8_t does not name a type, seems to be within the SDK
It suggested adding #include but not sure where. Shouldn’t really have to if it is part of the SDK.
As for the Blink example, I’m not seeing build contain any of the pico_w examples, in particular the Blink specifically for the pico_w
engrm@MuhammadTayyab MINGW64 /c/VSARM/sdk/pico/pico-examples/build (master)
$ cmake -G “MinGW Makefiles” .. -DPICO_SDK_PATH=C:/VSARM/sdk/pico/pico-sdk
PICO_SDK_PATH is C:/VSARM/sdk/pico/pico-sdk
Defaulting platform (PICO_PLATFORM) to ‘rp2040’ since not specified.
Defaulting target board (PICO_BOARD) to ‘pico’ since not specified.
Using board configuration from C:/VSARM/sdk/pico/pico-sdk/src/boards/include/boards/pico.h
Pico Platform (PICO_PLATFORM) is ‘rp2040’.
— Defaulting build type to ‘Release’ since not specified.
Defaulting compiler (PICO_COMPILER) to ‘pico_arm_cortex_m0plus_gcc’ since not specified.
Configuring toolchain based on PICO_COMPILER ‘pico_arm_cortex_m0plus_gcc’
Defaulting PICO_GCC_TRIPLE to ‘arm-none-eabi’
— The C compiler identification is GNU 14.3.1
— The CXX compiler identification is GNU 14.3.1
— The ASM compiler identification is GNU
— Found assembler: C:/VSARM/armcc/14.3 rel1/bin/arm-none-eabi-gcc.exe
— Detecting C compiler ABI info
— Detecting C compiler ABI info – done
— Check for working C compiler: C:/VSARM/armcc/14.3 rel1/bin/arm-none-eabi-gcc.exe – skipped
— Detecting C compile features
— Detecting C compile features – done
— Detecting CXX compiler ABI info
— Detecting CXX compiler ABI info – done
— Check for working CXX compiler: C:/VSARM/armcc/14.3 rel1/bin/arm-none-eabi-g++.exe – skipped
— Detecting CXX compile features
— Detecting CXX compile features – done
Build type is Release
— Found Python3: C:/Users/engrm/AppData/Local/Programs/Python/Python313/python.exe (found version “3.13.7”) found components: Interpreter
TinyUSB available at C:/VSARM/sdk/pico/pico-sdk/lib/tinyusb/hw/bsp/rp2040; enabling build support for USB.
BTstack available at C:/VSARM/sdk/pico/pico-sdk/lib/btstack
cyw43-driver available at C:/VSARM/sdk/pico/pico-sdk/lib/cyw43-driver
mbedtls available at C:/VSARM/sdk/pico/pico-sdk/lib/mbedtls
lwIP available at C:/VSARM/sdk/pico/pico-sdk/lib/lwip
CMake Error at C:/VSARM/sdk/pico/pico-sdk/tools/CMakeLists.txt:155 (message):
Incompatible picotool installation found: Requires version 2.1.1, you have
version unknown
Update your installation, or set PICOTOOL_FORCE_FETCH_FROM_GIT to download
and build the correct version
Call Stack (most recent call first):
C:/VSARM/sdk/pico/pico-sdk/tools/CMakeLists.txt:688 (pico_init_picotool)
C:/VSARM/sdk/pico/pico-sdk/src/cmake/on_device.cmake:81 (picotool_postprocess_binary)
blink/CMakeLists.txt:13 (pico_add_extra_outputs)
— Configuring incomplete, errors occurred!
“””””””””””””””””””””””””””””””””””””””””””””””””””””””””””””””””””””””””””””””””””””””””””””””””””””””””””””””””””””””””””””””””
itry to build this but get the following eorros multiple times. what i have to do now.
To run cmake and make in Git Bash, without getting the “mingw32-make[2]: *** [CMakeFiles\blink.dir\build.make:1341: blink.elf] Error -1073741819″ error, do the following path export before running cmake and make:
export PATH=”/c/VSARM/mingw/mingw64/bin:$PATH”
I tried it and it works. (Google Gemini)
Correction: export PATH=”/c/VSARM/mingw/mingw64/bin:/c/VSARM/arm-gcc/bin:$PATH”
To set up the Raspberry Pi Pico C/C++ toolchain on Windows with VS Code, start by installing the required tools like CMake, Git, and the ARM GCC compiler. Then clone the Pico SDK and configure your environment variables accordingly. After that, install the C/C++ and CMake extensions in VS Code and point them to your toolchain and SDK paths. This guide https://www.cleveroad.com/services/cross-platform-app-development-services/ can also give you a broader idea of development environments and workflows. Finally, create a simple project using the Pico examples, build it with CMake, and flash it onto your board to verify everything works correctly.