One of the biggest selling points of the ESP32 is its integrated Wi-Fi hardware and software stack. In this tutorial, you’ll learn how to create a robust Wi-Fi driver using ESP-IDF that connects to your local network. While this is a simplified example that doesn’t cover advanced features like provisioning or credential storage, the concepts and building blocks demonstrated here can be extended to implement those features.
You can watch a video version of this guide here:
Note: This tutorial requires physical hardware. The Wi-Fi libraries require an actual ESP32 board (QEMU emulation won’t work for this example). However, ESP-IDF does support the OpenCores Ethernet MAC driver for providing a virtual Ethernet connection in QEMU, which can be useful for developing and debugging IoT applications (something we will use in future tutorials).
Table of Contents
Hardware Connections
If you would like to use real hardware for this guide, you will need:
No other hardware is required, as we’ll just be making a barebones WiFi driver that connects to a local access point.
WiFi Station Library
We will start by writing the WiFi library in a separate “components” directory in our workspace. Later, we will create a demo application to use this library to connect to a WiFi access point and print out the connection details.
Here are some ESP-IDF references I recommend using while working on the WiFi driver:
Note that I will not list all of the code for this library (due to the volume of code). Instead, I will discuss the important parts with snippets throughout the tutorial. You can find the full library here: https://github.com/ShawnHymel/course-iot-with-esp-idf/tree/main/workspace/components/wifi_sta.
workspace/components/
└── wifi_sta/
    ├── CMakeLists.txt
    ├── Kconfig
    ├── include/
    │   └── wifi_sta.h
    └── wifi_sta.c
In ESP-IDF, custom drivers are organized as components. Each component is self-contained with its own build configuration, dependencies, and public interface. The wifi_sta component follows ESP-IDF’s standard structure: a CMakeLists.txt file defines how the component builds and what it depends on, a Kconfig file provides menu-driven configuration options that appear in idf.py menuconfig, an include/ directory contains the public header file that applications will use, and the .c source file implements the driver functionality.
This modular approach allows the WiFi driver to be reused across multiple projects. The component declares its dependencies (like esp_wifi and esp_netif) in its CMake configuration, making it easy to integrate into any ESP-IDF project by simply adding the components directory path. The Kconfig system enables compile-time configuration, so developers can customize WiFi settings, authentication modes, and IP versions without modifying the source code. These settings are configured through menuconfig and stored locally on the developer’s machine rather than being hardcoded into the repository.
Event Handler Implementation
We will start in wifi_sta/wifi_sta.c. The ESP-IDF WiFi driver uses an event-driven architecture where callbacks are triggered when specific events occur, like connecting to an access point, receiving an IP address, or losing connection. Your driver needs to register event handlers that respond to these WiFi and IP events. The key is setting up two main callback functions: on_wifi_event() for low-level WiFi connection events, and on_ip_event() for DHCP-related events when IP addresses are assigned.
Here’s the basic structure of the WiFi event handler using a switch statement to handle different event types:
static void on_wifi_event(void *arg,
                         esp_event_base_t event_base,
                         int32_t event_id,
                         void *event_data)
{
    switch(event_id) {
        case WIFI_EVENT_STA_START:
            if (s_wifi_netif != NULL) {
                wifi_start(s_wifi_netif, event_base, event_id, event_data);
            }
            break;

        case WIFI_EVENT_STA_CONNECTED:
            // Handle connection - register callbacks, start DHCP
            wifi_event_sta_connected_t *event_sta_connected =
                (wifi_event_sta_connected_t *)event_data;
            ESP_LOGI(TAG, "Connected to AP: %s", event_sta_connected->ssid);

            // Register interface receive callback
            wifi_netif_driver_t driver = esp_netif_get_io_driver(s_wifi_netif);
            esp_wifi_register_if_rxcb(driver, esp_netif_receive, s_wifi_netif);

            // Start DHCP process
            esp_netif_action_connected(s_wifi_netif, event_base, event_id, event_data);
            xEventGroupSetBits(s_wifi_event_group, WIFI_STA_CONNECTED_BIT);
            break;

        case WIFI_EVENT_STA_DISCONNECTED:
            esp_netif_action_disconnected(s_wifi_netif, event_base, event_id, event_data);
            xEventGroupClearBits(s_wifi_event_group, WIFI_STA_CONNECTED_BIT);
            break;
    }
}
The IP event handler works similarly but focuses on DHCP events. When an IPv4 or IPv6 address is obtained, you notify the WiFi driver, set event group bits to signal the application, and log the address information:
static void on_ip_event(void *arg,
                        esp_event_base_t event_base,
                        int32_t event_id,
                        void *event_data)
{
    switch(event_id) {
        case IP_EVENT_STA_GOT_IP:
            esp_wifi_internal_set_sta_ip();
            xEventGroupSetBits(s_wifi_event_group, WIFI_STA_IPV4_OBTAINED_BIT);

            ip_event_got_ip_t *event_ip = (ip_event_got_ip_t *)event_data;
            ESP_LOGI(TAG, "IP address: " IPSTR, IP2STR(&event_ip->ip_info.ip));
            break;

        case IP_EVENT_STA_LOST_IP:
            xEventGroupClearBits(s_wifi_event_group, WIFI_STA_IPV4_OBTAINED_BIT);
            break;
    }
}
The event group bits (WIFI_STA_CONNECTED_BIT, WIFI_STA_IPV4_OBTAINED_BIT) act as flags that allow your application to monitor the connection state in a thread-safe way. Applications can wait for specific bits to be set before proceeding, ensuring the WiFi connection is fully established before attempting network communication.
WiFi Initialization & Configuration
The wifi_sta_init() function serves as the entry point for your driver, handling all the setup steps outlined in the ESP-IDF documentation. This function is non-blocking: it starts the WiFi connection process and returns immediately, allowing your application to continue running while the connection establishes in the background. The application monitors connection status using event group bits that get set by the event handlers.
The initialization process follows a specific sequence. First, create the network interface and WiFi driver, then connect them together:
esp_err_t wifi_sta_init(EventGroupHandle_t event_group)
{
    esp_err_t esp_ret;

    // Save the event group handle
    if (event_group != NULL) {
        s_wifi_event_group = event_group;
    }

    // (s1.3) Create default WiFi network interface
    esp_netif_config_t netif_cfg = ESP_NETIF_DEFAULT_WIFI_STA();
    s_wifi_netif = esp_netif_new(&netif_cfg);

    // (s1.3) Create WiFi driver and attach to network interface
    s_wifi_driver = esp_wifi_create_if_driver(WIFI_IF_STA);
    esp_ret = esp_netif_attach(s_wifi_netif, s_wifi_driver);
Next, register all the event handlers for WiFi and IP events. These handlers connect your callback functions to the default event loop that was created in your application’s app_main():
    // Register WiFi events
    esp_event_handler_register(WIFI_EVENT, WIFI_EVENT_STA_START,
                              &on_wifi_event, NULL);
    esp_event_handler_register(WIFI_EVENT, WIFI_EVENT_STA_CONNECTED,
                              &on_wifi_event, NULL);
    esp_event_handler_register(WIFI_EVENT, WIFI_EVENT_STA_DISCONNECTED,
                              &on_wifi_event, NULL);

    // Register IP events (with conditional compilation)
    #if CONFIG_WIFI_STA_CONNECT_IPV4 || CONFIG_WIFI_STA_CONNECT_UNSPECIFIED
    esp_event_handler_register(IP_EVENT, IP_EVENT_STA_GOT_IP,
                              &on_ip_event, NULL);
    #endif
Finally, configure the WiFi connection parameters using values from Kconfig, initialize the driver, and start it. Notice how the SSID and password come from CONFIG_WIFI_STA_SSID and CONFIG_WIFI_STA_PASSWORD. These are configured through menuconfig and never get hardcoded into your source files:
    // Initialize WiFi driver
    wifi_init_config_t cfg = WIFI_INIT_CONFIG_DEFAULT();
    esp_wifi_init(&cfg);

    // Set mode to station
    esp_wifi_set_mode(WIFI_MODE_STA);

    // Configure connection with Kconfig values
    wifi_config_t wifi_config = {
        .sta = {
            .ssid = CONFIG_WIFI_STA_SSID,
            .password = CONFIG_WIFI_STA_PASSWORD,
            .threshold.authmode = auth_mode,
            .sae_pwe_h2e = sae_pwe_method,
        },
    };
    esp_wifi_set_config(WIFI_IF_STA, &wifi_config);

    // Start WiFi - this triggers WIFI_EVENT_STA_START
    esp_wifi_start();

    return ESP_OK;
}
The wifi_sta_stop() function reverses this entire process—unregistering events, disconnecting from WiFi, stopping and deinitializing the driver, and destroying the network interface. The wifi_sta_reconnect() function simply calls stop followed by init as a brute-force reconnection method. While not the most efficient approach (a better method would save connection details for faster reconnects), this simplified approach makes it easier to understand the building blocks.
Kconfig Setup
Kconfig (see this previous tutorial for a refresher on Kconfig in ESP-IDF) provides a menu-driven configuration system that lets developers customize the WiFi driver at compile time without modifying source code. The configuration options appear in idf.py menuconfig under “Component config > WiFi STA Configuration”. This keeps sensitive information like SSIDs and passwords out of your Git repository, as they are stored locally on each developer’s machine and baked into the firmware during the build process.
The wifi_sta/Kconfig file defines a hierarchical menu structure. At the top level, you enable the WiFi driver, and when enabled, it reveals additional configuration options:
menu "WiFi STA Configuration"

    config WIFI_STA_CONNECT
        bool "Connect using WiFi"
        default n
        help
            Enables the WiFi driver to connect to your local network.

    if WIFI_STA_CONNECT
        choice WIFI_STA_IP_TYPE
            prompt "Internet Protocol (IP) version"
            default WIFI_STA_CONNECT_IPV4

            config WIFI_STA_CONNECT_IPV4
                bool "IPv4"
                select LWIP_IPV4

            config WIFI_STA_CONNECT_IPV6
                bool "IPv6"
                select LWIP_IPV6

            config WIFI_STA_CONNECT_UNSPECIFIED
                bool "Either IPv4 or IPv6"
                select LWIP_IPV4
                select LWIP_IPV6
        endchoice
Notice the select statements: these automatically enable the necessary LWIP (lightweight IP) stack components based on your IP version choice. This cascading configuration ensures all dependencies are properly set up. The authentication mode and credentials are configured as strings and choices:
        choice WIFI_STA_AUTH_MODE
            prompt "Minimum WiFi authentication mode"
            default WIFI_STA_AUTH_WPA2_PSK

            config WIFI_STA_AUTH_WPA2_PSK
                bool "WPA2 PSK"
            config WIFI_STA_AUTH_WPA3_PSK
                bool "WPA3 PSK"
            config WIFI_STA_AUTH_WPA2_WPA3_PSK
                bool "WPA2/WPA3 PSK"
        endchoice

        config WIFI_STA_SSID
            string "WiFi SSID"
            default "myssid"
            help
                Network name (SSID) to connect to.

        config WIFI_STA_PASSWORD
            string "WiFi password"
            default "mypassword"
These Kconfig symbols translate to preprocessor macros (like CONFIG_WIFI_STA_SSID) that you use in your C code. The conditional compilation with #if CONFIG_WIFI_STA_CONNECT_IPV4 ensures only the necessary code for your chosen IP version gets compiled into the final binary. For WPA3, additional options let you configure SAE (Simultaneous Authentication of Equals) modes, such as choosing between Hunt and Peck, Hash-to-Element (H2E), or both methods depending on your router’s capabilities.
Supporting Files
Fill out the rest of the files that support the driver:
Demo Application
Now let’s build a simple demo application that uses the WiFi driver component. You can find the code for this part here: https://github.com/ShawnHymel/course-iot-with-esp-idf/tree/main/workspace/apps/wifi_demo
The application structure mirrors the component layout but lives in a separate apps directory:
workspace/apps/
└── wifi_demo/
    ├── CMakeLists.txt
    └── main/
        ├── CMakeLists.txt
        └── main.c
Initializing the System
We will focus on wifi_demo/main/main.c for our discussion.
Before initializing the WiFi driver, your application must perform three critical one-time setup steps: initialize the non-volatile storage (NVS) that the WiFi driver uses internally, initialize the TCP/IP network interface, and create the default event loop. These must be called only once in your entire application:
void app_main(void)
{
    esp_err_t esp_ret;
    EventGroupHandle_t network_event_group;
    EventBits_t network_event_bits;

    // Create event group for monitoring connection status
    network_event_group = xEventGroupCreate();

    // Initialize NVS: ESP32 WiFi driver uses NVS to store WiFi settings
    esp_ret = nvs_flash_init();
    if (esp_ret == ESP_ERR_NVS_NO_FREE_PAGES ||
        esp_ret == ESP_ERR_NVS_NEW_VERSION_FOUND) {
        ESP_ERROR_CHECK(nvs_flash_erase());
        esp_ret = nvs_flash_init();
    }

    // Initialize TCP/IP network interface (call once)
    esp_netif_init();

    // Create default event loop (call once)
    esp_event_loop_create_default();

    // Initialize WiFi driver
    esp_ret = wifi_sta_init(network_event_group);
Waiting for Connection
After calling wifi_sta_init(), the application needs to wait for the connection to complete and for an IP address to be assigned. FreeRTOS’s xEventGroupWaitBits() function allows you to block until specific event bits are set, with a timeout:
    // Wait for connection to access point (10 second timeout)
    network_event_bits = xEventGroupWaitBits(network_event_group,
                                             WIFI_STA_CONNECTED_BIT,
                                             pdFALSE,  // Don't clear on exit
                                             pdTRUE,   // Wait for all bits
                                             pdMS_TO_TICKS(10000));
    if (network_event_bits & WIFI_STA_CONNECTED_BIT) {
        ESP_LOGI(TAG, "Connected to WiFi network");
    }

    // Wait for IP address (IPv4 or IPv6)
    network_event_bits = xEventGroupWaitBits(network_event_group,
                                             WIFI_STA_IPV4_OBTAINED_BIT |
                                                WIFI_STA_IPV6_OBTAINED_BIT,
                                             pdFALSE,
                                             pdFALSE,  // Wait for ANY bit
                                             pdMS_TO_TICKS(10000));
    if (network_event_bits & WIFI_STA_IPV4_OBTAINED_BIT) {
        ESP_LOGI(TAG, "Connected to IPv4 network");
    }
Once connected with an IP address, your application can use the WiFi connection. The demo simply runs a loop that periodically checks the connection status, but in a real application, this is where you’d make HTTP requests, connect to MQTT brokers, or perform other network operations.
CMakeLists.txt Files
The CMakeLists.txt next to main.c uses the common boilerplate to simply include the main.c file:
idf_component_register(
    SRCS "main.c"
    INCLUDE_DIRS ""
)
The application’s CMakeLists.txt needs to reference the custom component directory so the build system can find your WiFi driver:
cmake_minimum_required(VERSION 3.16)

include($ENV{IDF_PATH}/tools/cmake/project.cmake)
list(APPEND EXTRA_COMPONENT_DIRS ../../components)

project(app)
Building and Flashing
Before building, you need to configure your WiFi settings through the menu system. Navigate to your project directory and set your ESP32 target, then open menuconfig:
cd workspace/apps/wifi_demo
idf.py set-target esp32s3
idf.py menuconfig
In menuconfig, navigate to “Component config” and scroll to the bottom to find “WiFi STA Configuration”. Enable “Connect using WiFi”, then configure your settings:
- IP version: Choose IPv4, IPv6, or Unspecified (most networks use IPv4)
- Authentication mode: Select your network’s security (typically WPA2 PSK)
- SSID: Enter your WiFi network name
- Password: Enter your WiFi password
- WPA3 options: Configure only if using WPA3
- Auto-reconnect: Leave disabled for this demo
Press ‘q’ to exit and ‘y’ to save. Build the project:
idf.py buildOn your host computer, flash the application binary to your ESP32 board (replace <SERIAL_PORT> with your actual serial port and adjust the binary paths as needed):
python -m esptool.py --port "<SERIAL_PORT>" --chip auto --baud 921600 \
--before default_reset --after hard_reset write_flash \
--flash_mode dio --flash_freq 40m --flash_size auto \
0x0 build/bootloader/bootloader.bin \
0x8000 build/partition_table/partition-table.bin \
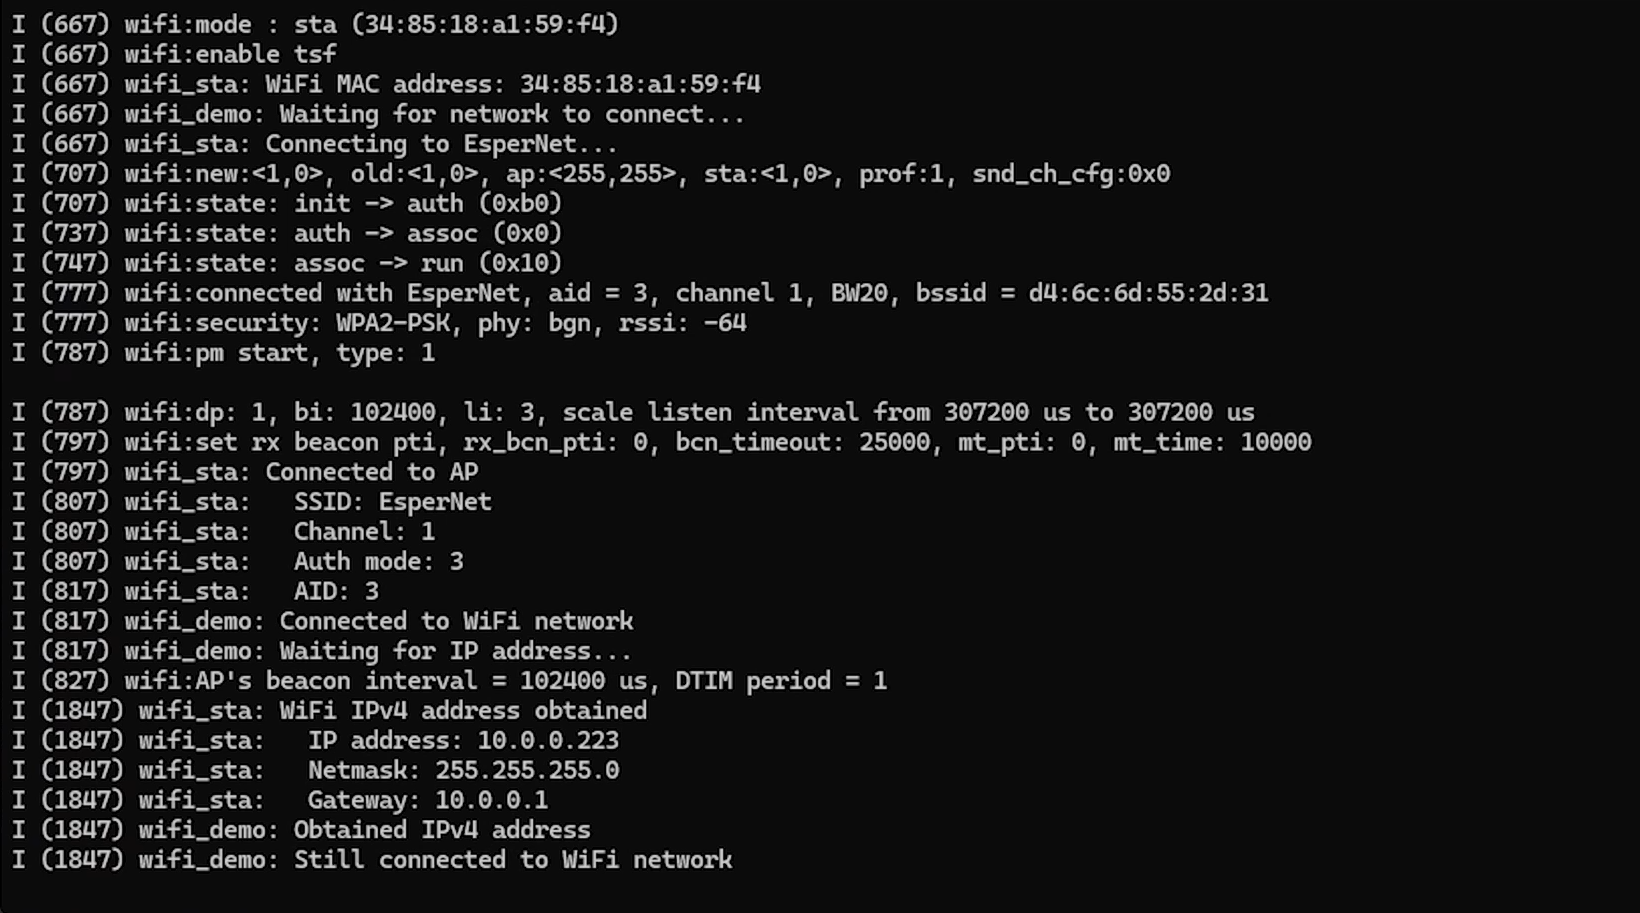
0x10000 build/your_app_name.binOpen a serial monitor to view the connection details:
python -m serial.tools.miniterm "<SERIAL_PORT>" 115200You should see output showing the initialization sequence, connection to your access point, and the assigned IP address.
Going Further
With a working WiFi driver, you’re ready to build IoT applications that communicate over the network. This foundation enables HTTP REST API calls, MQTT publish/subscribe messaging, and secure communications using TLS. The modular component structure means you can reuse this driver across multiple projects, simply adjusting the Kconfig settings for each deployment environment.
If you would like to go further, check out my IoT Firmware Development with ESP32 and ESP-IDF course. In the course, we cover the basics of ESP-IDF, reading from sensors, connecting to the internet via WiFi, posting data via HTTP REST calls, securing connections with TLS, and interacting with MQTT brokers.
