Previously, we looked at how to write a simple WiFi driver for the ESP32 using ESP-IDF. Now, we’ll dive into using that WiFi connection (or virtual Ethernet, if you use QEMU) to make simple HTTP GET requests with low-level BSD sockets. We’ll walk through the fundamentals of HTTP communication, including how to structure requests and parse responses, before diving into socket programming to establish network connections.
We’ll build a complete demo application that connects to WiFi, performs DNS lookups, creates and configures sockets, sends HTTP requests, and processes server responses. These are essential skills for building IoT devices that communicate with web servers and REST APIs. By the end, you’ll have a working demo that fetches a webpage from example.com and displays it in your terminal. This will provide you with a great starting point for building IoT devices.
You can watch a video version of this guide here:
Note: the code used in this tutorial can be found here: https://github.com/ShawnHymel/course-iot-with-esp-idf/tree/main/workspace/apps/http_request
Required Hardware
You will only need an ESP32 board for this demo. I’ve been using the ESP32-S3-DevKitC throughout the series, but other boards should work. Just note that you will likely need to change the target chip when compiling the program.
If you do not have an ESP32 board, you can also try the demo using QEMU! We’ll demonstrate how to do that in the tutorial.
Understanding Sockets
A socket is a software endpoint that allows two programs to communicate over a network. Think of it like a telephone connection: one program “dials” another, and once connected, they can exchange information back and forth. The BSD (Berkeley Software Distribution) socket API is a standard set of functions originally developed for Unix systems that has become the de facto standard for network programming across most operating systems, including embedded systems like the ESP32. When you create a socket, you specify whether you want to use TCP (Transmission Control Protocol) for reliable, ordered data transfer, or UDP (User Datagram Protocol) for faster but less reliable communication.
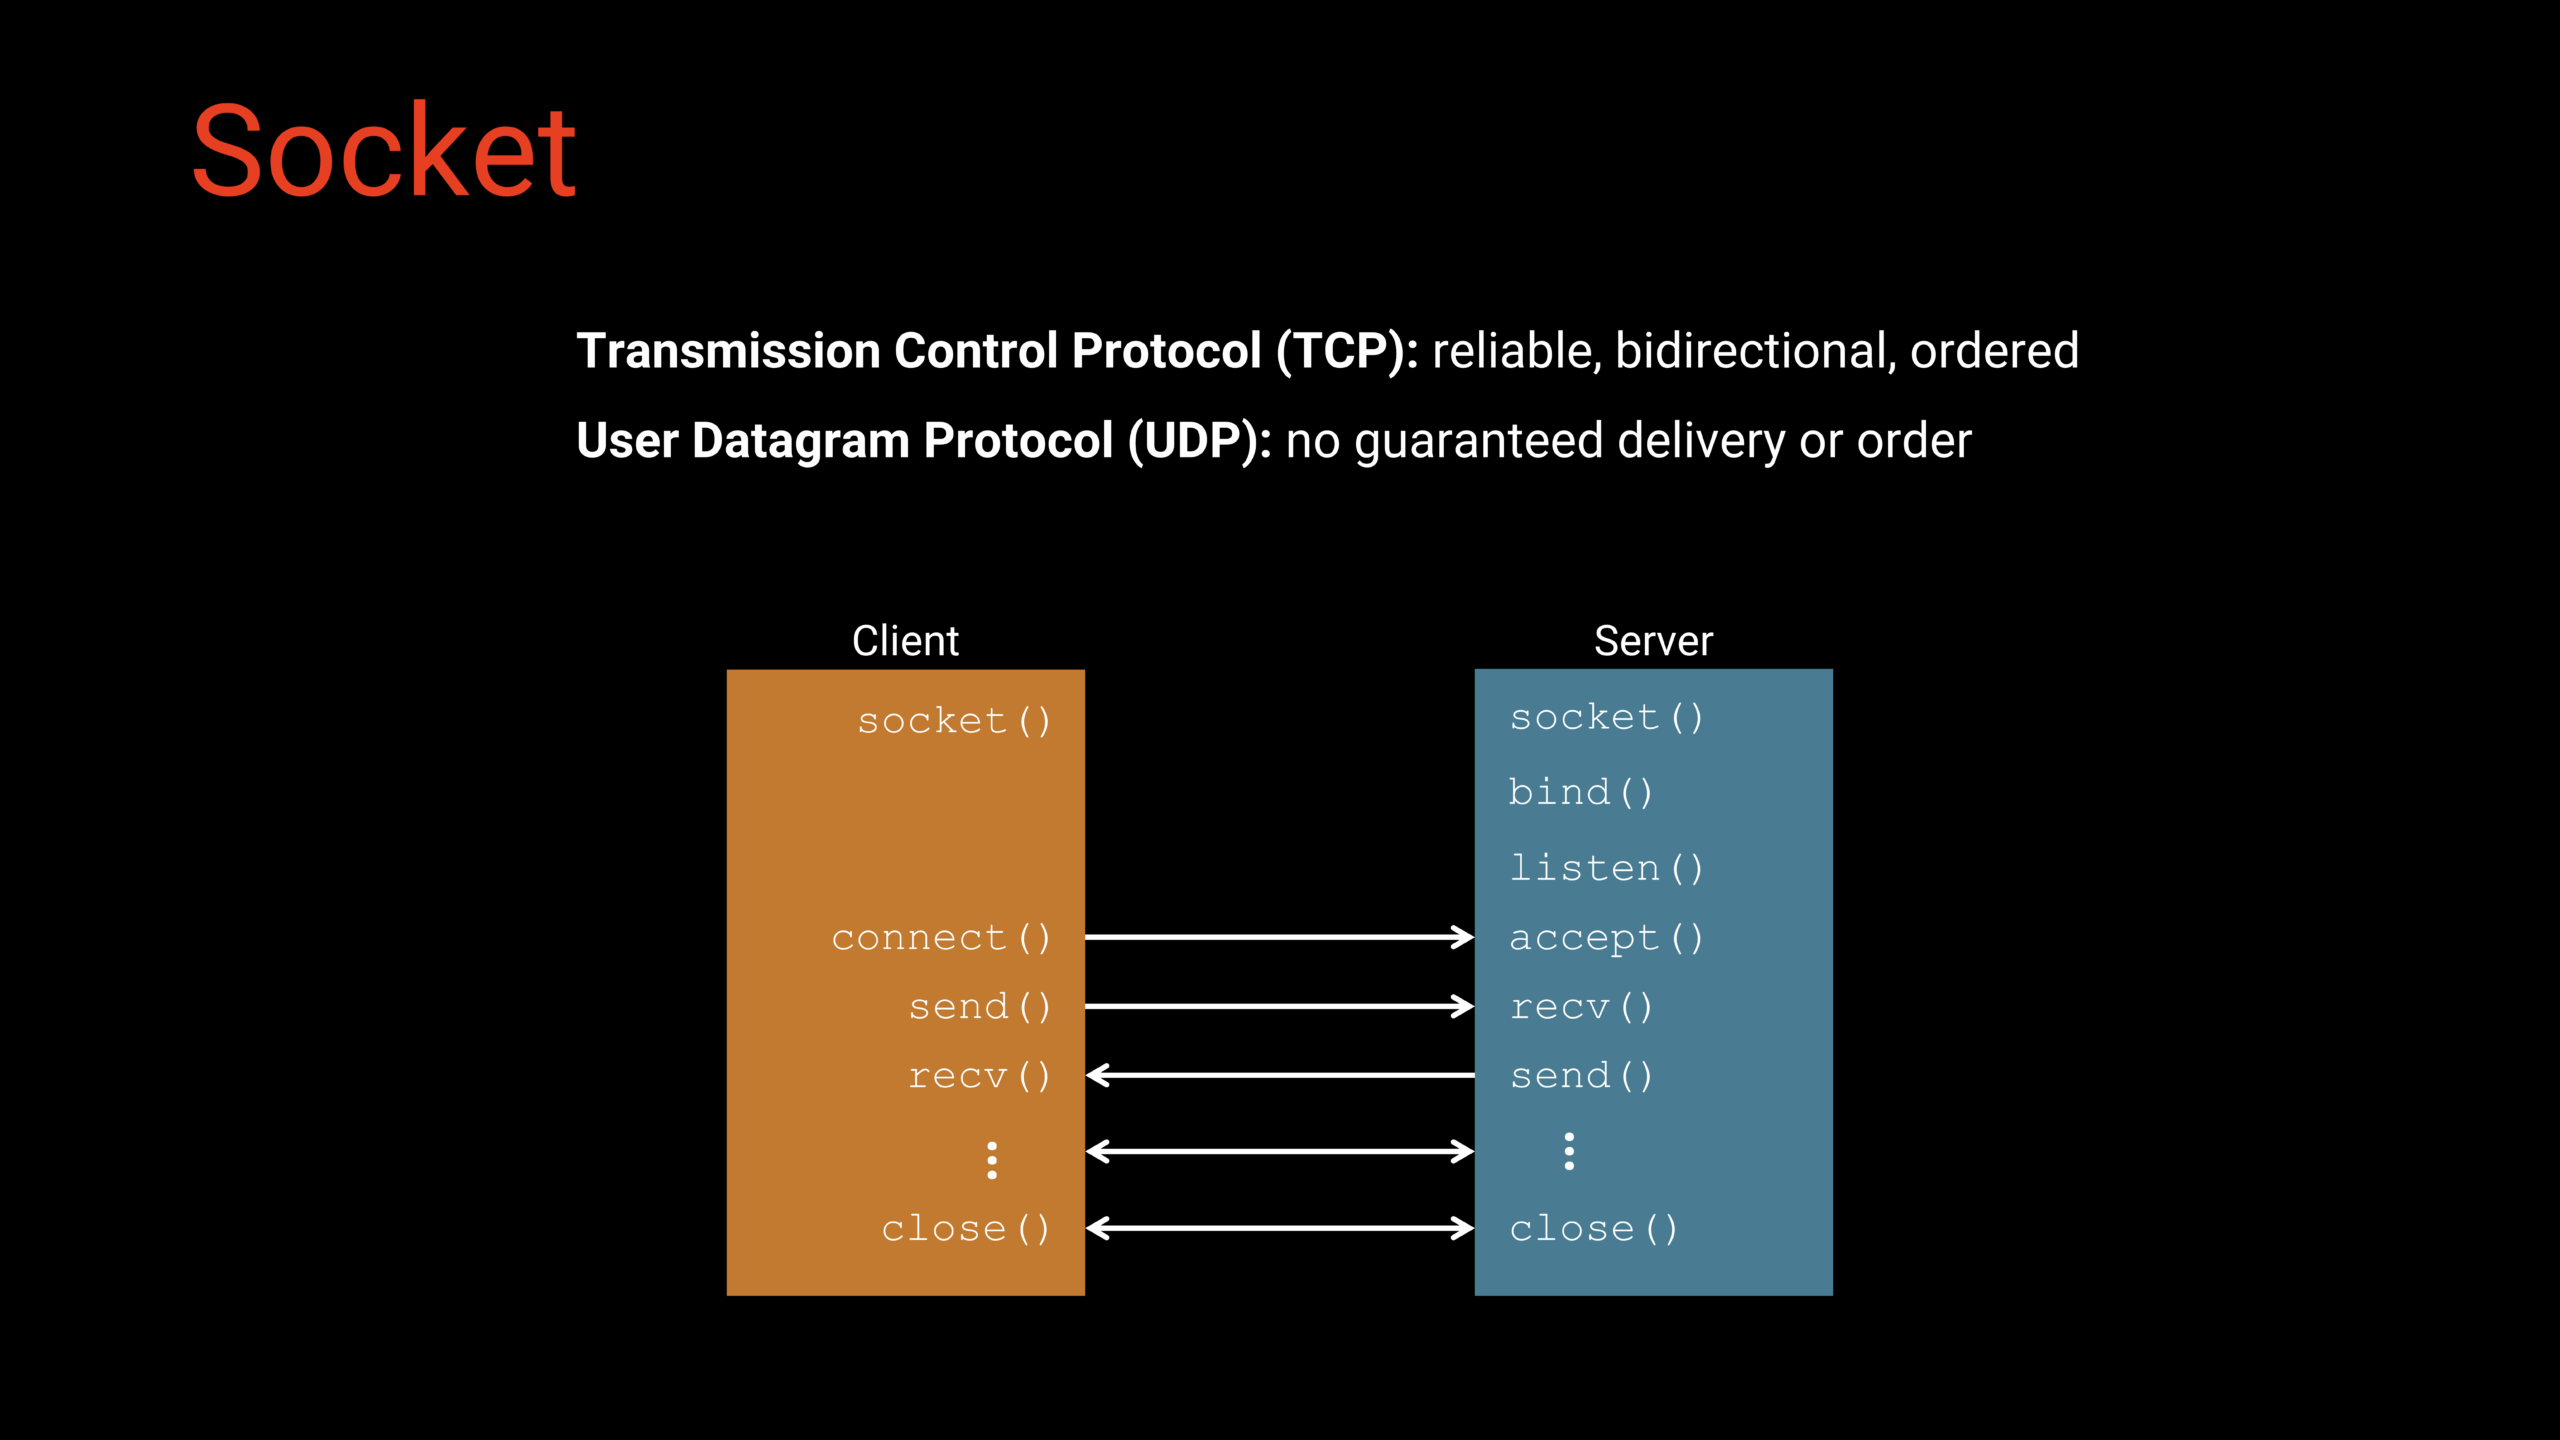
The basic pattern for socket communication follows a predictable sequence. On the server side, you create a socket, bind it to a specific port on your computer, and set it to listen for incoming connections. On the client side (which is what we’ll be building), you create a socket and then call connect() to establish a connection to the server’s address and port. Once connected, both sides can use send() and recv() functions to exchange data bidirectionally. When communication is complete, either side calls close() to terminate the connection and free up resources. For our HTTP GET request demo, the ESP32 will act as the client, connecting to a web server, sending an HTTP request, receiving the response, and then closing the connection.
Application
In this project, we’ll build an application that connects your ESP32 to a WiFi network, performs a DNS lookup to find the IP address of example.com, establishes a socket connection to the server, sends an HTTP GET request, and prints the HTML response to the serial terminal. The application will repeat this process every 5 seconds, demonstrating a complete cycle of network communication. We’ll use a network wrapper component to make it easy to switch between physical WiFi hardware and the QEMU emulator for testing.
To start, you’ll want to make the following directory structure in apps/:
apps/http_request/
├── CMakeLists.txt
└── main/
    ├── CMakeLists.txt
    └── main.c
We’ll create three files: a top-level CMakeLists.txt to configure the build system, a main/CMakeLists.txt to register our source files, and main.c which contains all of our application code.
CMakeLists.txt
The top-level CMakeLists.txt configures the entire project build system by setting the minimum CMake version, including ESP-IDF’s build scripts, and defining the project name. It also adds our custom components directory (where the network wrapper lives) to the build path so ESP-IDF knows where to find those additional libraries we’ll be using.
# Set the minimum required version of CMake for a project
cmake_minimum_required(VERSION 3.16)

# Include ESP-IDF build system
include($ENV{IDF_PATH}/tools/cmake/project.cmake)

# Add external components to the project
list(APPEND EXTRA_COMPONENT_DIRS ../../components)

# Set the project name
project(app)
main/CMakeLists.txt
The main/CMakeLists.txt file tells ESP-IDF where to find your source code and any header files for this component. For our simple project, we only need to register main.c as our source file with no additional include directories.
idf_component_register(
    SRCS "main.c"
    INCLUDE_DIRS ""
)
main/main.c
In main/main.c, we write our application code:
/**
 * SPDX-FileCopyrightText: 2025 Shawn Hymel
 * SPDX-License-Identifier: Apache-2.0
 */

#include <string.h>
#include "esp_event.h"
#include "esp_log.h"
#include "esp_netif.h"
#include "freertos/FreeRTOS.h"
#include "freertos/task.h"
#include "nvs_flash.h"
#include "lwip/netdb.h"

#include "network_wrapper.h"

// Settings
static const uint32_t sleep_time_ms = 5000;

// Server settings and URL to fetch
#define WEB_HOST "example.com"
#define WEB_PORT "80"
#define WEB_PATH "/"

// HTTP GET request
static const char *REQUEST = "GET " WEB_PATH " HTTP/1.0\r\n"
    "Host: "WEB_HOST":"WEB_PORT"\r\n"
    "User-Agent: esp-idf/1.0 esp32\r\n"
    "\r\n";

// Set timeouts
#define SOCKET_TIMEOUT_SEC      5   // Set socket timeout in seconds
#define RX_BUF_SIZE             64  // Set receive buffer size (bytes)
#define CONNECTION_TIMEOUT_SEC  10  // Set delay to wait for connection (sec)

// Tag for debug messages
static const char *TAG = "http_request";

// Main app entrypoint
void app_main(void)
{
    esp_err_t esp_ret;
    int ret;
    struct addrinfo *dns_res;
    int sock;
    char recv_buf[RX_BUF_SIZE];
    uint32_t recv_total;
    ssize_t recv_len;
    EventGroupHandle_t network_event_group;
    EventBits_t network_event_bits;

    // Hints for DNS lookup
    struct addrinfo hints = {
        .ai_family = WEB_FAMILY,
        .ai_socktype = SOCK_STREAM
    };

    // Socket timeout
    struct timeval sock_timeout = {
        .tv_sec = SOCKET_TIMEOUT_SEC,
        .tv_usec = 0
    };

    // Welcome message (after delay to allow serial connection)
    ESP_LOGI(TAG, "Starting HTTP GET request demo");

    // Initialize event group
    network_event_group = xEventGroupCreate();

    // Initialize NVS: ESP32 WiFi driver uses NVS to store WiFi settings
    // Erase NVS partition if it's out of free space or new version
    esp_ret = nvs_flash_init();
    if (esp_ret == ESP_ERR_NVS_NO_FREE_PAGES ||
        esp_ret == ESP_ERR_NVS_NEW_VERSION_FOUND) {
      ESP_ERROR_CHECK(nvs_flash_erase());
      esp_ret = nvs_flash_init();
    }
    ESP_ERROR_CHECK(esp_ret);

    // Initialize TCP/IP network interface (only call once in application)
    // Must be called prior to initializing the network driver!
    esp_ret = esp_netif_init();
    ESP_ERROR_CHECK(esp_ret);

    // Create default event loop that runs in the background
    // Must be running prior to initializing the network driver!
    esp_ret = esp_event_loop_create_default();
    ESP_ERROR_CHECK(esp_ret);

    // Initialize network connection
    esp_ret = network_init(network_event_group);
    ESP_ERROR_CHECK(esp_ret);

    // Do forever: perform HTTP GET request
    while (1) {

        // Make sure we have a connection and IP address
        network_event_bits = xEventGroupGetBits(network_event_group);
        if (!(network_event_bits & NETWORK_CONNECTED_BIT) ||
            !((network_event_bits & NETWORK_IPV4_OBTAINED_BIT) ||
            (network_event_bits & NETWORK_IPV6_OBTAINED_BIT))) {
            ESP_LOGI(TAG, "Network connection not established yet.");
            if (!wait_for_network(network_event_group,
                                  CONNECTION_TIMEOUT_SEC)) {
                ESP_LOGE(TAG, "Failed to connect to WiFi. Reconnecting...");
                esp_ret = network_reconnect();
                if (esp_ret != ESP_OK) {
                    ESP_LOGE(TAG, "Failed to reconnect WiFi (%d)", esp_ret);
                    abort();
                }
                continue;
            }
        }

        // Perform DNS lookup
        ret = getaddrinfo(WEB_HOST, WEB_PORT, &hints, &dns_res);
        if (ret != 0 || dns_res== NULL) {
            ESP_LOGE(TAG, "DNS lookup failed (%d)", ret);
            vTaskDelay(1000 / portTICK_PERIOD_MS);
            continue;
        }

        // Print resolved IP addresses (we will just use the first)
        ESP_LOGI(TAG, "DNS lookup succeeded. IP addresses:");
        for (struct addrinfo *addr = dns_res; addr != NULL; addr = addr->ai_next) {
            if (addr->ai_family == AF_INET) {
                struct in_addr *ip = &((struct sockaddr_in *)addr->ai_addr)->sin_addr;
                inet_ntop(AF_INET, ip, recv_buf, INET_ADDRSTRLEN);
                ESP_LOGI(TAG, "  IPv4: %s", recv_buf);
            } else if (addr->ai_family == AF_INET6) {
                struct in6_addr *ip = &((struct sockaddr_in6 *)addr->ai_addr)->sin6_addr;
                inet_ntop(AF_INET6, ip, recv_buf, INET6_ADDRSTRLEN);
                ESP_LOGI(TAG, "  IPv6: %s", recv_buf);
            }
        }

        // Create a socket
        sock = socket(dns_res->ai_family, dns_res->ai_socktype, dns_res->ai_protocol);
        if (sock < 0) {
            ESP_LOGE(TAG, "Failed to create socket (%d): %s", errno, strerror(errno));
            vTaskDelay(1000 / portTICK_PERIOD_MS);
            continue;
        }

        // Set socket send timeout
        ret = setsockopt(sock, SOL_SOCKET, SO_SNDTIMEO, &sock_timeout, sizeof(sock_timeout));
        if (ret < 0) {
            ESP_LOGE(TAG, "Failed to set socket send timeout (%d): %s", errno, strerror(errno));
            close(sock);
            vTaskDelay(1000 / portTICK_PERIOD_MS);
            continue;
        }

        // Set socket receive timeout
        ret = setsockopt(sock, SOL_SOCKET, SO_RCVTIMEO, &sock_timeout, sizeof(sock_timeout));
        if (ret < 0) {
            ESP_LOGE(TAG, "Failed to set socket receive timeout (%d): %s", errno, strerror(errno));
            close(sock);
            vTaskDelay(1000 / portTICK_PERIOD_MS);
            continue;
        }

        // Connect to server
        ret = connect(sock, dns_res->ai_addr, dns_res->ai_addrlen);
        if (ret < 0) {
            ESP_LOGE(TAG, "Failed to connect to server (%d): %s", errno, strerror(errno));
            close(sock);
            vTaskDelay(1000 / portTICK_PERIOD_MS);
            continue;
        }

        // Delete the address info
        freeaddrinfo(dns_res);

        // Send HTTP GET request
        ESP_LOGI(TAG, "Sending HTTP GET request...");
        ret = send(sock, REQUEST, strlen(REQUEST), 0);
        if (ret < 0) {
            ESP_LOGE(TAG, "Failed to send HTTP GET request (%d): %s", errno, strerror(errno));
            close(sock);
            vTaskDelay(1000 / portTICK_PERIOD_MS);
            continue;
        }

        // Print the HTTP response
        ESP_LOGI(TAG, "HTTP response:");
        recv_total = 0;
        while (1) {

            // Receive data from the socket
            recv_len = recv(sock, recv_buf, sizeof(recv_buf) - 1, 0);

            // Check for errors
            if (recv_len < 0) {
                ESP_LOGE(TAG, "Failed to receive data (%d): %s", errno, strerror(errno));
                break;
            }

            // Check for end of data
            if (recv_len == 0) {
                break;
            }

            // Null-terminate the received data and print it
            recv_buf[recv_len] = '\0';
            printf("%s", recv_buf);
            recv_total += (uint32_t)recv_len;
        }

        // Close the socket
        close(sock);

        // Wait before trying again
        vTaskDelay(sleep_time_ms / portTICK_PERIOD_MS);
    }
}
Includes and Configuration
At the top of the file, we include the necessary header files for ESP-IDF functionality—things like esp_event.h for event handling, esp_netif.h for network interfaces, lwip/netdb.h for BSD socket functions, and our custom network_wrapper.h. We then define configuration constants including the server we want to connect to (example.com), the port (80 for HTTP), the path we want to fetch (/), timeout values, and our receive buffer size. The HTTP GET request itself is defined as a formatted string constant that includes the request line, required headers (Host and User-Agent), and the blank line that signals the end of headers.
Network Initialization
Before we can make any network requests, we need to initialize several ESP-IDF subsystems in a specific order. First, we initialize NVS (Non-Volatile Storage) because the WiFi driver uses it to store settings—if initialization fails due to version changes or lack of space, we erase and reinitialize it. Next, we call esp_netif_init() to set up the TCP/IP stack, which must be done only once in your application. Then we create the default event loop with esp_event_loop_create_default(), which runs in the background and allows us to use event-driven programming with callbacks. Finally, we call our network wrapper’s network_init() function, passing in an event group handle that we’ll use to monitor the connection status. These four initialization steps must happen in this order before we can start making network connections.
Main Loop: Checking Network Connection
Inside our infinite while(1) loop, the first thing we do is verify that we have an active network connection and an IP address before attempting any communication. We check the event group bits to ensure both the NETWORK_CONNECTED_BIT is set and that we’ve obtained either an IPv4 or IPv6 address. If we’re not fully connected, we call wait_for_network() with a timeout—if that fails, we attempt to reconnect using network_reconnect() and then continue back to the top of the loop to check again. This pattern ensures we don’t try to communicate before the network is ready.
DNS Lookup
Once we know we’re connected, we perform a DNS lookup to translate the hostname (example.com) into an IP address. We use the getaddrinfo() function from the BSD socket API, passing in the host, port, some hints about what type of address we want (IPv4 or IPv6, stream socket for TCP), and a pointer to a dns_res structure that will be filled with the results. DNS can return multiple IP addresses in a linked list, so we iterate through them and print each one to the console for debugging. In practice, we’ll just use the first address returned to establish our connection.
Creating and Configuring the Socket
With an IP address in hand, we create a socket by calling socket() with the address family (IPv4 or IPv6), socket type (stream for TCP), and protocol from our DNS results. The function returns an integer socket handle that we’ll use for all subsequent operations. We then configure the socket by calling setsockopt() twice: once to set the send timeout and once to set the receive timeout. These timeouts are important because they prevent our application from hanging indefinitely if the server doesn’t respond. If any of these steps fail, we use the global errno variable and strerror() function to print helpful error messages, close the socket, wait a moment, and return to the beginning of the loop to try again.
Connecting to the Server
Now that our socket is created and configured, we establish a connection to the web server by calling connect() with our socket handle, the server address from the DNS lookup, and the address length. This function blocks until the connection is established or times out. Once connected, we’re done with the DNS results, so we call freeaddrinfo() to clean up that memory and prevent leaks (important in embedded systems where memory is limited).
Sending the HTTP GET Request
With an active connection, sending our HTTP request is straightforward: we call send() with the socket handle, our pre-formatted HTTP request string, the length of that string, and flags (set to 0 for our simple case). The send() function returns the number of bytes sent, or a negative number if an error occurred. If successful, the server will process our request and begin sending back a response.
Receiving and Printing the Response
The server’s response arrives as a stream of data that might be larger than our buffer, so we receive it in chunks using a loop. We call recv() with our socket handle, receive buffer, buffer size (minus 1 to leave room for a null terminator), and flags. The function returns the number of bytes received: a positive number means we got data, zero means the server closed the connection and we’re done, and a negative number indicates an error. For each chunk received, we add a null terminator to make it a valid C string, print it to the console with printf(), and keep a running total of bytes received. This streaming approach is memory-efficient and works well even when the response is too large to fit in RAM all at once.
Cleanup and Loop
After we’ve received all the data (or encountered an error), we close the socket with close() to free up system resources and properly terminate the connection. We print the total number of bytes received for debugging purposes, then call vTaskDelay() to wait 5 seconds before starting the entire process again. This delay prevents us from hammering the server with requests and gives you time to observe the output before it scrolls by.
Building and Flashing to Physical Hardware
Configuring the Project
Before we can build the project, we need to configure it for our specific ESP32 variant and set up our WiFi credentials. Open a terminal in the apps/http_request/ directory and run the following commands:
idf.py set-target esp32s3Replace esp32s3 with your specific ESP32 variant (e.g., esp32, esp32c3, esp32s3). This command configures the build system for your target chip.
Next, we need to configure the network settings using menuconfig:
idf.py menuconfigThis opens an interactive configuration menu. Navigate using the arrow keys and follow these steps:
- Scroll down to Component config and press Enter
- Scroll all the way to the bottom where you’ll see custom library options
- Find WiFi Station Configuration and press Space to enable it
- Press Enter to configure the WiFi settings:
- Set your IP version (IPv4 or IPv6, depending on your network)
- Set the minimum security to match your network (e.g., WPA2)
- Enter your SSID (WiFi network name)
- Enter your password
- Press Escape to go back to the previous menu
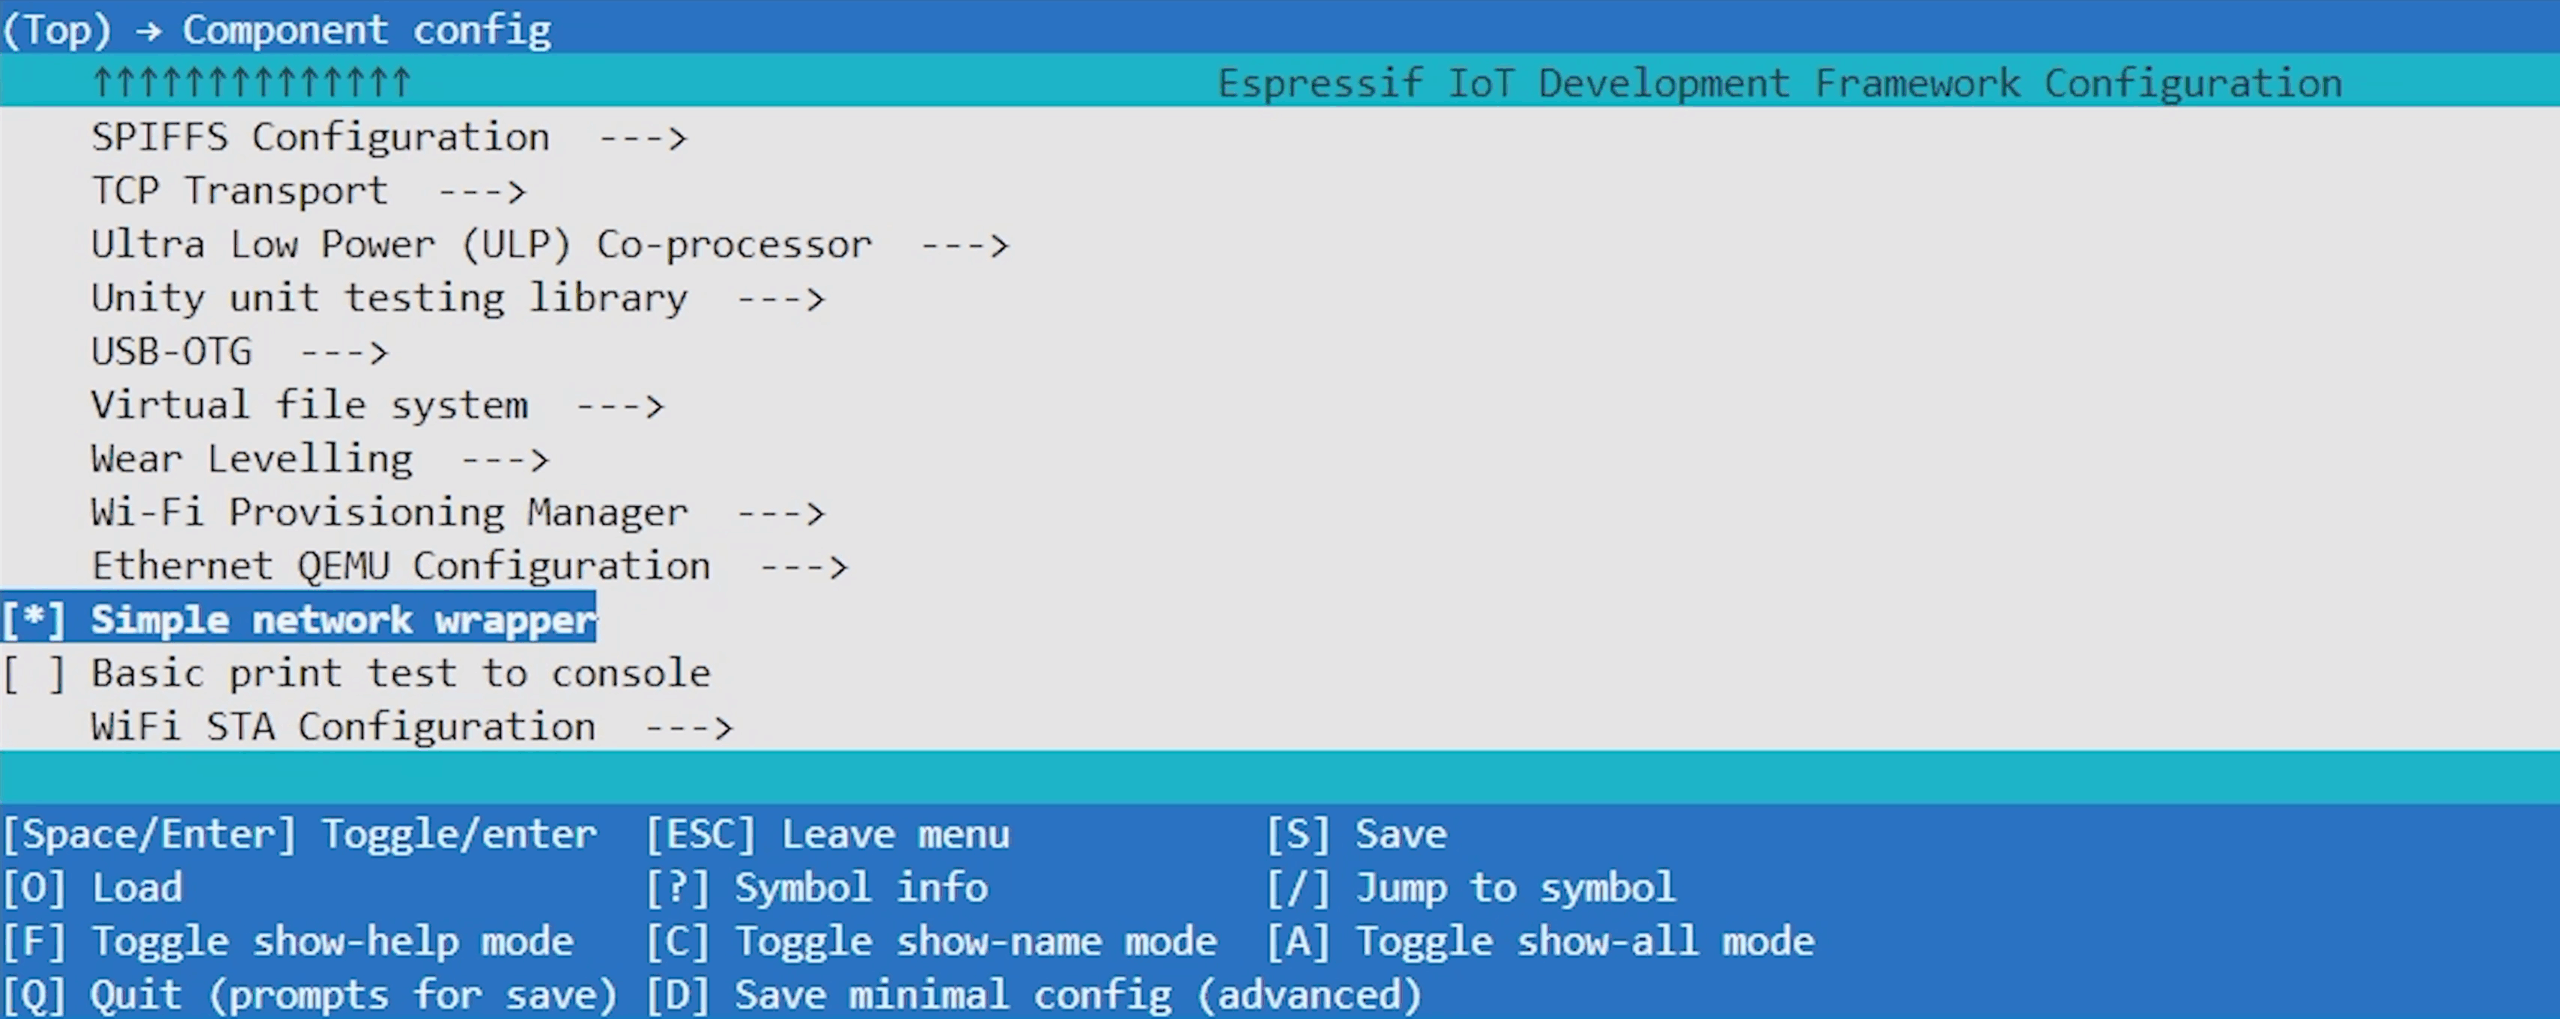
- Find Simple Network Wrapper and press Space to enable it (this is required for our network wrapper functions to work)
- Press Q to quit, then Y to save your configuration
Building the Project
With the configuration complete, build the project:
idf.py buildThe build process will compile your code and generate the firmware binaries. If you encounter errors about missing semicolons or type mismatches, double-check your main.c against the provided code. The build output will show you which files are being compiled and will end with a success message if everything works correctly.
Flashing to the ESP32
To flash the compiled firmware to your ESP32 board, use the esptool.py command from your host OS (change <SERIAL_PORT> to the serial port of your connected ESP32 board):
python -m esptool.py --port "<SERIAL_PORT>" --chip auto --baud 921600 \
    --before default_reset --after hard_reset write_flash \
    --flash_mode dio --flash_freq 40m --flash_size auto \
    0x0 build/bootloader/bootloader.bin \
    0x8000 build/partition_table/partition-table.bin \
    0x10000 build/app.bin
Note: The bootloader address (0x0) may be different depending on your ESP32 variant. For the base ESP32, it’s typically 0x1000, while for the S3 variant it’s 0x0.
Once flashing is complete, you can monitor the serial output to see your application in action:
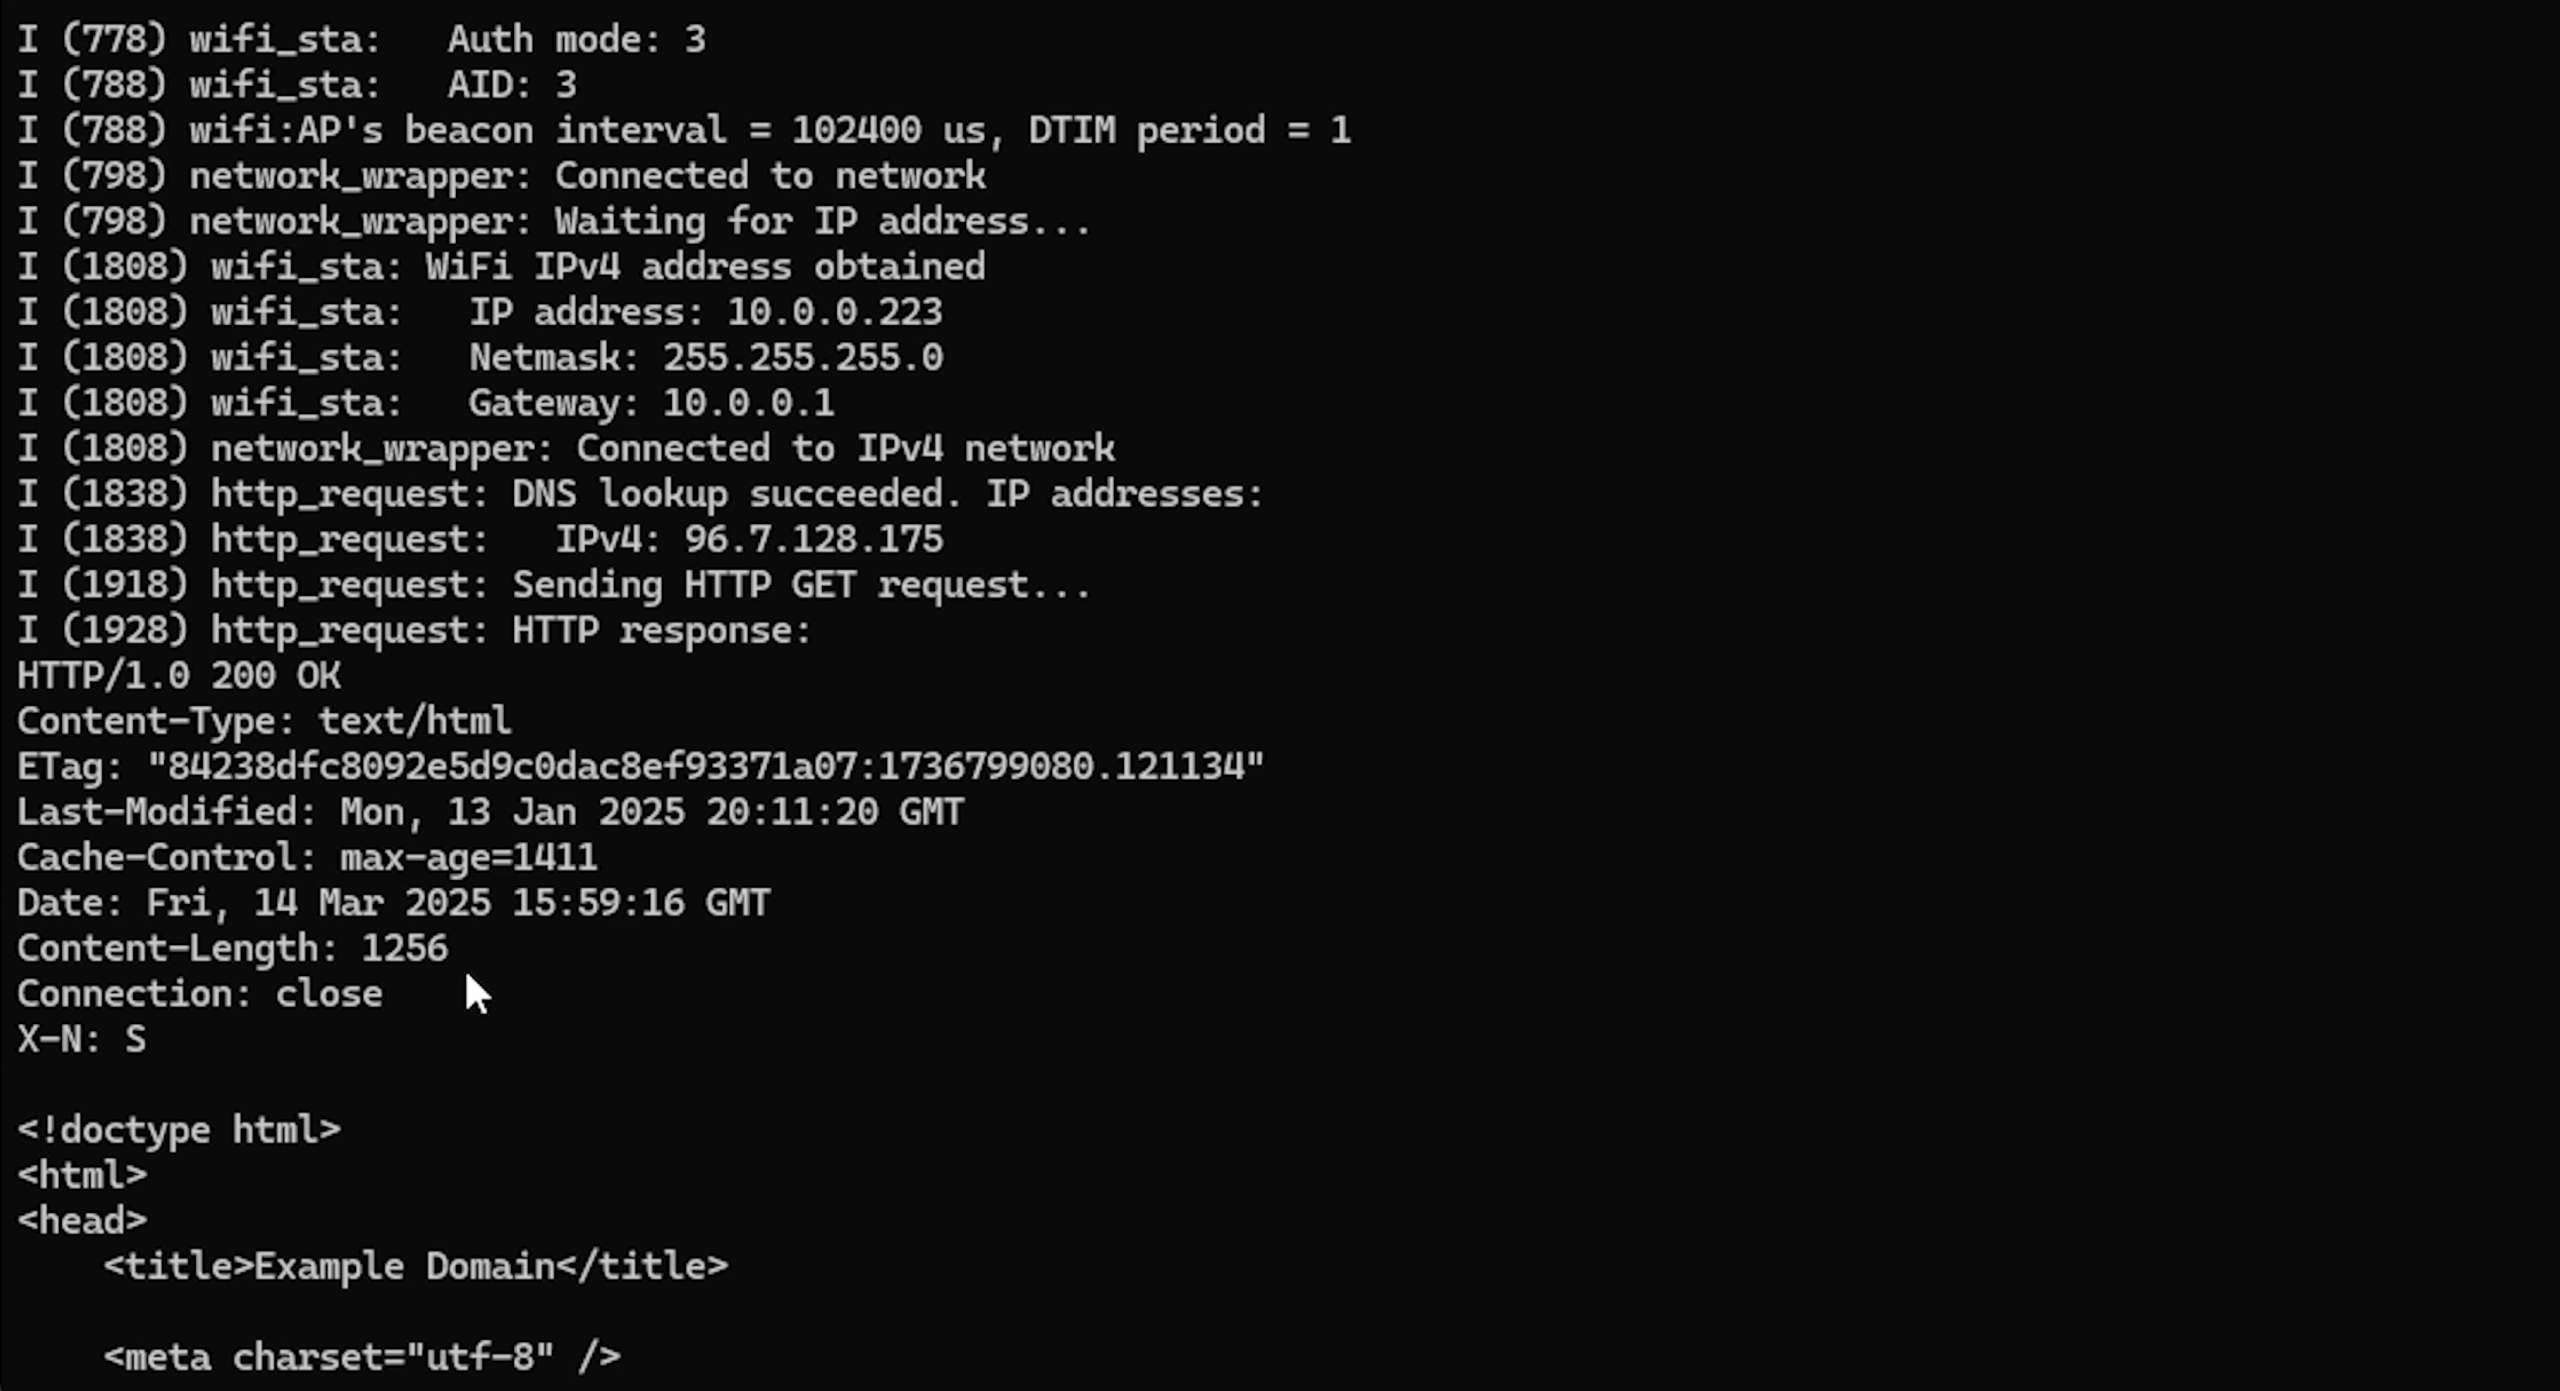
python -m serial.tools.miniterm "<SERIAL_PORT>" 115200After the ESP32 resets, you should see output showing:
- The ESP32 connecting to your WiFi network
- Your network SSID being printed
- An IP address being obtained from DHCP
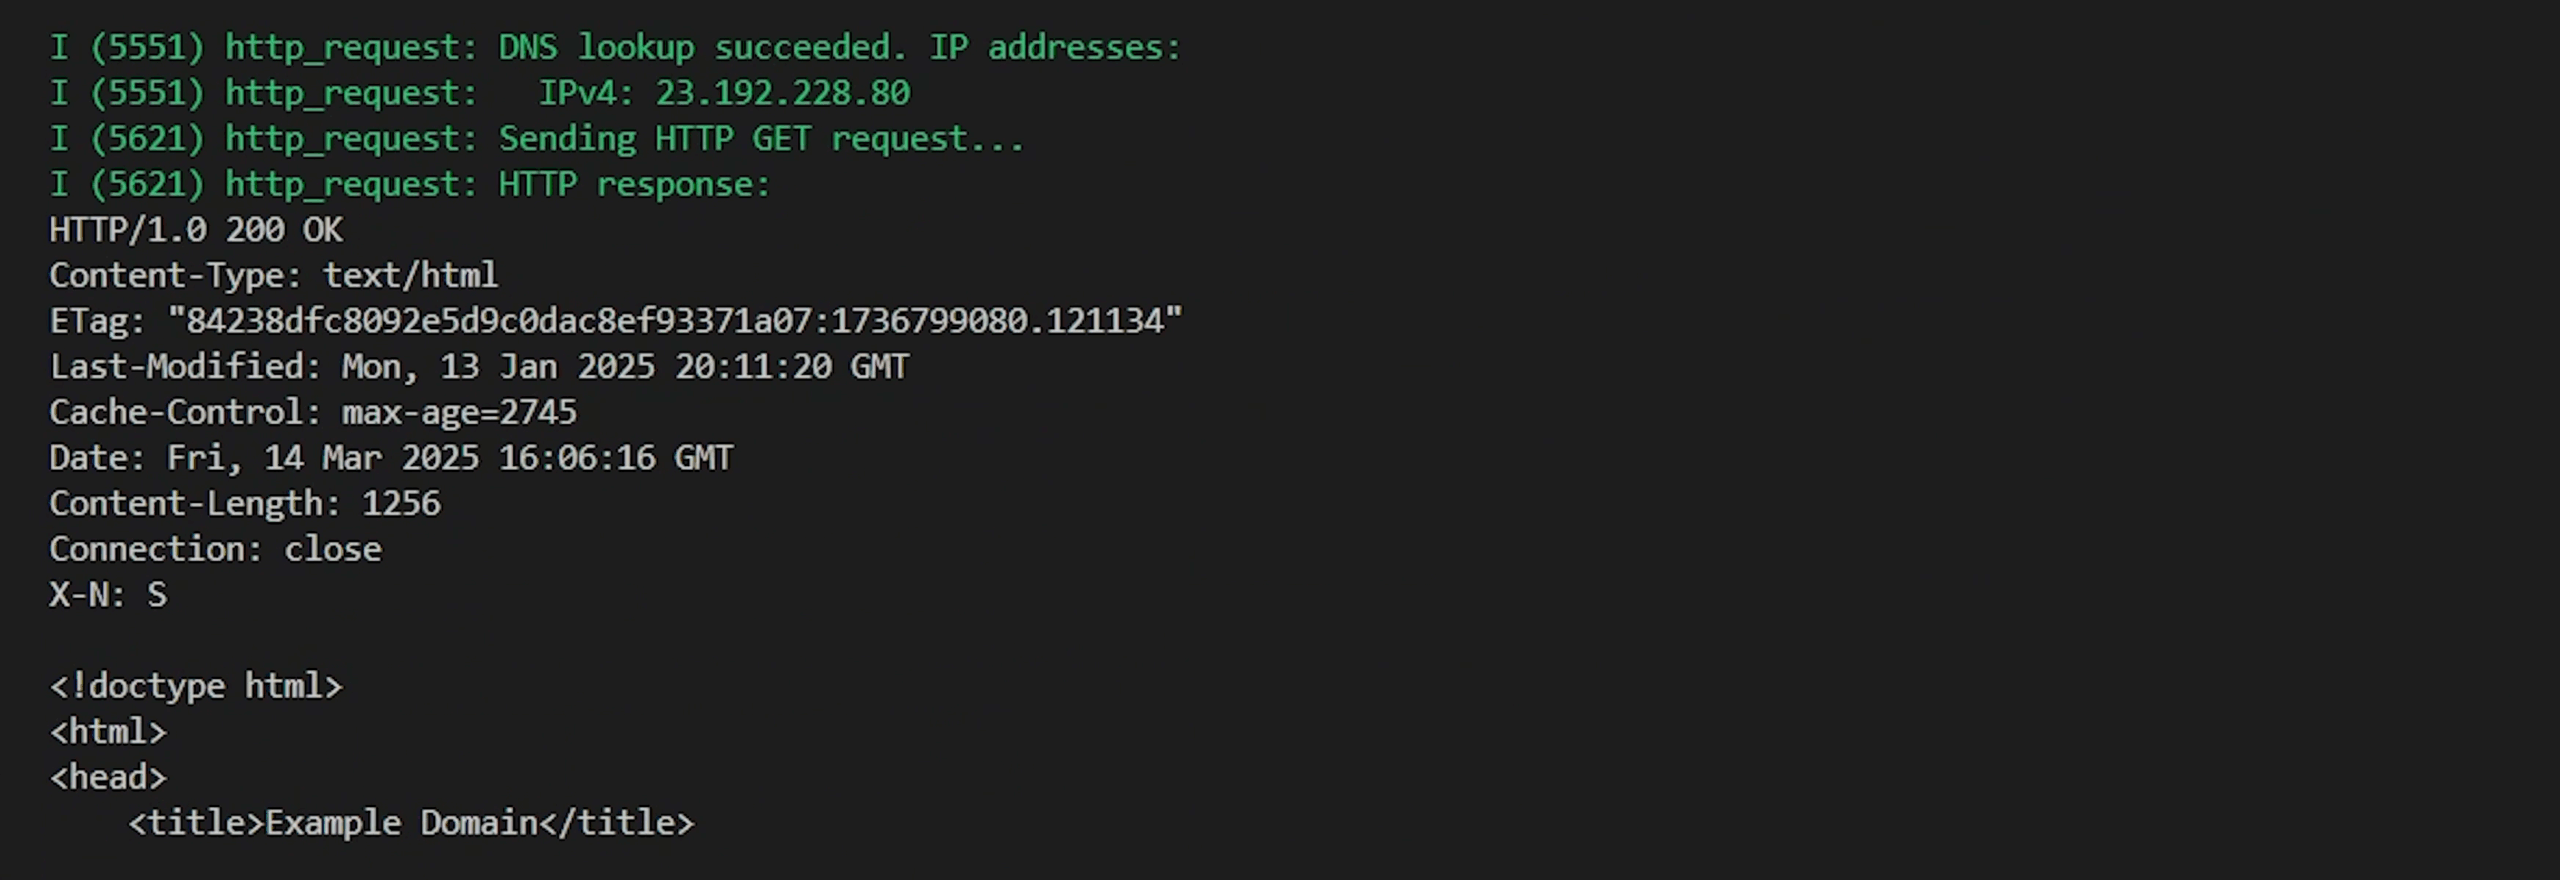
- The DNS lookup succeeding with the IP address of example.com
- The HTTP response, including status code (200 OK), headers, and the full HTML content
- The total number of bytes received (should be around 1256-1521 bytes)
- A 5-second pause before the process repeats
If you see the HTML content printed to your console, congratulations! Your ESP32 is successfully making HTTP requests over the internet.
Running with QEMU (Without Physical Hardware)
If you don’t have access to physical ESP32 hardware, you can test your application using QEMU, an emulator that can simulate an ESP32 with virtual networking. This is particularly useful for development and testing without needing to flash physical devices.
Configuring for QEMU
First, set the target to the base ESP32 variant, as QEMU works most reliably with this version:
idf.py set-target esp32Note: The ESP32-S3 variant can have issues in QEMU, so it’s recommended to stick with the base esp32 target for emulation.
When you change targets with set-target, ESP-IDF resets all previous configuration settings since different chip variants may have different options. This means we need to reconfigure our network settings, but this time we’ll use the QEMU Ethernet driver instead of WiFi.
Open the configuration menu:
idf.py menuconfigNavigate through the menu:
- Scroll down to Component config and press Enter
- Scroll to the bottom to find the custom library options
- Find Simple Network Wrapper and press Space to enable it
- Press Enter to go into the network wrapper configuration
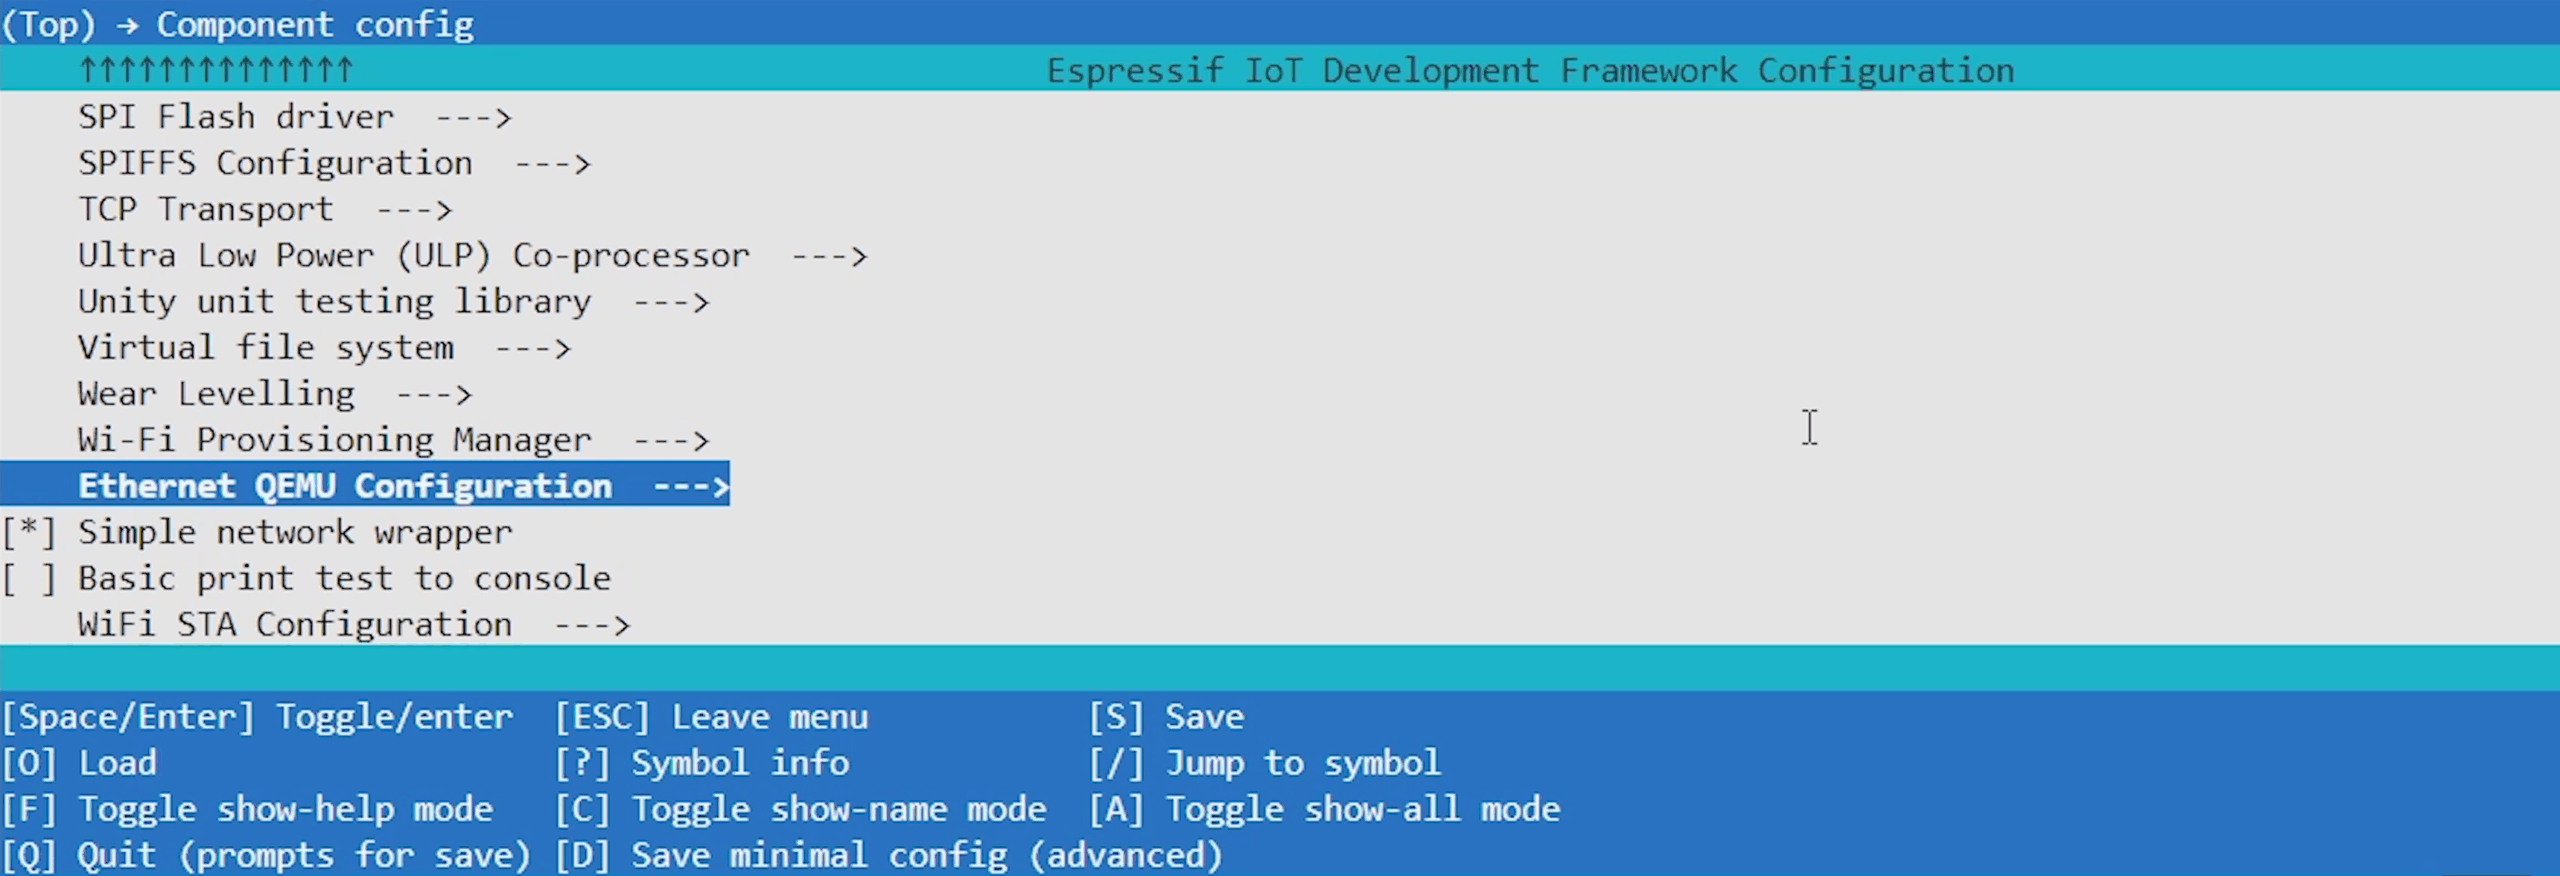
- Find Ethernet QEMU Configuration and press Space to enable it
- Press Enter to configure the Ethernet settings:
- Choose your preferred IP version (IPv4 is recommended for broader compatibility)
- Press Escape to go back
- Press Q to quit, then Y to save your configuration
Notice that we did not enable the WiFi Station Configuration this time. The network wrapper will use the QEMU Ethernet driver instead.
Building and Running in QEMU
ESP-IDF provides a convenient command that builds your project and automatically launches it in QEMU:
idf.py qemu monitorThe monitor flag enables colored output and formatting in the console, making it easier to read the logs.
This command will build your project (if needed), start QEMU, boot the virtual ESP32, and display the serial output.
Once QEMU starts, you should see output similar to the physical hardware version, but with some differences:
- The virtual ESP32 boots up
- It connects to a virtual network inside the QEMU environment
- It obtains an IP address (typically 10.0.2.15)
- The gateway address (10.0.2.2) represents the host machine. In this case, the Docker container if you’re using the ESP-IDF container, not your actual computer.
- The DNS lookup succeeds and returns the IP address for example.com
- The HTTP response is displayed with the status code, headers, and full HTML content
- The total bytes received is printed
- After 5 seconds, the process repeats
The virtual networking in QEMU is isolated but can still access the internet through your host machine, allowing you to make real HTTP requests to external servers like example.com.
To exit QEMU and return to your terminal, press Ctrl+A, then X.
Going Further
You’ve now built a complete HTTP client application using low-level BSD sockets on the ESP32, giving you the foundation to communicate with web servers and REST APIs from your embedded devices. These skills (DNS lookups, socket creation and configuration, sending requests, and receiving responses in chunks) are essential building blocks for more complex IoT applications. From here, you can expand this project to work with REST APIs, add POST requests to send data to servers, or explore secure communication with HTTPS/TLS and alternative protocols like MQTT for pub/sub messaging in IoT systems.
If you would like to go further, check out my IoT Firmware Development with ESP32 and ESP-IDF course. In the course, we cover the basics of ESP-IDF, reading from sensors, connecting to the internet via WiFi, posting data via HTTP REST calls, securing connections with TLS, and interacting with MQTT brokers.
