While C may be the preferred language of many embedded programmers, C++ does have a place, especially if you want to use certain libraries, like TensorFlow Lite for Microcontrollers. In this tutorial, I will show you how to get started making a program (blinky) for an STM32 microcontroller using C++ on STM32CubeIDE.
I will use an ST Nucleo-L432KC for this demonstration, as it’s small, fits on a breadboard, and still has a powerful ARM Cortex-M4 core. You are welcome to use any STM32 part, but I generally recommend starting out with one of the Nucleo boards.
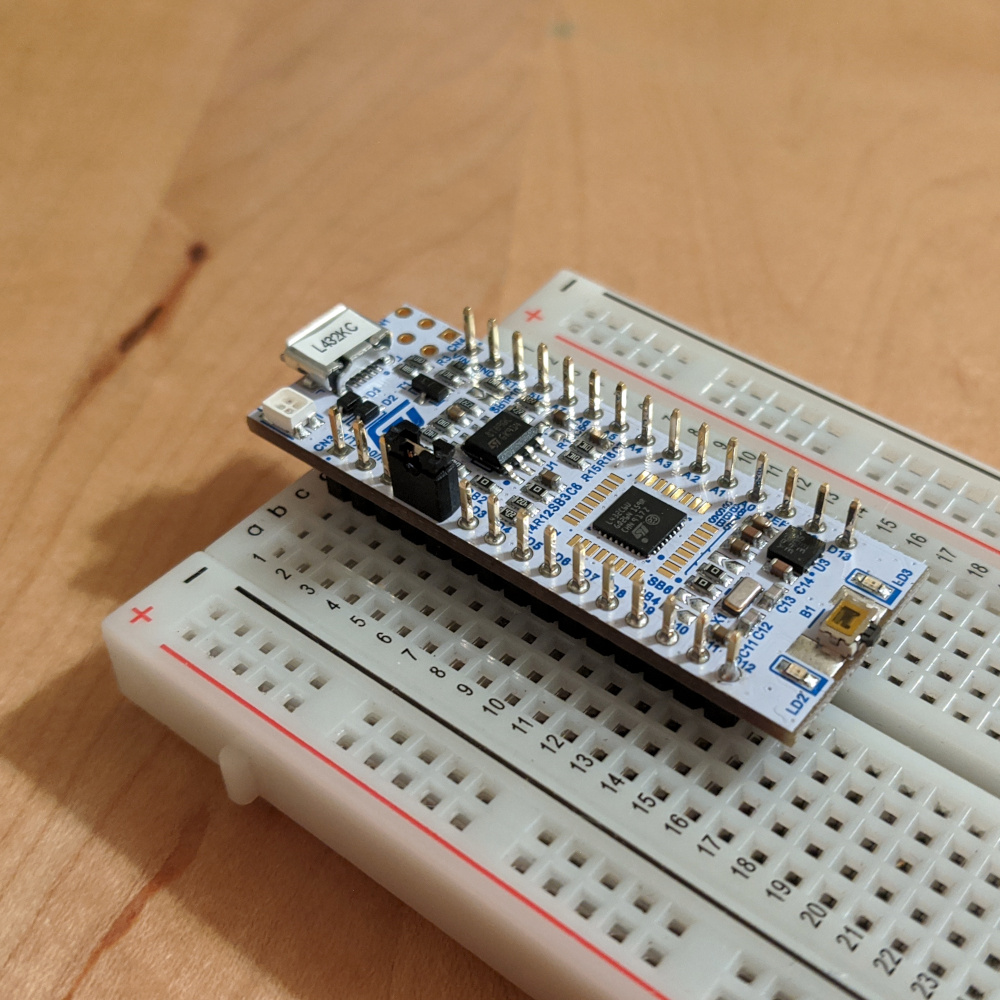
Plug your STM32 part into your computer.
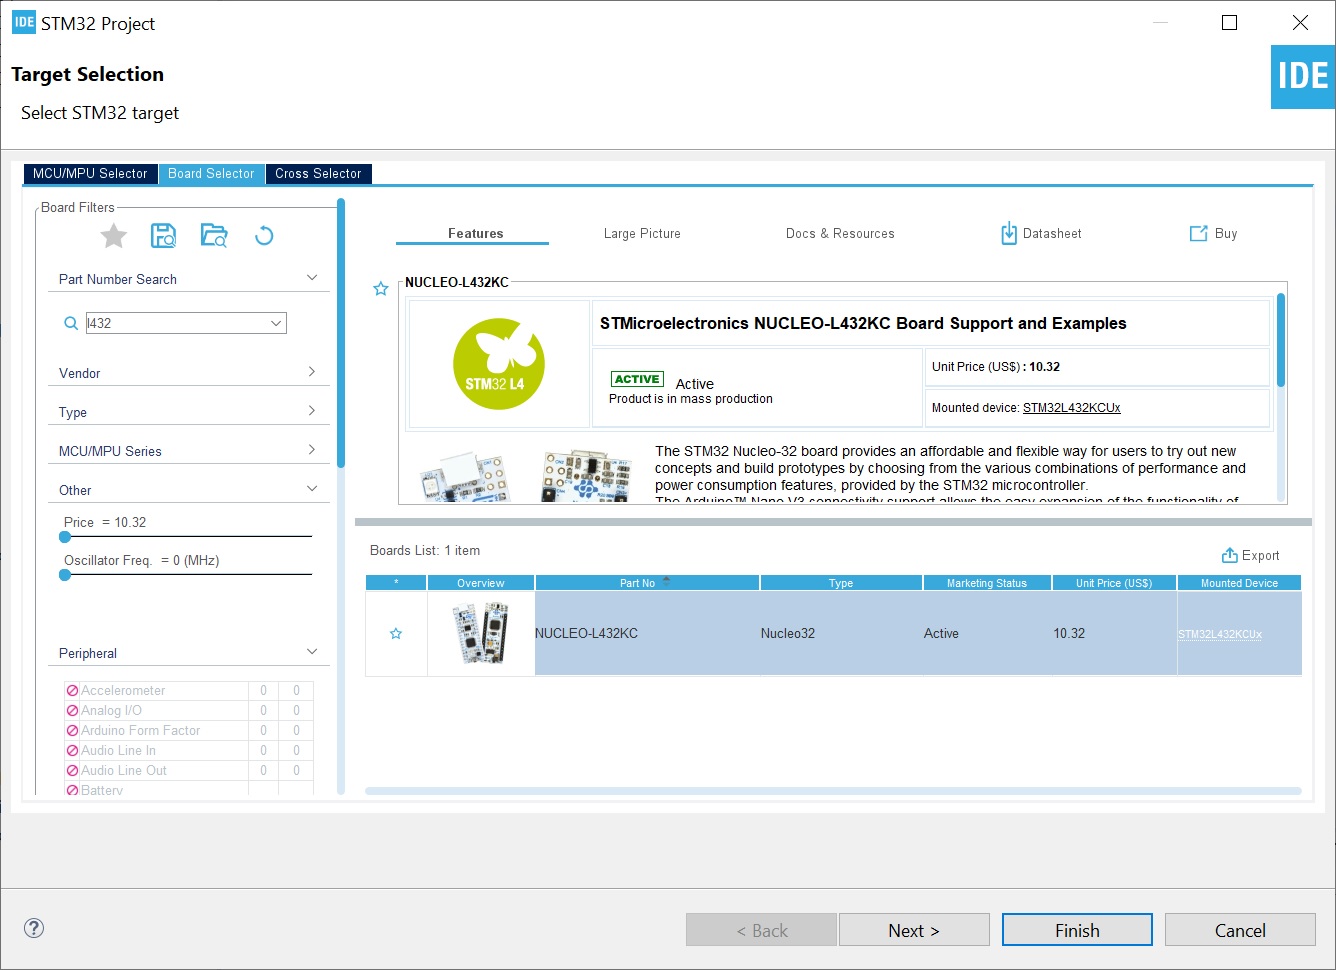
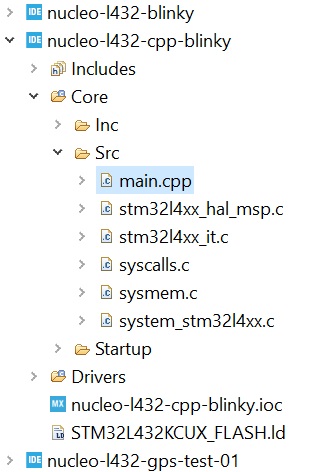
Start STM32CubeIDE[link] and select File > New > STM32 Project. Select your target microcontroller or board (I’ll select my Nucleo-L432KC).
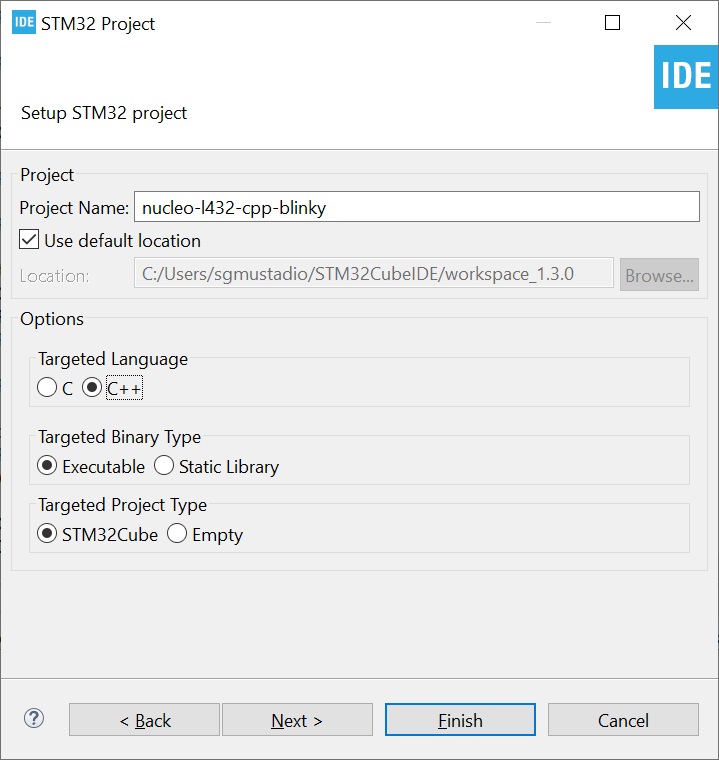
Click Next and then give your project a name. I like to prefix the board I’m using to the project name, so nucleo-l432-cpp-blinky is what I called mine. In Targeted Language, select C++.
Click Finish and click Yes when asked, “Initialize all peripherals with their default Mode?” Click Yes to open the new perspective.
Leave everything as default on the CubeMX device configuration GUI.
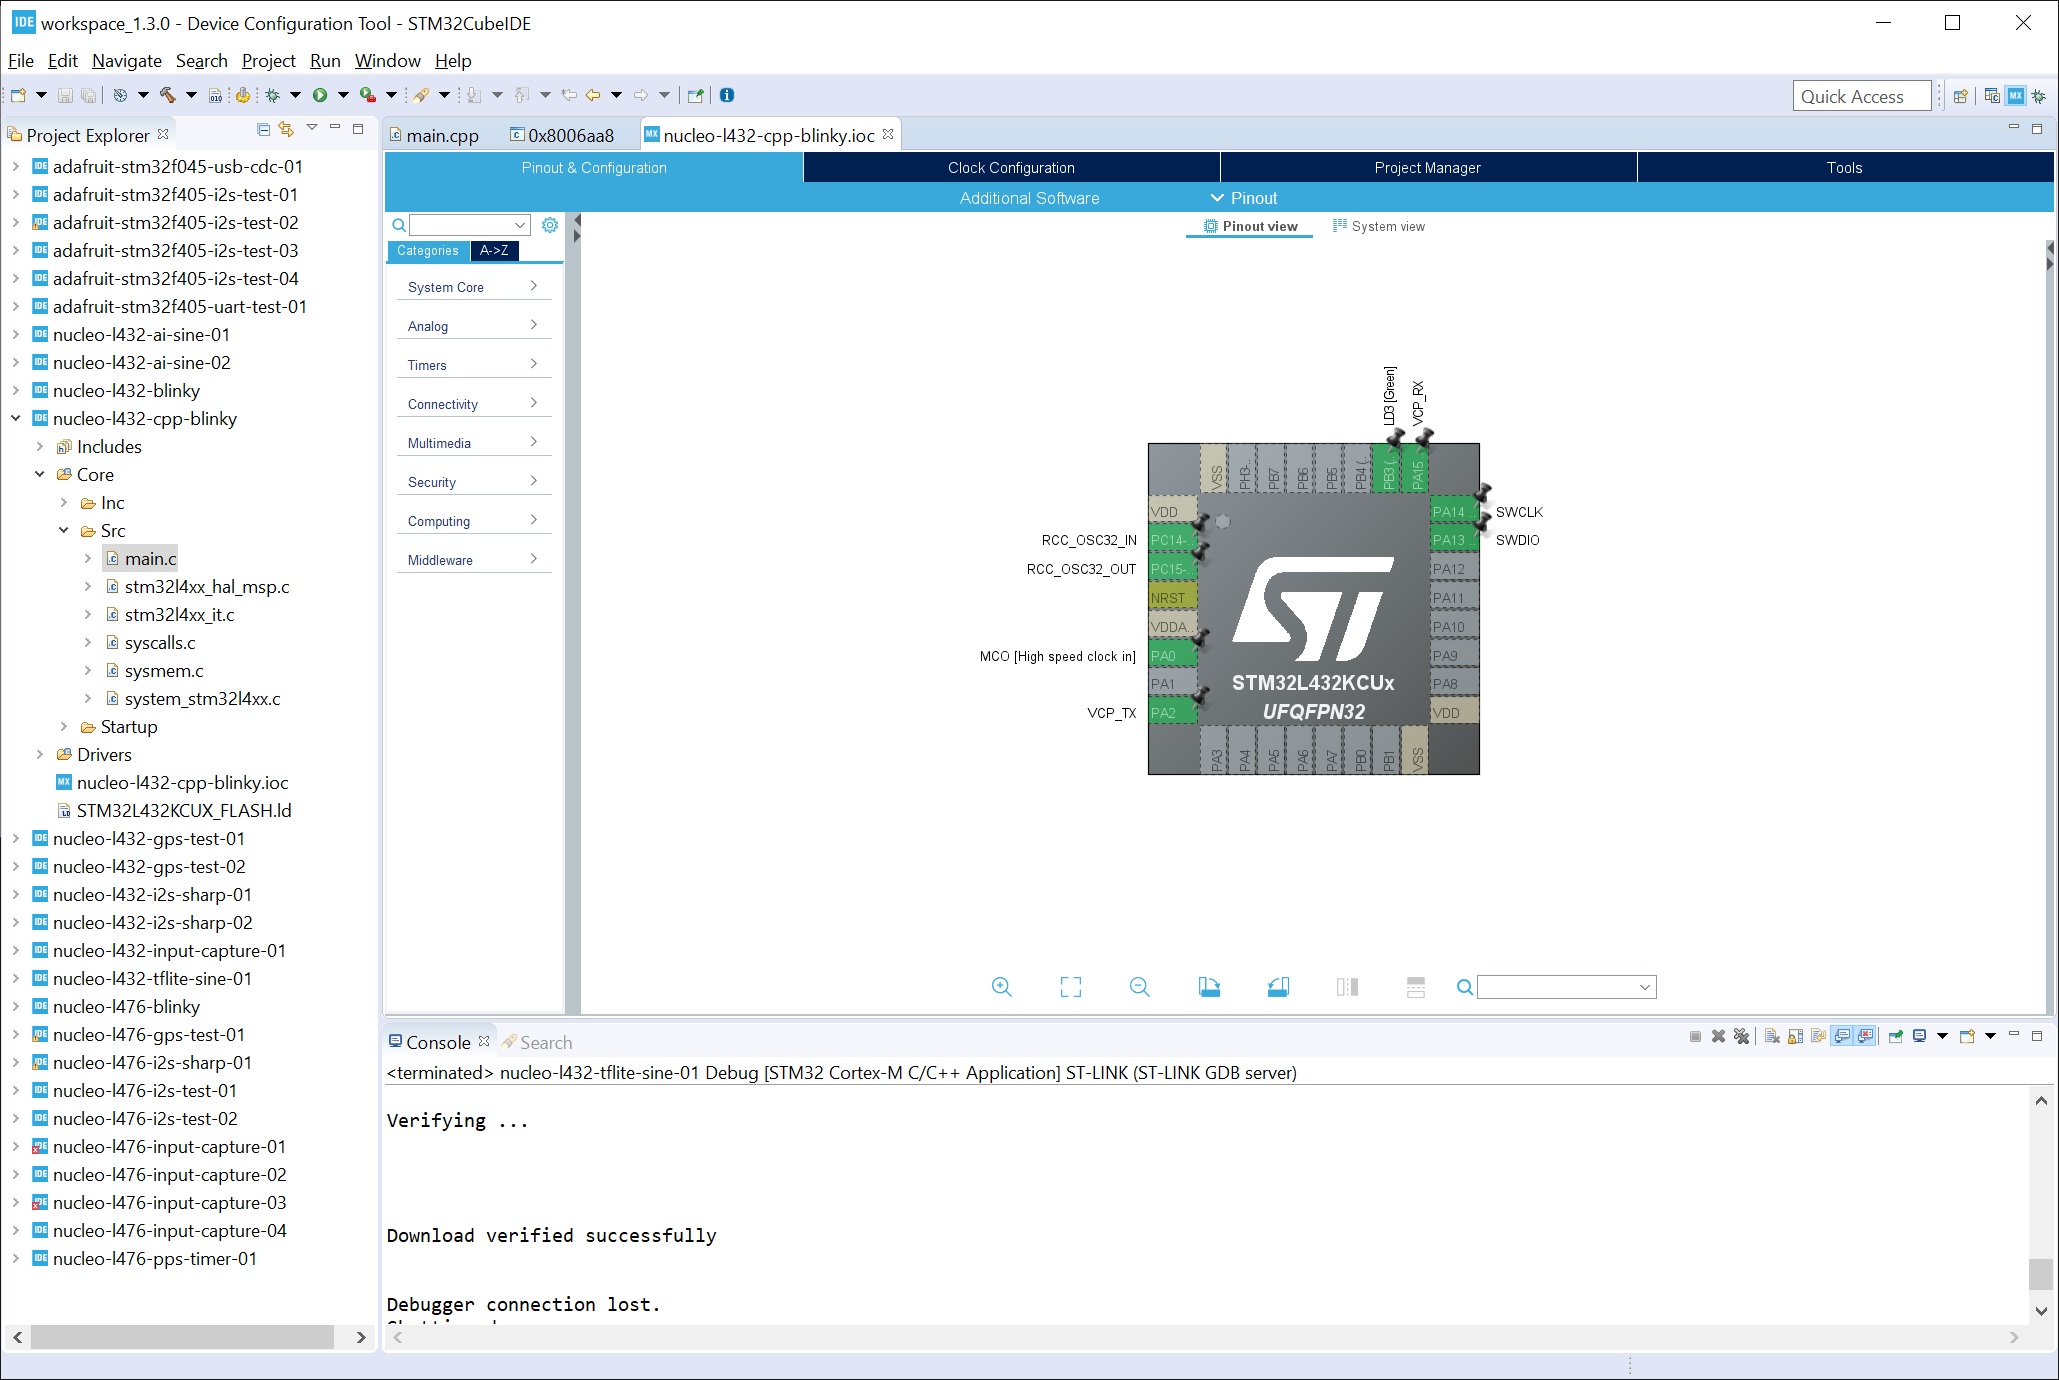
Code should be automatically generated. However, CubeMX generates a main.c file, which is not what we want for a C++ project. Right click on <project name> > Core > Src > main.c and select Rename. Change the name of the file to main.cpp. The compiler is sensitive to file suffixes, so .c files will compile as C code and .cpp or .cc files will compile as C++.
Open the main.cpp file associated with the project. Scroll down to the while (1) loop and add the following code just inside the while (1) loop:
HAL_GPIO_TogglePin(LD3_GPIO_Port, LD3_Pin);
HAL_Delay(500);
In context of the rest of the source code, this should look something like:
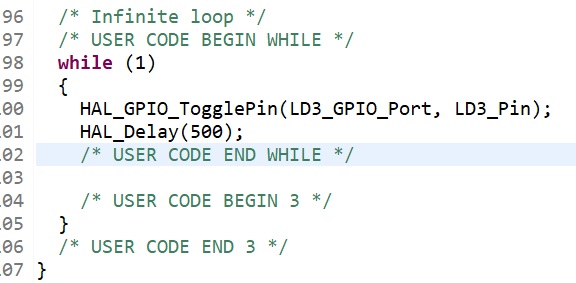
Note that the GPIO port and pin names might be different for your board. If you’re using a Nucleo-64, the labels will be LD2_GPIO_Port and LD2_Pin.
In case you are wondering: yes, this is still C inside of a C++ file. Most of the STM32 HAL libraries are written in C, but they’re safe to call in C++.
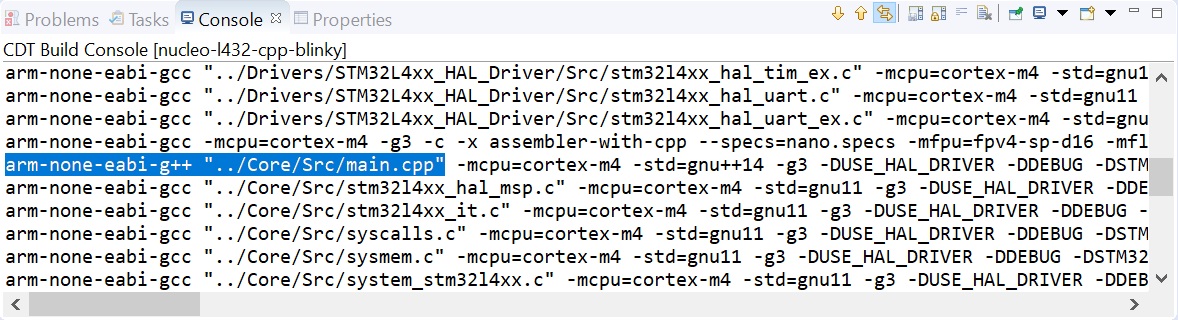
Save and click Project > Build Project. You should notice that any .cpp or .cc files get automatically built with g++.
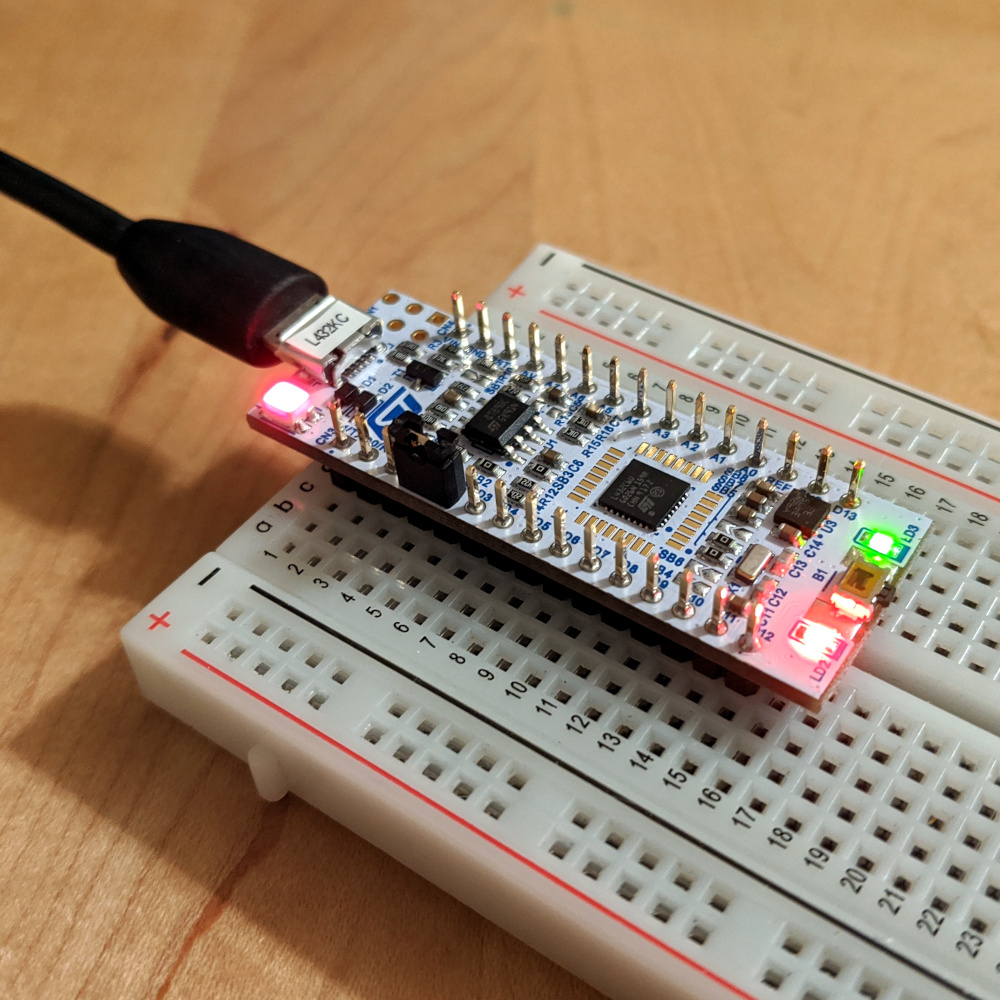
Click Run > Debug and click OK to accept the default launch configuration properties. Accept any prompts you might see to open the debug perspective. Click Run > Resume, and you should see the LED begin to blink.
That’s it! You should be ready to build your STM32 project in C++ with all of the object-oriented programming you so desire.
Please note that you can generally call C functions from within a C++ program and vice versa. You will need to add extern “C” to your functions, which is detailed in this article.
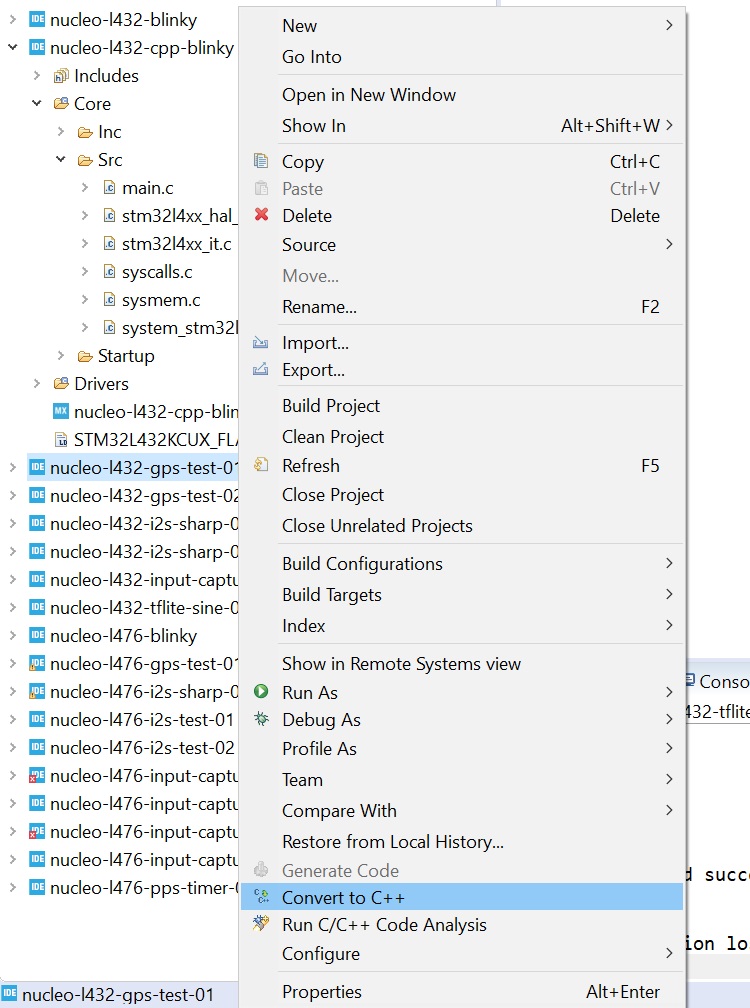
If you are already working within a C project and you wish to convert it to C++, right-click on the project name in the project explorer pane and click Convert to C++. You will then need to rename any source files (to .cpp or .cc) you wish to be compiled by g++.
If you right-click on any C++ project, you’ll find that you can revert it back to a C project using a similar method.
I hope this helps! I know that I’m looking forward to using C++ libraries in my STM32 project.
Thank you!
This worked perfectly with my l432kc.
I followed your tutorial video on digikey but was unable to get the led blink with the C code, however it worked with c++.
Any idea why that may be the option.
All other settings were the same,
The code I added was-
HAL_GPIO_TogglePin(GPIOA, GPIO_PIN_3);
HAL_Delay(500);
That’s really weird…the same code should work in both C and C++. Did you get any errors or does it just not blink?
OK. Bardzo dobry opis. Proszę o więcej praktycznych przykładów.
That’s what I did at first, but the issue is that after you rename the main.c to main.cpp if you re-generate the code when changing a port or adding an interface in the chip view config, it will re-generate the main.c and you won’t have your code in it. You’ll have a brand new main.c and a main.cpp not updated. For now I recommend renaming it back to main.c before doing any change to ports in the chip graphic view. Re-generate, and then rename again to cpp.
I recently ran into this problem, too. The other thing you can do is copy the initialization steps (the parts outside your /*** USER CODE ***/ guards) from main.c to main.cpp and delete main.c.
Many thanks, this worked for me.
The approach I took for C++ is to create a C++ source file, mymain.cpp, in the Core/Src folder and then call the entry point in that source. The result is that main.c is regenerated containing all the initialization code but the only thing it does is initialize the environment and then call the function mymain() in mymain.cpp to start my application running.
You do need to declare the C++ function that is the entry point for the C++ source in main.c and also declare it as a C entry point in mymain.cpp so that the C++ compiler doesn’t do name mangling and the linker will be able to find it. And you need to include main.h in the source file mymain.cpp as well in order to get access to the defines and other content the generator produces.
So the declaration needed in both main.c and mymain.cpp is “extern “C” int mymain(void);” without the quotes. Make sure you place it in a user code section of main.c so that it survives the generation step.
Thanks for the idea, I have the same issue with .cpp and .c files, at the moment is the only solution I can find
After I ran into this same problem, I started experimenting wrapping the STM32 HAL (which is all C code) with C++ outlined by this article – https://barenakedembedded.com/how-to-use-cpp-with-stm32-hal/
It is just C, you should test at least a CLASS in you example. Also – in my IDE there is no Convert to C++ or vice versa.
Ther is no CLASS example. So no real C== piece of code is being use in the example.
Hi! I’ve tried to do this process, but when I change the extension name from .c to .cpp, after I compile, the code present a bunch of differents errors that did not happened before with ,c extension.
Just for complement information, I’m using the STM32CubeIDE Version: 1.6.0 Build: 9614_20210223_1703 (UTC)
Did you click on the project and select “Convert to C++?” You need to do this in addition to renaming the extension from .c to .cpp.
Hi Shawn, I already clicked on the “convert to C++” option, so if I click again in the options a have “Convert to C” option, but even with the project in C++ and renaming the main.c to main.cpp or main.cc I keep having the same problem! I already tried to delete main.c file and create a main.cpp but it’s not work too!
My CubeIDE version is the last one:
Version: 1.6.1
Build: 9958_20210326_1446 (UTC)
What errors are you seeing? I just tried it again on STM32CubeIDE v1.6.0, and everything worked fine for me. I did not write any code in main–I just created a new STM32 C project for the Nucleo-F042, converted the project to C++, renamed main.c to main.cpp, and clicked Project > Build Project. It correctly called arm-none-eabi-gcc for the .c files and arm-none-eabi-g++ for my C++ file (main.cpp) without any errors.
Hi Shawn, thank you very much for this nice tutorial. A general question: Is there actually any drawback to always use C++ instead of C for a new project? Thanks in advance.
There are pros and cons to using C vs. C++. Some C++ may not be as portable if you don’t have access to a suitable C++ compiler. You might have more overhead in C++ to handle objects, so in theory, C could give you a smaller binary. For this reason, I usually see most embedded projects done in C rather than C++. Here is a great discussion on C vs. C++: https://softwareengineering.stackexchange.com/questions/113295/when-to-use-c-over-c-and-c-over-c. Hope that helps!
Hello Shawn
Thank you very much for your good tutorial on C++ in STM32Cube.
This is the first time for me to create firmware in C++. Do you know any good examples and learning resources I can use?
Thank you for your help
Most embedded firmware programmers used C for their work. However, using C++ is not much different than using C for firmware, assuming you can get the compiler to work. You will want to learn C++ first in a regular programming environment before trying to use it in firmware. There are a number of blogs, videos, and courses on the internet that will help you with that.
Hello Shawn,
have you ever tried adding a class to the project and successfully compiled that?
I have not succeeded thus far with the most recent CubeMX/CubeIDE.
Hey Shawn. Love your articles. I’m a C++ programmer, but a bit rusty after a few years. Thanks for bringing me back up to speed on the STM32 IDE. I’m going to try out the C++20 gnU extension and see how that works.
I would like to know how to I use cout to debug the code as I need to print some code to debug.
Hi Shawn,
Is there a way to stop code generation from creating a new ‘main.c’ file every time I edit the .ioc file? Can you configure your project so the code generator edits the existing main.cpp file?
Thanks.
In my experience, no–you cannot prevent main.c from being generated. It’s very frustrating. I make sure to copy my main.c file or ensure my custom code is in the comment headers that I do not want to be deleted.
1. Make your project a C++ project either in the initial configuration or by converting it.
2. Create a file MainCpp.cpp. As its first line use:
#include main.c
3. In the generated main.c file, do the following:
3.a. Add a declaration for your “main”:
/* USER CODE BEGIN PFP */
void mainCpp();
/* USER CODE END PFP */
3.b. Modify the “infinite loop” section to just call main.cpp:
/* USER CODE BEGIN WHILE */
mainCpp();
/* USER CODE END WHILE */
4. In the MainCpp.cpp file, add the new “main”
void mainCpp() {
// Your init code here
while (1) {
// Your loop code here
}
}
5. In the project explorer, right click on the main.c file. From the popup menu, select Resource Configurations -> Exclude from Build. In the dialog, click on Select All, and then OK.
You are now in C++ world. Make any other code changes in your MainCpp.cpp file.
You can now make config changes and let the system regenerate the main.c file. Your two changes will be preserved since they are in the user code area. All of the generated initialization code is still run properly and is run before your new mainCpp function is called. Since the main.c file is included at the top of the file, the .cpp file has access to all of the variables declared there. In addition, since the main.c file include main.h, your .cpp file has access to the generated #define symbols.
This is perfect Keith. Elegant and flawless.
startup_stm32h750vbtx.s:99: undefined reference to `main’
我的软件显示了这样的报错,我不明白是怎么了
Hello Shawn! After the recent update (as of few months ago), STmicroelectronics decided to remove the CubeMX from the CubeIDE. Is there any way we could program in C++ now without fearing that CubeMX will overwrite our files when regenerating peripherals in case we change the code because, for C++ to work, we need to change main.c to main.cpp which CubeMX might not recognise? Inside the CubeMX I don’t see any option to select the target language like we had when it was integrated inside the CubeIDE before.
Oof…that stinks 🙁 I haven’t touched STM32 in a while, so I honestly do not know. This might be a good question for the ST forum: https://community.st.com/
Very nice solution! I like just to propose a little extension that turned out to be useful in my application:
In step 2 (2. Create a file MainCpp.cpp. As its first line use) replace
#include main.c
with
extern “C” {
#include main.c
}
By doing so, all code of the CubeIDE (HAL etc.), which is naturally written in C, remains as C in that sense that name mangeling, used in C++, is disabled for this part.