This tutorial will show you how to install TensorFlow with GPU support on Windows. You will need an NVIDIA graphics card that supports CUDA, as TensorFlow still only officially supports CUDA (see here: https://www.tensorflow.org/install/gpu).
If you are on Linux or macOS, you can likely install a pre-made Docker image with GPU-supported TensorFlow. This makes life much easier. See here for details (this article is about a year old, so a few things might be out of date). However, for those of us on Windows, we need to do things the hard way, as there is no NVIDIA Docker support on Windows.
See this article if you would like to install TensorFlow on Windows without GPU support.
[Update February 13, 2022] Updated some screenshots and a few commands to ensure that everything works with TensorFlow 2.7.0.
Table of Contents
Prerequisites
To start, you need to play the version tracking game. First, make sure your graphics card can support CUDA by finding it on this list: https://developer.nvidia.com/cuda-gpus.
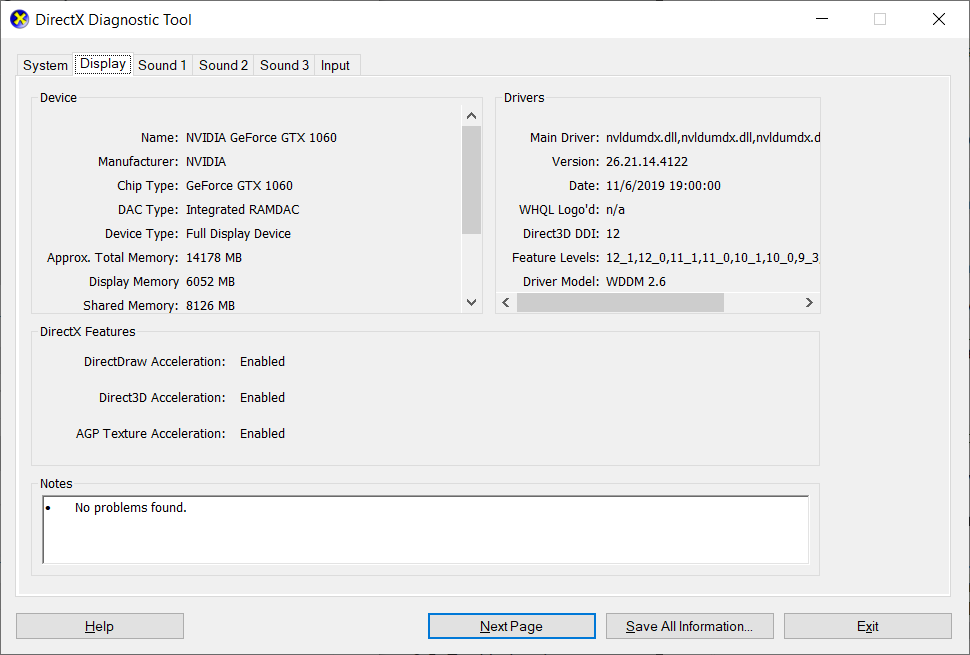
For example, my laptop has a GeForce GTX 1060, which supports CUDA and Compute Capability 6.1.
You can find the model of your graphics card by clicking in the Windows search bar and entering “dxdiag.” This tool will identify your system’s hardware. The Display tab should list your graphics card (if present on your computer).
Then, we need to work backwards, as TensorFlow usually does not support the latest CUDA version (note that if you compile TensorFlow from source, you can likely enable support for the latest CUDA, but we won’t do that here). Take a look at this chart to view the required versions of CUDA and cuDNN.
At the time of writing (updated Feb 13, 2022), this is the most recent TensorFlow version and required software:
| Version | Python version | Compiler | Build tools | cuDNN | CUDA |
|---|---|---|---|---|---|
| tensorflow_gpu-2.7.0 | 3.7-3.9 | MSVC 2019 | Bazel 3.7.2 | 8.1 | 11.2 |
Take a note of the particular required software versions listed for the particular TensorFlow version you wish to use. While you could compile TensorFlow from source to support newer versions, it’s much easier to install the specific versions listed here so we can install TensorFlow using pip.
Install Microsoft Visual C++ Compiler
The CUDA Toolkit uses the Microsoft Visual C++ (MSVC) compiler. The easiest way to install it is through Microsoft Visual Studio.
Download and install Visual Studio Community (which is free) from this site: https://visualstudio.microsoft.com/vs/community/. Yes, it’s a full IDE that we won’t use–we just need the compiler that comes with it.
[Update Feb 13, 2022] Note: at this time, the CUDA Toolkit installer will not find the latest version of Visual Studio Community (2022). You will need to install the older 2019 version by downloading from here.
Run the installer. You will be asked to install workloads. Click on the Individual components tab. Search for “msvc 2019” and select the latest MSVC C++ 2019 build tools version for your computer. For me, that was MSVC v142 – VS 2019 C++ x64/x86 build tools (Latest).
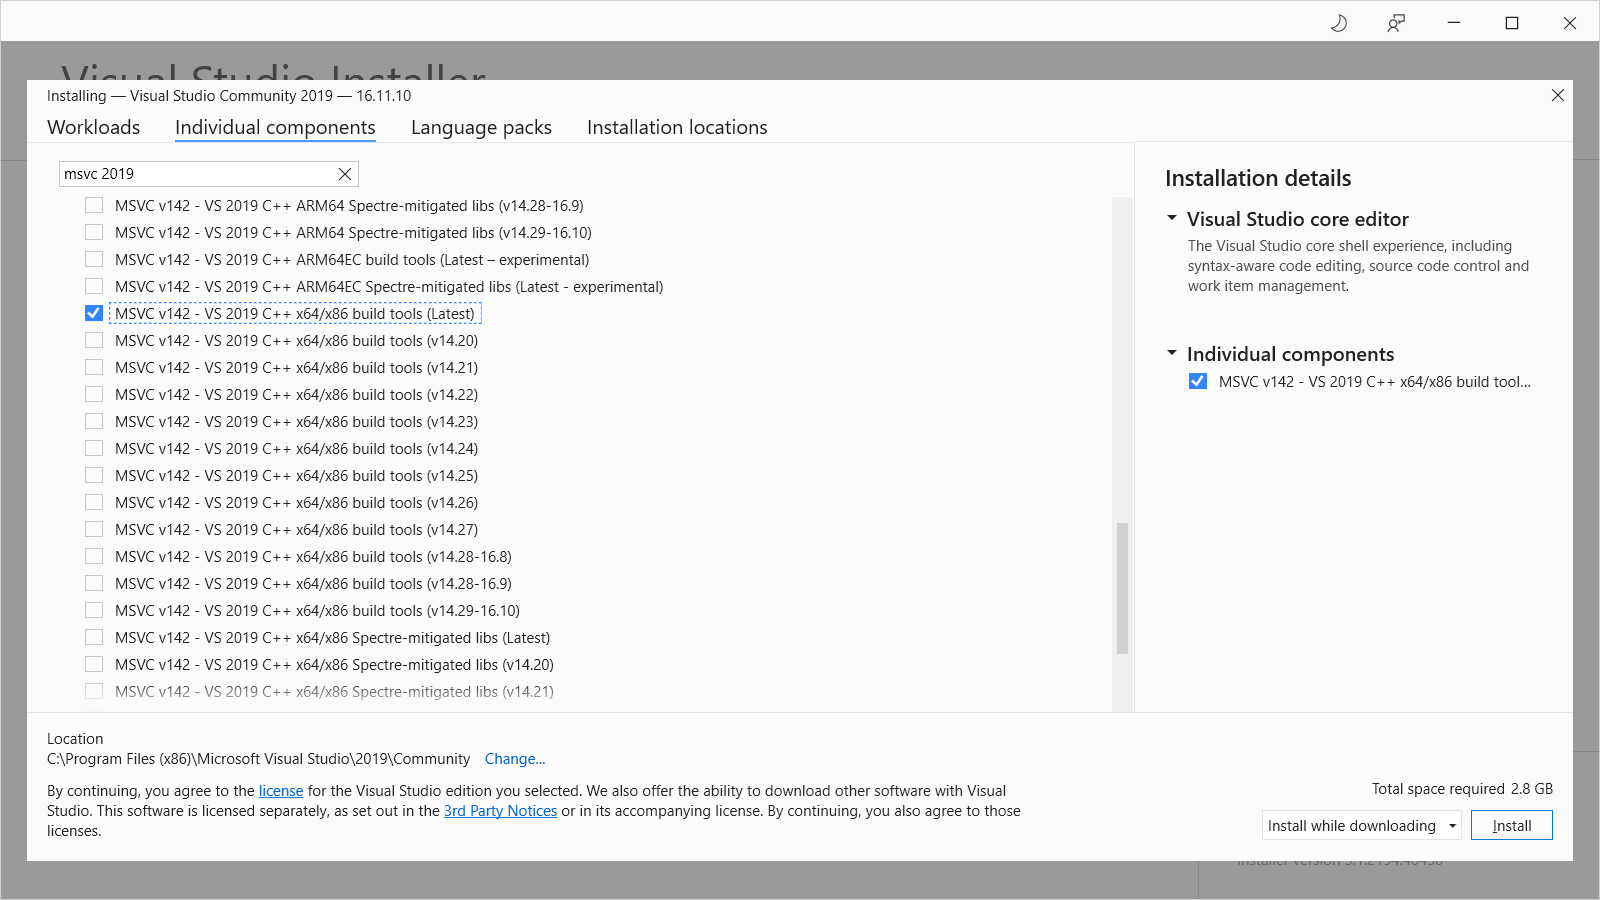
Click Install. When asked about continuing installation without a workload, click Continue. After installation is complete, you do not need to sign into Visual Studio. Simply close out all of the installation windows.
Install CUDA Toolkit
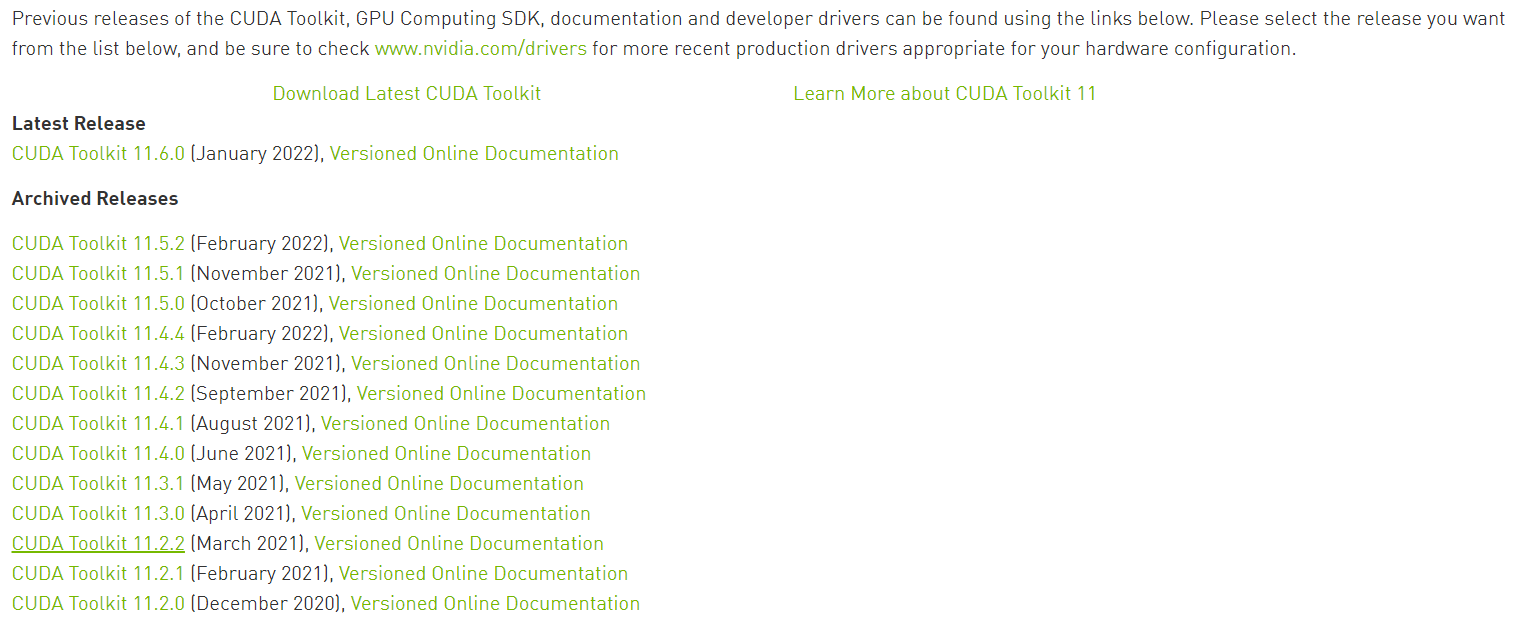
Navigate to the CUDA Toolkit site. Note the CUDA version in the table above, as it’s likely not the latest CUDA release. So, you’ll need to click on Archive of Previous CUDA Releases. Download the CUDA Toolkit version that is required for the TensorFlow version you wish to install (see the table in the Prerequisites section). For me, that would be CUDA Toolkit 10.1 update2 (Feb 13, 2022 update: CUDA Toolkit 11.2.2).
Download the installer for your operating system (which is probably Windows 10). I used the exe (network) installer so that it downloads only the required components.
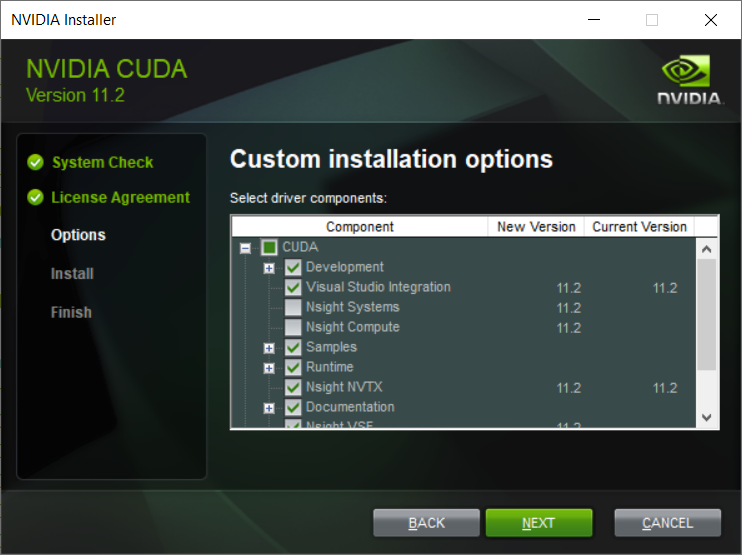
Run the installer. It will take a few minutes to scan your system. Once scanning is done, accept the license agreement and select Custom (Advanced) install.
Deselect the components you don’t need. For example, we likely won’t be developing custom CUDA kernels, so deselect Nsight Compute and Nsight Systems. I don’t have a 3D monitor, so I’ll deselect 3D Vision. I’ll keep PhysX selected for gaming, but feel free to deselect it, as it’s not needed by TensorFlow. You can leave everything else selected.
Click Next. Leave the installation directories as default (if you wish) and click Next again to download and install all of the drivers and toolkit. This will take a few minutes. Close the installer when it finishes.
Install cuDNN
GPU-accelerated TensorFlow relies on NVIDIA cuDNN, which is a collection of libraries used to run neural networks with CUDA.
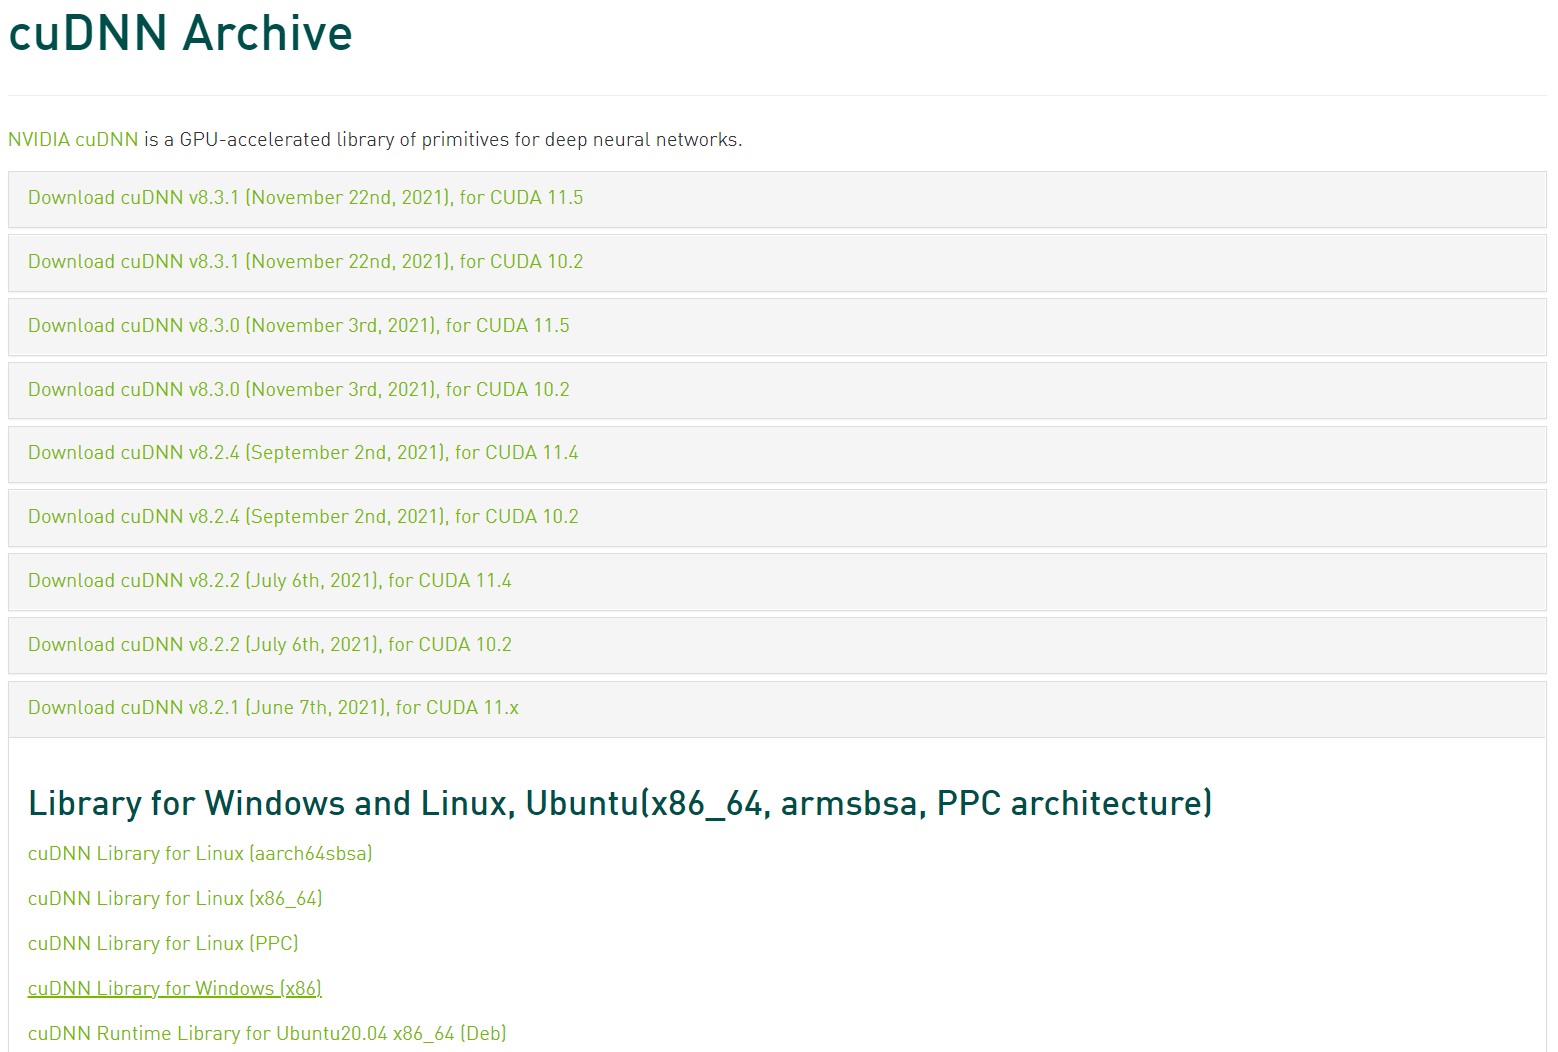
Head to https://developer.nvidia.com/rdp/cudnn-download. Create an NVIDIA Developer account (or login if you already have one). Ignore the cuDNN version listed in the TensorFlow version table (in the Prerequisites section). Instead, head to the cuDNN Archive and download the version that corresponds to the CUDA version you just installed.
For example, I just installed CUDA 11.2, so I’m going to download cuDNN v8.2.1 (which is the latest version that supports CUDA 11.x). Choose the cuDNN Library for your operating system (e.g. Windows).
The next part is a bizarre and seemingly old-fashioned method of installing a library. The full instructions can be found on this NVIDIA page (see section 3: Installing cuDNN on Windows).
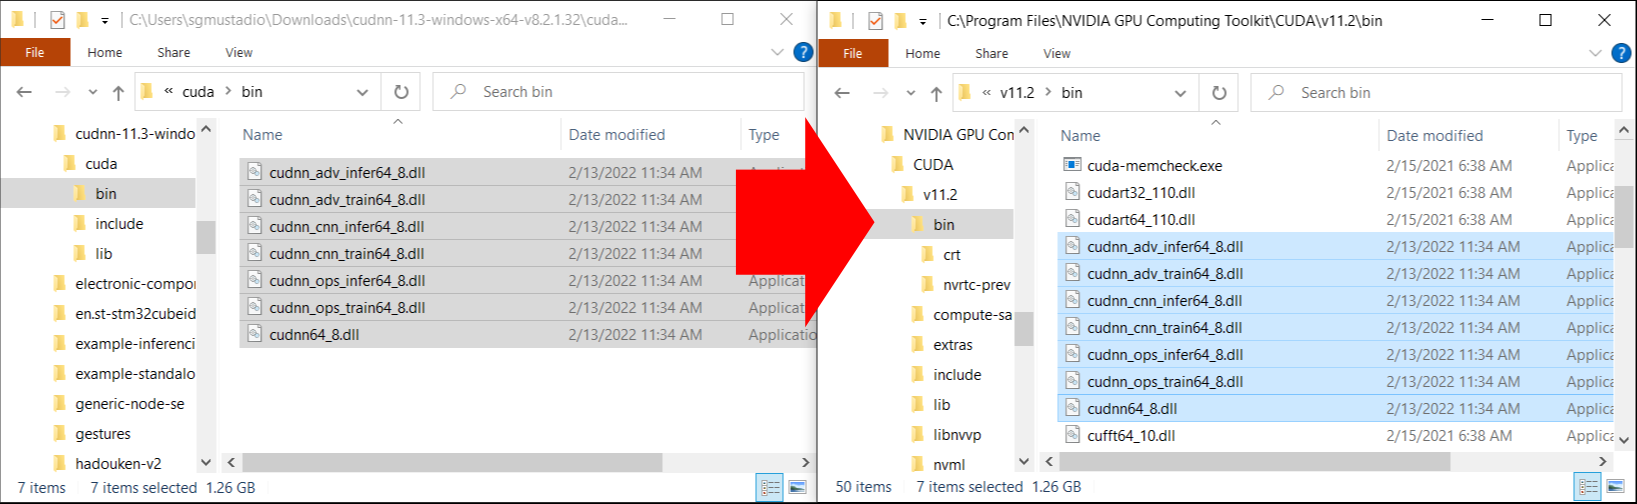
Unzip the downloaded archive. Navigate into the unzipped directory and copy the following files into the CUDA installation directory (* being any files found with the listed file extension, and vxx.x is the CUDA version you installed).
Copy <cuDNN directory>\cuda\bin\*.dll to C:\Program Files\NVIDIA GPU Computing Toolkit\CUDA\vxx.x\bin
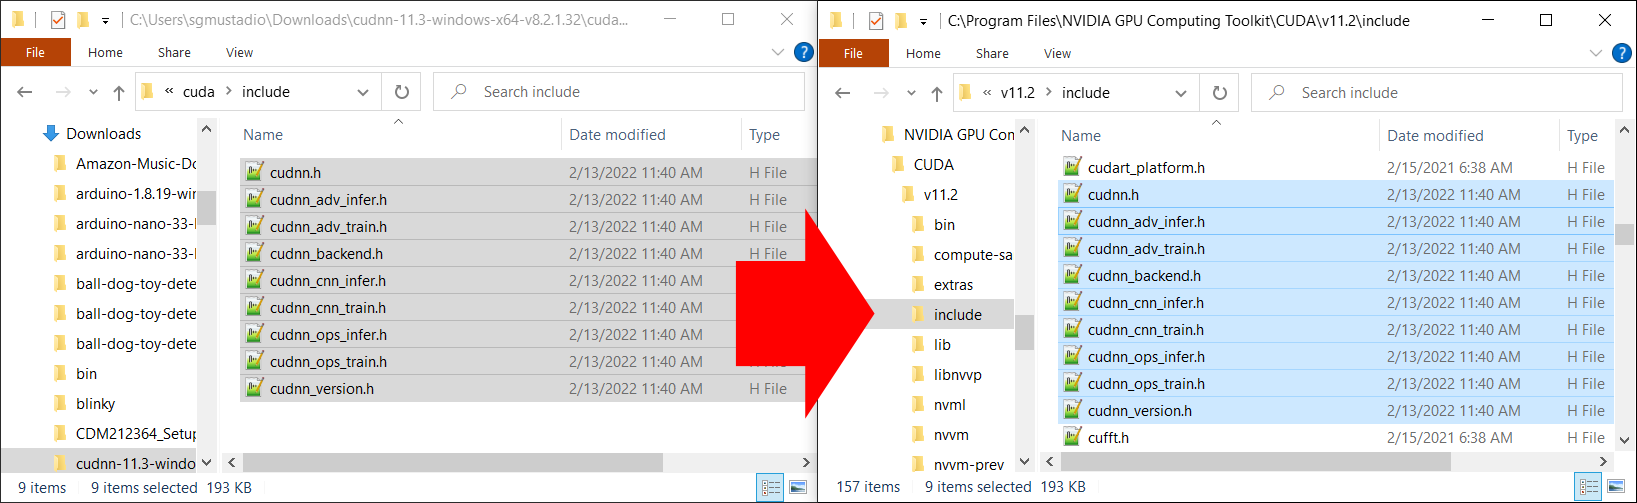
Copy <cuDNN directory>\cuda\include\*.h to C:\Program Files\NVIDIA GPU Computing Toolkit\CUDA\vxx.x\include
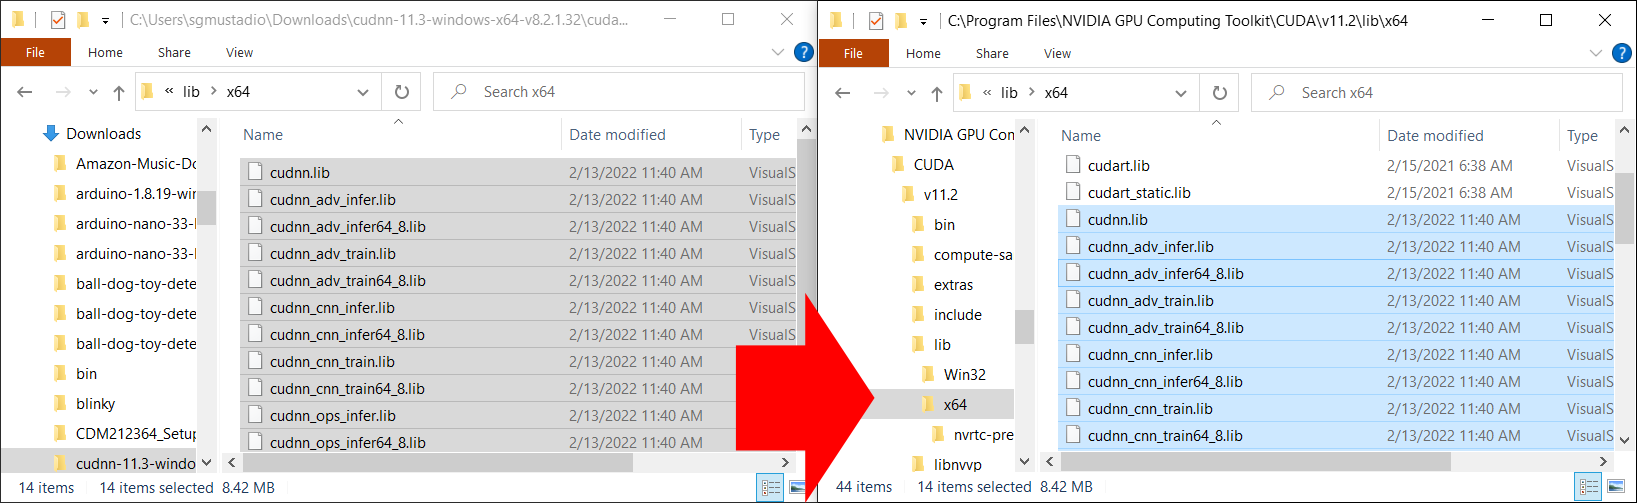
Copy <cuDNN directory>\cuda\lib\x64\*.lib to C:\Program Files\NVIDIA GPU Computing Toolkit\CUDA\vxx.x\lib\x64
Next, we need to update our environment variables. Open Control Panel > System and Security > System > Advanced System Settings.
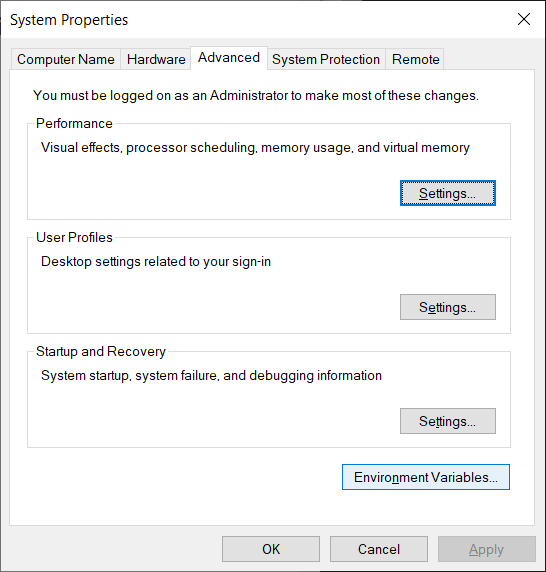
Click Environment Variables at the bottom of the window.
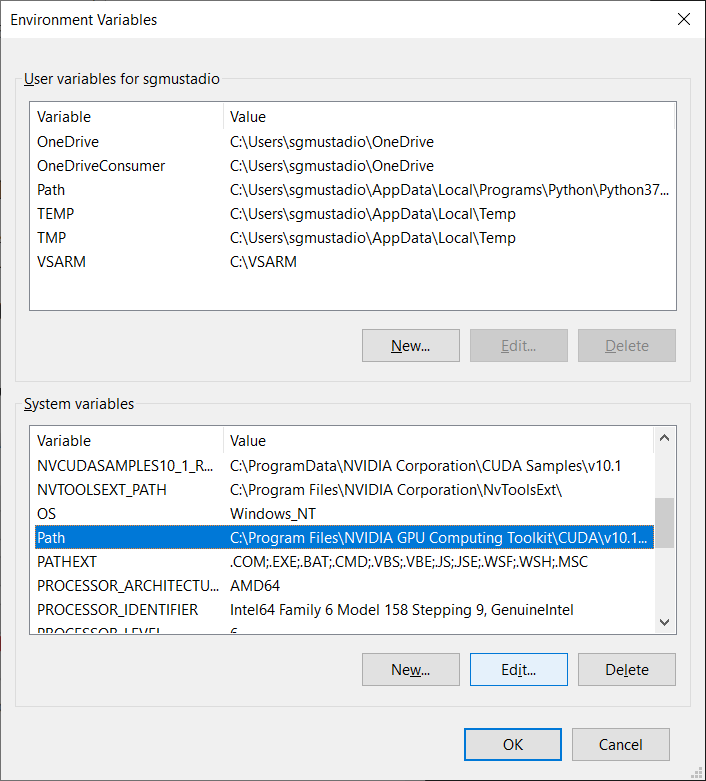
In the new window and in the System variables pane, select the Path variable and click Edit in the System variables pane.
You should see two CUDA entries already listed.
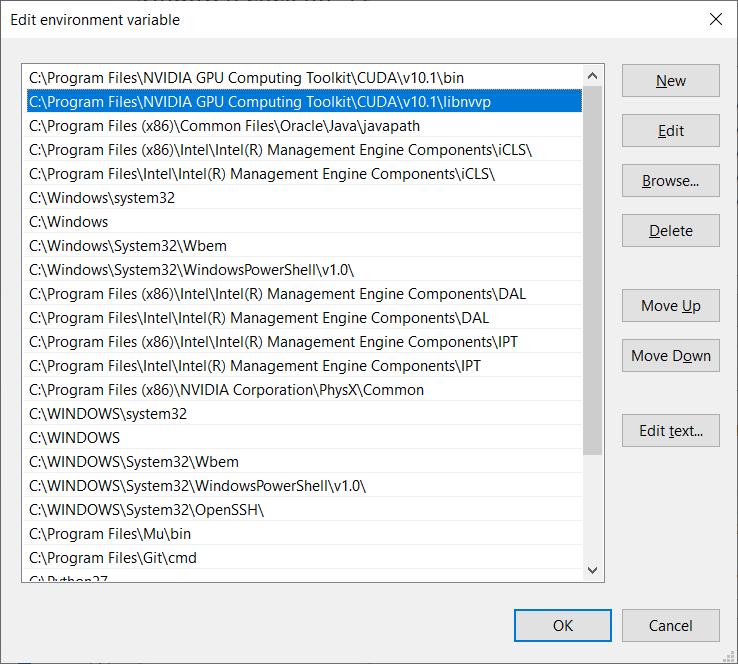
If you do not see these listed, add the following directories to this Path list (where vxx.x is your CUDA version number):
- C:\Program Files\NVIDIA GPU Computing Toolkit\CUDA\vxx.x\bin
- C:\Program Files\NVIDIA GPU Computing Toolkit\CUDA\vxx.x\libnvvp
Click OK on the three pop-up windows to close out of the System Properties.
Install TensorFlow
You can install TensorFlow any way you wish, but I highly recommend doing so through Anaconda. It makes installing Python, various packages, and managing environments much easier.
Head to anaconda.com. Download the Individual Edition for your operating system (Windows x64). Anaconda comes pre-packaged with Python set at a particular version, so you will need to note the version of Python required by TensorFlow in the Prerequisites section. For me, I need something between 3.7-3.9. As a result, Python 3.9 that comes with Anaconda (at the time of this Feb 13, 2022 update) works fine.
Run the Anaconda installer, accepting all the defaults.
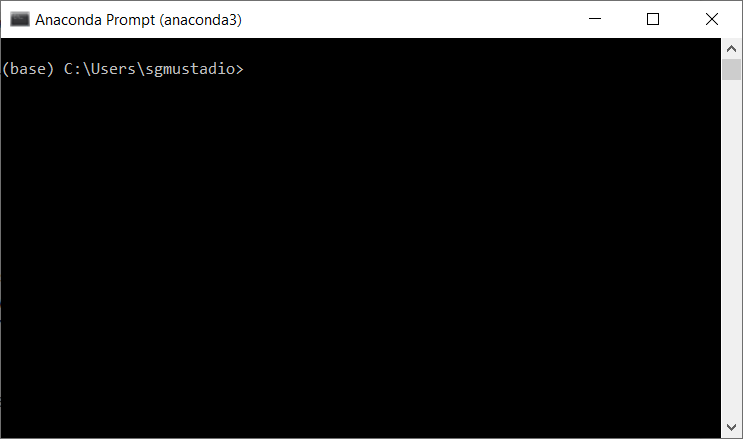
When it’s done, run the Anaconda Prompt (anaconda3).
In the terminal, we’ll create a new Python environment, which will help us keep this version of TensorFlow separate from the non-GPU version. First, update conda with the following:
conda update -n base -c defaults conda
Then, enter the following commands to create a virtual environment:
conda create --name tensorflow-gpu
conda activate tensorflow-gpu
Install a version of Python supported by TensorFlow-GPU (as given by the table in the Prerequisites section) for your virtual environment (I’ll use Python version 3.9).
conda install python=3.9
Enter the following command to make sure that you are working with the version of Python you expect:
python --version
If you wish to also install Jupyter Notebook, you can do that with:
conda install jupyter
Rather than let pip try to figure out which version of TensorFlow you want (it will likely be wrong), I recommend finding the exact .whl file from TensorFlow’s site. Head to the TensorFlow Pip Installer page and look at the Package Location list.
Look under the Windows section for the wheel file installer that supports GPU and your version of Python. For me, this will be the wheel file listed with Python 3.9 GPU support. Note that GPU support (_gpu), TensorFlow version (-2.2.0), and supported Python version (-cp37) are listed in the filename. Highlight and copy the URL with the .whl file you want.

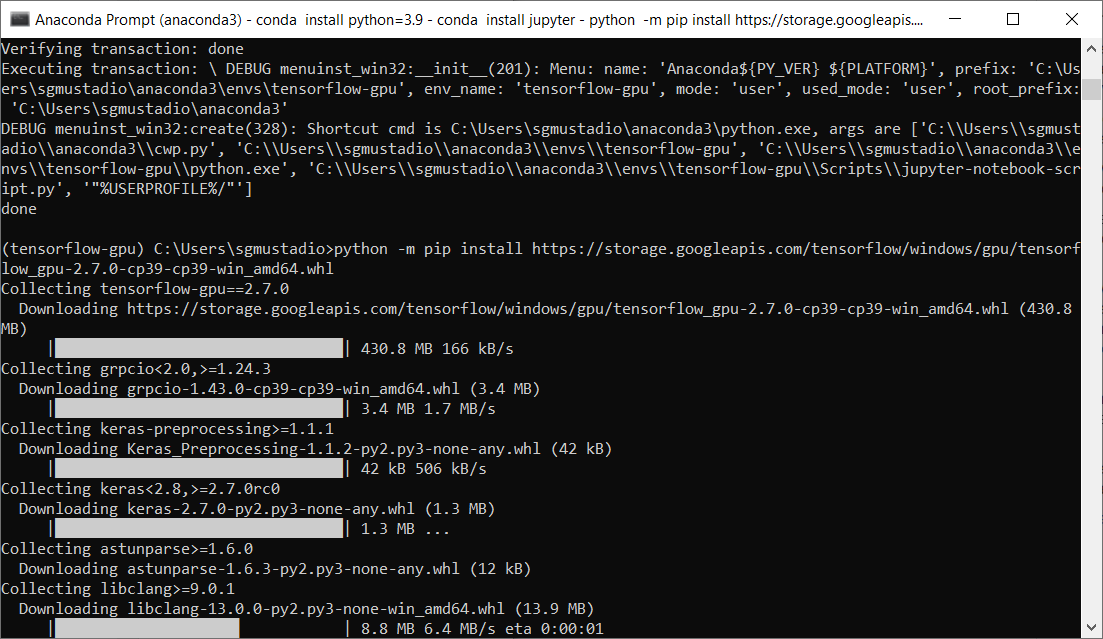
In Anaconda, enter the following command, replacing <wheel_url> with the URL that you copied in the previous step (i.e. paste it in).
python -m pip install <wheel_url>
Press ‘enter’ and let this run. It will take a few minutes.
When that’s done, go into the Python command line interface:
python
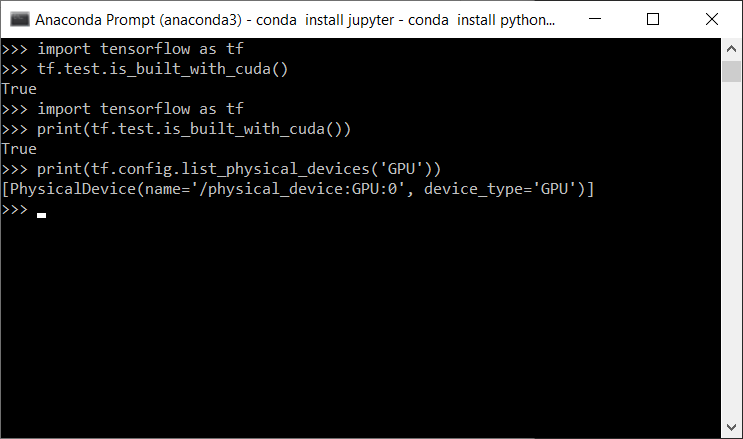
From there, enter the following commands (one at a time):
import tensorflow as tf
print(tf.test.is_built_with_cuda())
print(tf.config.list_physical_devices('GPU'))
These will tell you if TensorFlow is capable of running on your graphics card. The first line imports TensorFlow, the second line makes sure it can work with CUDA (it should output “True”), and the third line should list the GPUs available to TensorFlow.
Note that if you see any weird errors about missing Windows DLL files (whether in the Anaconda prompt, within Python, or in Jupyter Notebook), try the following from within Anaconda:
python -m pip install pypiwin32
Close the Anaconda prompt.
Running TensorFlow
When you’re ready to do some machine learning stuff, open the Anaconda Prompt and enter the following:
conda activate tensorflow-gpu
From there, you can use Python in Anaconda or start a Jupyter Notebook session (see here for a good overview of how to work with Jupyter Notebook):
jupyter notebook
If you wish to install a new Python package, like matplotlib, you can enter the following into the Anaconda Prompt (make sure you are in your environment, tensorflow-gpu, and exit Jupyter Notebook by pressing ctrl+c):
python -m pip install <name_of_package>
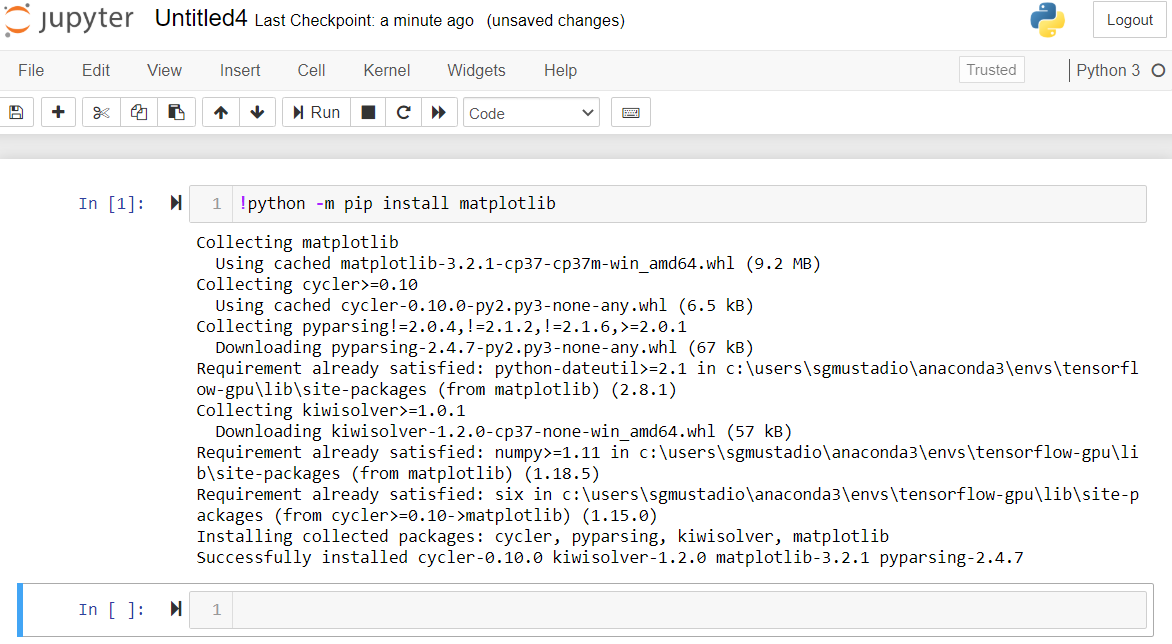
Alternatively, you can install a package from within Jupyter Notebook by running the following command in a cell:
!python -m pip install <name_of_package>
For example, here is how I installed matplotlib:
Some libraries, like OpenCV, require you to install system components or dependencies outside of the Python environment, which means you can’t simply use pip. If so, check to see if the package is available in the conda-forge. If it is, you can install it in your Anaconda environment with:
conda install -c conda-forge <name_of_package>Going Further
I hope this helps you get started using TensorFlow on your GPU! Thanks to Anaconda, you can install non-GPU TensorFlow in another environment and switch between them with the conda activate
See the following videos if you are looking to get started with TensorFlow and TensorFlow Lite:
- Getting Started with TensorFlow and Keras
- Intro to TensorFlow Lite Part 1: Wake Word Feature Extraction
- Intro to TinyML Part 1: Training a Neural Network for Arduino in TensorFlow
Thank you so much for this! After trying to follow outdated instructions this was the first to work for me.
Glad it helped!
Like GratefulUser420 says, your tut currently (Aug 2020) stands alone amid a sea of obsolete and rotted Google results.
NOTE: For some reason I was getting weird and horrifying .dll errors when trying to import tensorflow, but running “conda install numpy” made everything better.
Kudos, Shawn.
Glad it helped! I ran across the same issue, which is why I created this tutorial. That being said, I’m sure it’ll be obsolete in a couple of months!
thanks very much for the guide. installed tensorflow gpu finally after many failed attempts from other sites. wish i had found this site first… nevertheless, job done now… and many thanks for the help!
Glad it helped!
finally i was able to install tensorflow 2 using your guide
Thanks a lot
Great, thanks, that was really clear and worked first time.
I owe a thank you.
Thanks for tutorial but. aNAconda is a pain in the ass if we use IDE in Windows 10
Anaconda works fine for me on Windows 10. It’s not perfect, but I found it to be a lot easier than all the other methods I tried (i.e. installing Python locally through Windows’ CLI). What’s not working for you in Anaconda?
Hello, I followed the given steps completely. conda created the latest python version that is 3.8 . Installed the cuda version 11.1 alongwith cudnn . But eventually getting the error:
“`
2020-11-15 10:21:04.309190: W tensorflow/stream_executor/platform/default/dso_loader.cc:59] Could not load dynamic library ‘cudart64_101.dll’; dlerror: cudart64_101.dll not found
2020-11-15 10:21:04.320539: I tensorflow/stream_executor/cuda/cudart_stub.cc:29] Ignore above cudart dlerror if you do not have a GPU set up on your machine.
“`
It would be great if you could suggest why this exact issue might be happening? And how to solve this?
Make sure that you’ve got the right version of CUDA matched with the right version of cuDNN and matched with the right version of TensorFlow (it’s a bit of a pain to make sure all the versions match). This chart might help: https://www.tensorflow.org/install/source#gpu. If your versions are compatible, then you can download the .dll directly from here: https://github.com/tensorflow/tensorflow/issues/36111#issuecomment-581815799.
Hi, thanks a lot for the article. I’m getting the same error. Could you explain in a bit detail what to do after downloading .dll? Where to extract it?
The post in the link suggests putting the .dll in C:\Program Files\NVIDIA GPU Computing Toolkit\CUDA\vxx.x\bin\ (where vxx.x is your CUDA version, e.g. v10.2).
Worked perfectly! Thanks!
I wanted CUDA 10.1 like you, but I’ve seen several versions of CUDNN for CUDA 10.1. I first tried the most recent one (cuDNN v.8.0.4 as of this writing) but when listing the GPU devices later with python, I obtained the error : cannot find cudnn64_7.dll. I noticed in C:\Program Files\NVIDIA GPU Computing Toolkit\CUDA\v10.1\bin I had cudnn64_8.dll.
I noticed the cudnn64_7.dll was instead in cuDNN v7.6.5 (the same as the one you used). So I removed all dll an .h files copied with cuDNN v8.0.4 and redid the procedure with cuDNN v7.6.5 and it worked perfectly. Hope this helps other people.
You’ve done the hard work of explaining all steps in details with screenshots! Kudos!!
Even the WLS2 approach failed, using the special windows insider build (ubuntu using the latest nvidia-docker image: step by step instructions from nvidia failed at some point when installing the CUDA toolkit: /usr/lib/wsl/lib/libcuda.so.1 is not a symbolic link
Experimented by several people: https://github.com/microsoft/WSL/issues/5548
This approach doesn’t seem to be mature.
But your recipe is so much simpler and worked!
One of the best articles I have come across for this purpose. I wish I would have encountered this a bit earlier. Many articles lack the clarity that you have covered. The fact that this article not only covers the correct steps but also provides resources and explanation makes this a powerful and a long lasting resource for anyone. Thanks for this contribution.
Best! Just follow the steps as mentioned and don’t add your intuition because it will create trouble. I’m the sufferer.
Got to echo the rest. This was really helpful! And while the exact versions might be obsolete by now, the instructions on matching them, checking against tensorflow dependencies table, etc are timeless! Thanks a lot for taking time to write it up!
Thanks a lot, Shawn! I skipped the Conda part, works like a charm.
Lot’s Lot’s of love for this article.
Good info, Shawn. But I received the following error message when shutting down a jupyter kernel with tensorflow:
[I 2021-11-13 23:19:20.085 ServerApp] Kernel shutdown: 0cdf70a9-b5cf-4e02-9e43-f78104114b80
Error in atexit._run_exitfuncs:
Traceback (most recent call last):
File “C:\Users\dlin1\miniconda3\lib\logging\__init__.py”, line 2127, in shutdown
h.close()
File “C:\Users\dlin1\miniconda3\lib\site-packages\absl\logging\__init__.py”, line 951, in close
self.stream.close()
File “C:\Users\dlin1\miniconda3\lib\site-packages\ipykernel\iostream.py”, line 428, in close
if self._exc:
AttributeError: ‘OutStream’ object has no attribute ‘_exc’
Could you please suggest a way to fix it? Thanks.
I’m not sure what’s causing that error–it looks like something from Anaconda. Does everything else seem to be working OK (e.g. TensorFlow operations run without error and you can save/load your Notebooks)? If so, you probably don’t need to worry about it.
By using “python -m pip install” and “conda install”, do you mix pip and conda installs? Would that create any problems down the road?
I am always confused about these two package management tools (pip and conda). I use conda to create a baseline environment first. But then some packages need pip install and I use pip to install them. After that, I use pip to install and update more packages in that baseline environment. Do you see any problems with this approach? Would it create problems if I want to create a new conda environment later on? Would that new conda environment recognize the pip installs?
Good question–I do try to use pip where I can, as that keeps everything within a particular Python environment. However, pip is not able to do some things, like install Python or install some drivers (which is required by some tools like Jupyter Notebook). For those, I’ll use the conda installer/manager. Hope that helps!
If you use user conda again, after using pip to install/upgrade packages, will conda recognize the changes done by pip?
Yes, installations done with pip will be saved by the conda environment.
Great. Thank you, Shawn!
Hi Shawn,
Can you suggest on how to debug tensorflow GPU installation on the WSL 2 of Windows 11? I got the following error messages for my install:
2021-12-16 09:01:28.607328: I tensorflow/stream_executor/cuda/cuda_gpu_executor.cc:925] could not open file to read NUMA node: /sys/bus/pci/devices/0000:06:00.0/numa_node
Your kernel may have been built without NUMA support.
2021-12-16 09:01:28.660756: W tensorflow/stream_executor/platform/default/dso_loader.cc:64] Could not load dynamic library ‘libcudnn.so.8’; dlerror: libcudnn.so.8: cannot open shared object file: No such file or directory
2021-12-16 09:01:28.660768: W tensorflow/core/common_runtime/gpu/gpu_device.cc:1850] Cannot dlopen some GPU libraries. Please make sure the missing libraries mentioned above are installed properly if you would like to use GPU. Follow the guide at https://www.tensorflow.org/install/gpu for how to download and setup the required libraries for your platform.
Skipping registering GPU devices…
Hi Shawn,
I have fixed the problem. I used conda install tensorflow-gpu=2.6.2 and it installed all drivers too. So I am good. But thanks for all your help!
David
very helpful article. saved a lot of time for us. guided us through each & every step. you’re a lifesaver. keep up the good work.
Awesome. It is of great help. Thank you
If there is anyone who encounters an error like this –
TypeError: Unable to convert function return value to a Python type! The signature was
() -> handle
-> then try downgrading your numpy version to 1.23.5 by using – “pip install numpy==1.23.5”. I had this issue and it got resolved.