custom wake word cover

Custom Wake Word Part 1: Capturing Data

One of the biggest complaints about many home assistants (like the Amazon Echo) is the inability to create custom wake words. Sure, you can select from a list of pre-existing wake words, but to create your own is quite a technical challenge. Sometimes, it might be fun to say something other than “Alexa” or “OK Google.”

I want to create a multi-part series on how you might go about creating custom wake words (also known as a “hotword”). These tutorials will show you how to collect voice samples and train a simple machine learning model (neural network) to use on any number of devices, including single board computers (e.g. Raspberry Pi) and microcontrollers (e.g. Arduino).

This first tutorial will demonstrate one possible way to collect voice samples necessary for training your model. If you would like to see me discuss data collection and why I’m doing this project, see this video:

Why You Need to Capture Data for Your Custom Wake Word

Unfortunately, you can’t just say a word a couple of times and train a neural network to recognize that word. Computers are still not quite as capable as toddlers.

Even if you said a word 100 times, the neural network would likely learn features of your voice rather than the word itself. After that, every time you said something even remotely close to the wake word, the model would label it as the wake word.

To remedy this, we need lots of different types of people with different types of voices saying the same word (and with different inflections). With hundreds or thousands of different training examples, the neural network will hopefully learn the features that uniquely make up that word rather than your particular voice.

Companies that make voice assistants have their own methods of capturing voice samples. For example, Google scrapes millions of YouTube videos to create audio training sets for sounds and voices. Here is an example of one such set you can use in your training. Note that these are “human-labeled,” meaning Google likely paid lots of people to listen to lots of audio clips and assign a label to each one.

Another way to collect voice data is by crowd-sourcing. We can do that by creating a web page that people can volunteer to submit their own audio samples.

Google Speech Commands Dataset

For the TinyML research project as part of the TensorFlow Lite library, Pete Warden created the Speech Commands Dataset, which you can download here.

Pete collected this data by asking volunteers to visit a web page, which he designed to walk users through submitting voice samples. You can visit that page here.
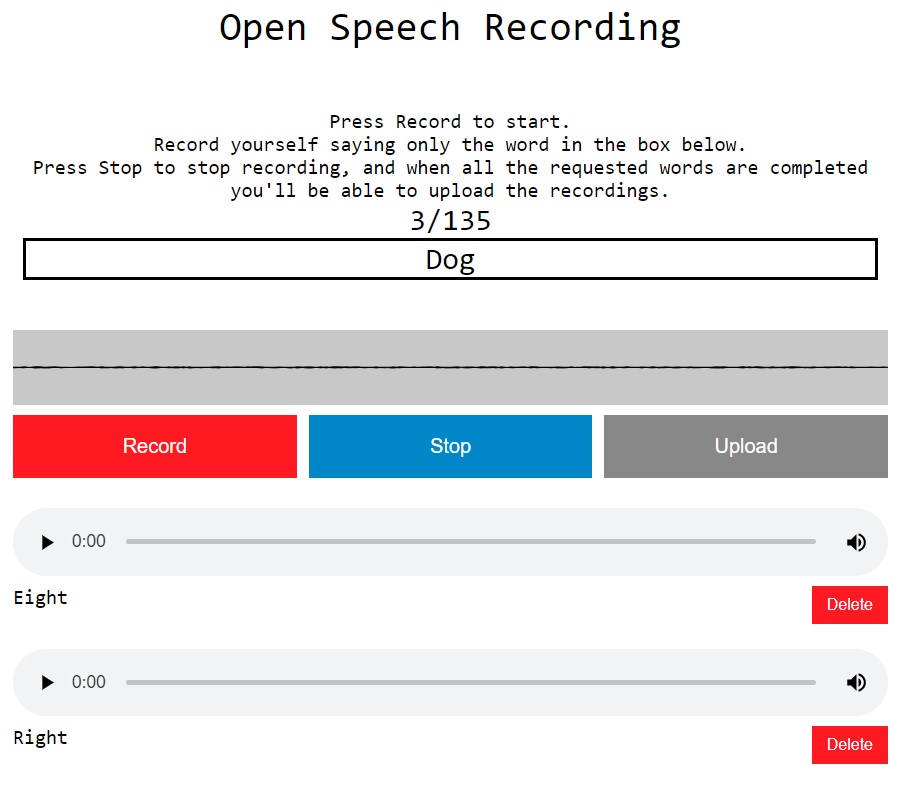
The Google Speech Commands dataset was used to train a neural network to recognize simple words, such as “yes,” “no,” “up,” “down,” and so on. The model was simple enough to be deployed on a microcontroller so that it could recognize one or more of these words.

You can learn more about the Google Speech Commands dataset here. Pete Warden has released code for this page here.

simple-recorderjs

Had I known about the Pete’s source code, I probably would have used that. However, I ended up going down a slightly different route to crowd source my wake word dataset.

I came across this open source project, which adds an audio recording and playback feature to web pages. Since I am not much of a web developer, I got my friend, Andrew, to help me modify that project to my needs.

Custom Speech Data Collection Page

The code Andrew and I came up with can be found in this GitHub repository. Specifically, it is saved in the “botwords” directory.

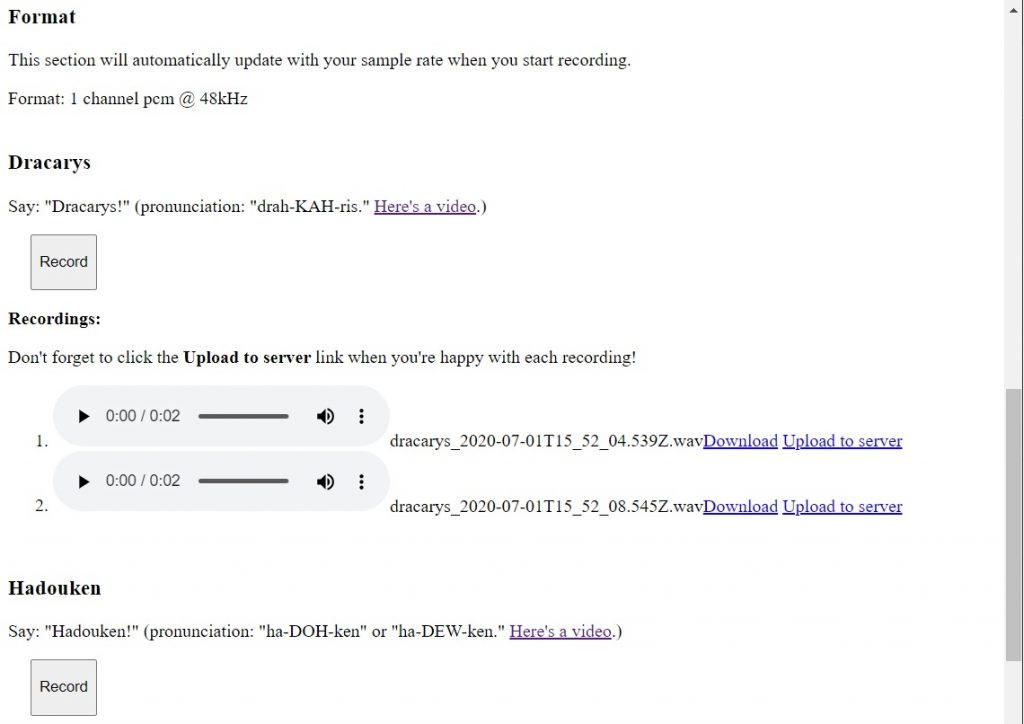
The botwords page is hosted on my server as a standalone page. It is very simple HTML and does not rely on any other frameworks (such as WordPress). It gives an overview of the projects my collaborators and I are working on and instructions on how to submit your voice.

A user can press the “Record” button under each word to record their sample. Once recorded, a playback bar will appear, which allows users to preview their recording. If satisfied, they can click “Upload to server,” which will save the .wav file on my server. Users are encourages to create multiple recordings with different inflections for each wake word or phrase.
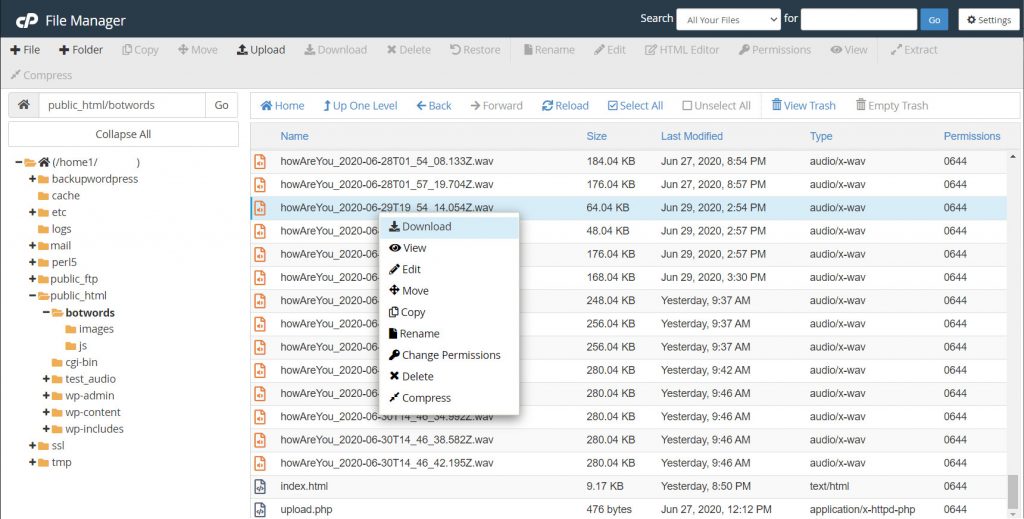
To use the page, simply drop the botwords folder into your public_html folder on your server. It will then be hosted at <your_website>/botwords. Feel free to change the code in index.html and app.js to perform whatever actions you want. You can change the slug by changing the directory name. For example, if you rename the botwords directory to myproject, the URL becomes <your_website>/myproject.

From there, tell all your friends and get people to submit speech samples. I do not recommend leaving the page up indefinitely, as your server could easily become overloaded, depending on how popular you are.

When you’re done running your “speech crowd sourcing campaign,” log into your server and download the .wav files, which should be located in the project directory (botwords for me).
Modifying the Code

If you want to use the botwords code for your own project, you should not need to modify app.js (unless you want to change how recording is done or to increase/decrease the recording time).

The part you need to worry about is how the recordButton objects work in index.html. Here is one example:

<!-- Section: Hadouken -->
<br>
<h3>Hadouken</h3>
<p>Say: "Hadouken!" (pronunciation: "ha-DOH-ken" or "ha-DEW-ken." <a href="https://www.youtube.com/watch?v=7jgdycXQv80">Here's a video</a>.)</p>
<button class="recordButton" id="hadouken" style="height:50px; margin-left:20px;">Record</button>
<p><strong>Recordings:</strong></p>
<ol id="hadoukenList"></ol>

Notice that we assigned the button to class “recordButton” and gave it a unique ID that told us something about the wake word we want to record. That ID string is prepended to the front of the .wav filename, and it should be the same string found in the <ol> list (prepended to the ID string, such as “hadoukenList”). The JavaScript code will look for this list ID name when attaching playback objects.

So, if you wanted to record “hello,” you would need:

<button class="recordButton" id="hello" style="height:50px; margin-left:20px;">Record</button>
<p><strong>Recordings:</strong></p>
<ol id="helloList"></ol>

Collaboration

For my personal project, I would like to get a video game controller to respond to the Street Fighter II phrase “hadouken.” This might seem frivolous (because, well, it is), but I’m hoping I can use it as a way to develop a series of tools and tutorials to help people train their own wake words.

Additionally, I am collaborating with Jorvon Moss (@Odd_Jayy), who is building a dragon companion bot along with with Alex Glow (@glowascii), who is modifying her owl bot and building a new fennec fox bot. Both of these amazing makers are hoping to have their robotic pets respond to a handful of spoken words.

Conclusion

Much has been written about automatic speech recognition (ASR), and many tools already exist in our daily lives that we can interact with using our voices (e.g. asking Alexa a question). These ASR systems often require huge systems to process full speech.

I would like to find ways to make machine learning simpler by bringing it to the edge. What kinds of fun things would you make if your device could only respond to 2 different spoken words? The advantage is that it does not require an Internet connection or a full computer to operate.

In the process, I hope to make machine learning more accessible to makers, engineers, and programmers who might not have a background in it.

How to Install TensorFlow on Windows

This tutorial will show you how to install TensorFlow on Windows. You do need need any special hardware. Although, you should be running Windows 10 on a 64-bit processor.

TensorFlow maintains a number of Docker images that are worth trying if you do not want to fight with version numbers. Read about how to use the TensorFlow Docker images here.

Prerequisites

We need to pay attention to version numbers, as TensorFlow works with only certain versions of Python. Head to this page to look at the available versions of TensorFlow.

At the time of writing, the most recent version of TensorFlow available is 2.2.0. By looking at the table, we can see that it requires Python version 3.5-3.8.

Version Python version Compiler Build tools
tensorflow-2.2.0 3.5-3.8 MSVC 2019 Bazel 2.0.0

Install Anaconda

While you could install TensorFlow directly on your system next to whatever Python version you wish, I recommend doing everything through Anaconda.

Anaconda provides a terminal prompt and can easily help you switch between Python environments. This proves to be extremely helpful when you want to run multiple versions of Python and TensorFlow side by side.

Head to anaconda.com and download the Individual Edition for your operating system (Windows x64). Run the Anaconda installer and accept all the default settings.

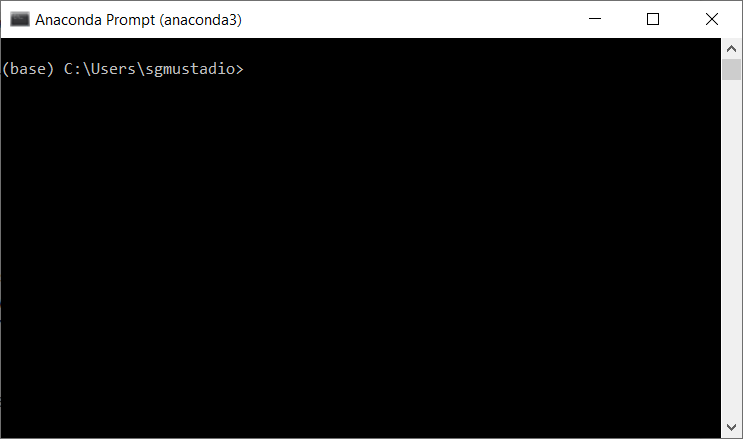
When that is complete, run the Anaconda Prompt (anaconda3).

The Anaconda Prompt

Install TensorFlow

In the terminal, we want to create a new Python environment. This helps us keep various versions of Python and TensorFlow separate from each other (such as separate CPU and GPU versions). Enter the following commands:

conda create --name tensorflow-cpu
conda activate tensorflow-cpu

Check the version of Python that came with Anaconda using the following command:

python --version

If you want to use different version of Python, you can enter the following command (x.x is the version of Python). For example, I will install 3.7, as that falls in the acceptable version range for TensorFlow 2.2.0, which requires Python 3.5-3.8:

conda install python=x.x

If you wish to also install Jupyter Notebook, you can do so with the following:

conda install jupyter

Note that if you switch environments in Anaconda (e.g. to tensorflow-gpu), you will need to reinstall packages, as the each environment keeps everything separate.

If we run pip on its own to install TensorFlow, it will likely try to pull an outdated version. Since we want the newest release, we’ll have to tell pip where to download a specific wheel file (.whl). 

Navigate to the TensorFlow Pip Install page and look at the Package Location list.

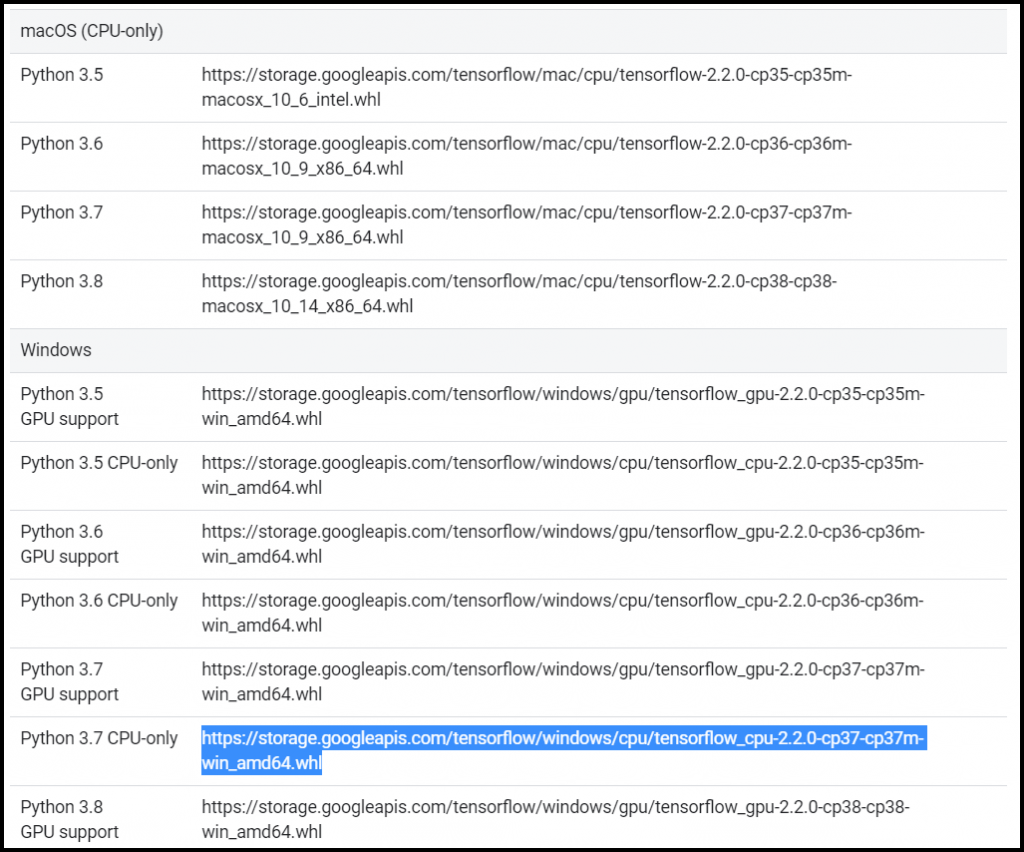
Go to the Windows section and find the CPU-only version that supports your version of Python. For me, this will be the .whl file listed with Python 3.7 CPU-only. Note that the required versions are listed in the filename: CPU-only (_cpu), TensorFlow version (-2.2.0), and supported Python version (-cp37). Highlight and copy the .whl file URL.

Python pip .whl file location to install TensorFlow on Windows

In Anaconda, enter the following command and replace <wheel_url> with the URL that you just copied:

python -m pip install <wheel_url>

Press ‘enter’ and wait a few minutes while TensorFlow installs.

Install TensorFlow with Anaconda

When it’s done, go into the Python command line interface:

python

Check if TensorFlow is installed by entering the following commands:

import tensorflow as tf
print(tf.__version__)

You should see the version of TensorFlow printed out (e.g. “2.2.0”).

How to check TensorFlow version in Python

Close the Anaconda prompt.

Running TensorFlow

When you’re ready to work with TensorFlow, open the Anaconda Prompt and enter the following:

conda activate tensorflow-cpu

Now, you can use TensorFlow from within the Anaconda Prompt or start a Jupyter Notebook session. 

jupyter notebook

This article gives a good introduction to using Jupyter Notebook.

If you want to install a Python package, you can do so inside of the Anaconda Prompt. Make sure that you are in the desired environment (e.g. tensorflow-cpu) first and that Jupyter Notebook is not running (quit Jupyter Notebook by pressing ctrl+c inside the Anaconda Prompt). From there, install a package with:

python -m pip install <name_of_package>

You can also install a package from inside Jupyter Notebook by running the following command in a cell:

!python -m pip install <name_of_package>

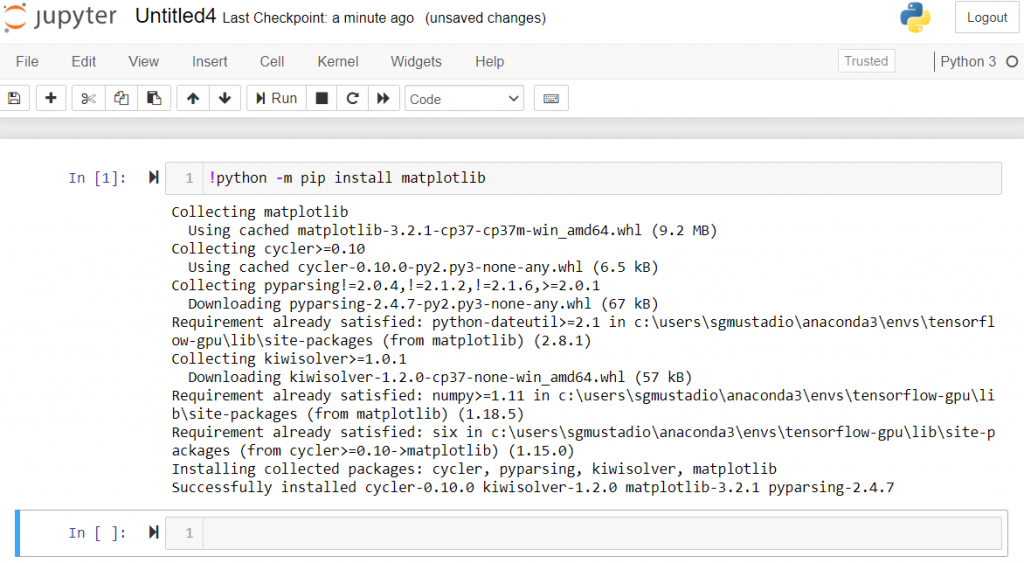
For example, I installed matplotlib here:

Install Python package from within Jupyter Notebook

Going Further

If you have an NVIDIA graphics card capable of running CUDA, you might be able to speed up some of your TensorFlow applications by enabling GPU support. You will need to install several drivers, and I recommend installing tensorflow-gpu in a separate Anaconda environment. See this guide on installing TensorFlow with GPU support on Windows.

See the following videos if you are looking for an introduction on TensorFlow and TensorFlow Lite:

Install TensorFlow with GPU support

How to Install TensorFlow with GPU Support on Windows

This tutorial will show you how to install TensorFlow with GPU support on Windows. You will need an NVIDIA graphics card that supports CUDA, as TensorFlow still only officially supports CUDA (see here: https://www.tensorflow.org/install/gpu).

If you are on Linux or macOS, you can likely install a pre-made Docker image with GPU-supported TensorFlow. This makes life much easier. See here for details (this article is about a year old, so a few things might be out of date). However, for those of us on Windows, we need to do things the hard way, as there is no NVIDIA Docker support on Windows.

See this article if you would like to install TensorFlow on Windows without GPU support.

[Update February 13, 2022] Updated some screenshots and a few commands to ensure that everything works with TensorFlow 2.7.0.

Prerequisites

To start, you need to play the version tracking game. First, make sure your graphics card can support CUDA by finding it on this list: https://developer.nvidia.com/cuda-gpus.

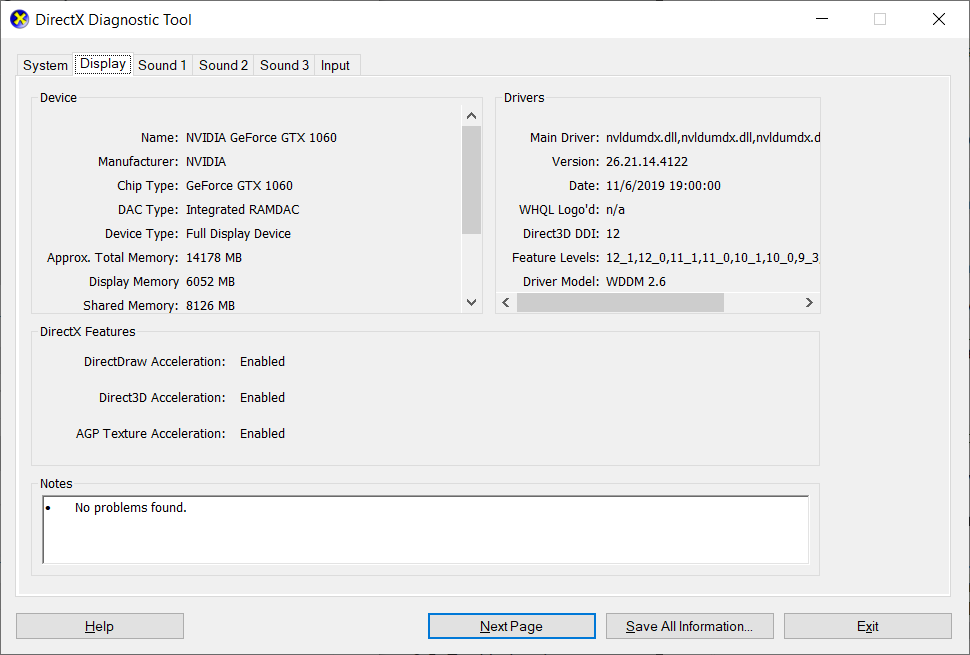
For example, my laptop has a GeForce GTX 1060, which supports CUDA and Compute Capability 6.1.

You can find the model of your graphics card by clicking in the Windows search bar and entering “dxdiag.” This tool will identify your system’s hardware. The Display tab should list your graphics card (if present on your computer).

DirectX Diagnostic Tool

Then, we need to work backwards, as TensorFlow usually does not support the latest CUDA version (note that if you compile TensorFlow from source, you can likely enable support for the latest CUDA, but we won’t do that here). Take a look at this chart to view the required versions of CUDA and cuDNN.

At the time of writing (updated Feb 13, 2022), this is the most recent TensorFlow version and required software:

Version Python version Compiler Build tools cuDNN CUDA
tensorflow_gpu-2.7.0 3.7-3.9 MSVC 2019 Bazel 3.7.2 8.1 11.2

Take a note of the particular required software versions listed for the particular TensorFlow version you wish to use. While you could compile TensorFlow from source to support newer versions, it’s much easier to install the specific versions listed here so we can install TensorFlow using pip.

Install Microsoft Visual C++ Compiler

The CUDA Toolkit uses the Microsoft Visual C++ (MSVC) compiler. The easiest way to install it is through Microsoft Visual Studio.

Download and install Visual Studio Community (which is free) from this site: https://visualstudio.microsoft.com/vs/community/. Yes, it’s a full IDE that we won’t use–we just need the compiler that comes with it.

[Update Feb 13, 2022] Note: at this time, the CUDA Toolkit installer will not find the latest version of Visual Studio Community (2022). You will need to install the older 2019 version by downloading from here.

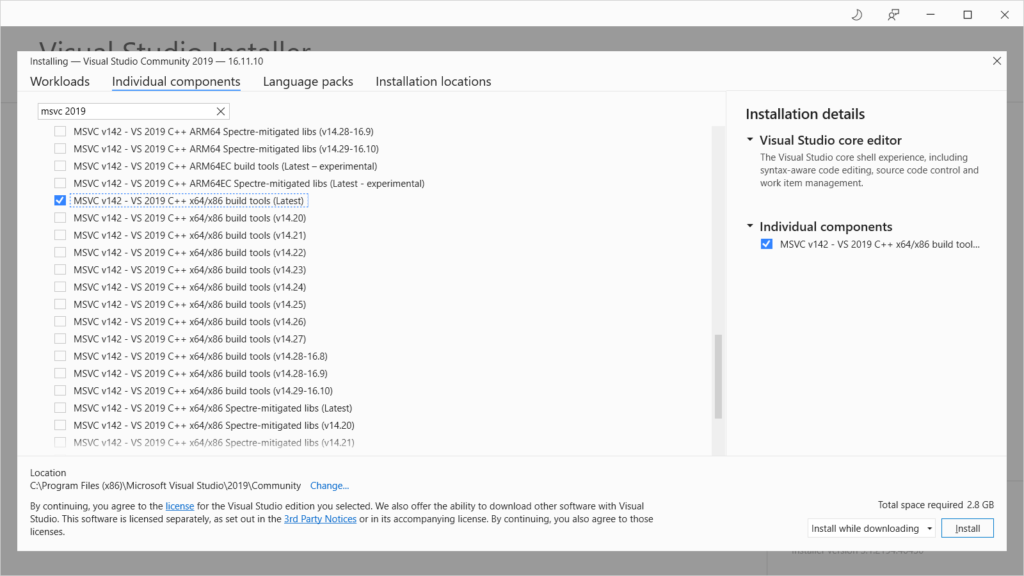
Run the installer. You will be asked to install workloads. Click on the Individual components tab. Search for “msvc 2019” and select the latest MSVC C++ 2019 build tools version for your computer. For me, that was MSVC v142 – VS 2019 C++ x64/x86 build tools (Latest).

Install MSVC for Visual Studio Community

Click Install. When asked about continuing installation without a workload, click Continue. After installation is complete, you do not need to sign into Visual Studio. Simply close out all of the installation windows.

Install CUDA Toolkit

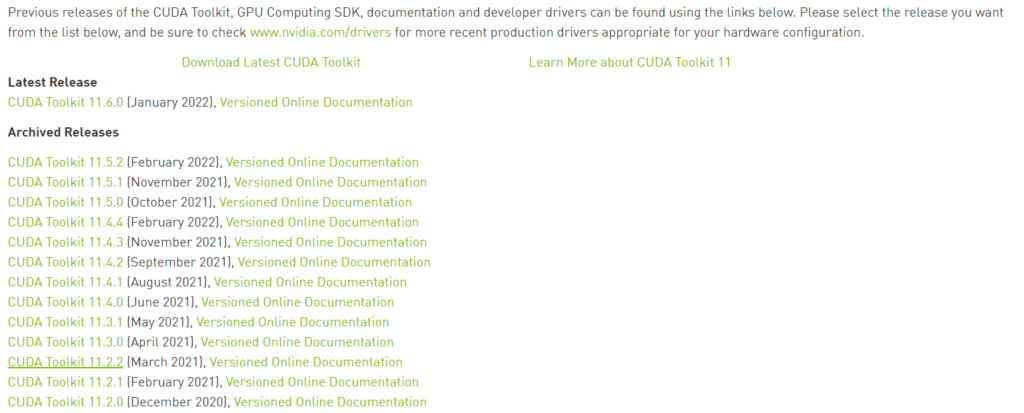
Navigate to the CUDA Toolkit site. Note the CUDA version in the table above, as it’s likely not the latest CUDA release. So, you’ll need to click on Archive of Previous CUDA Releases. Download the CUDA Toolkit version that is required for the TensorFlow version you wish to install (see the table in the Prerequisites section). For me, that would be CUDA Toolkit 10.1 update2 (Feb 13, 2022 update: CUDA Toolkit 11.2.2).

CUDA toolkit archive versions

Download the installer for your operating system (which is probably Windows 10). I used the exe (network) installer so that it downloads only the required components.

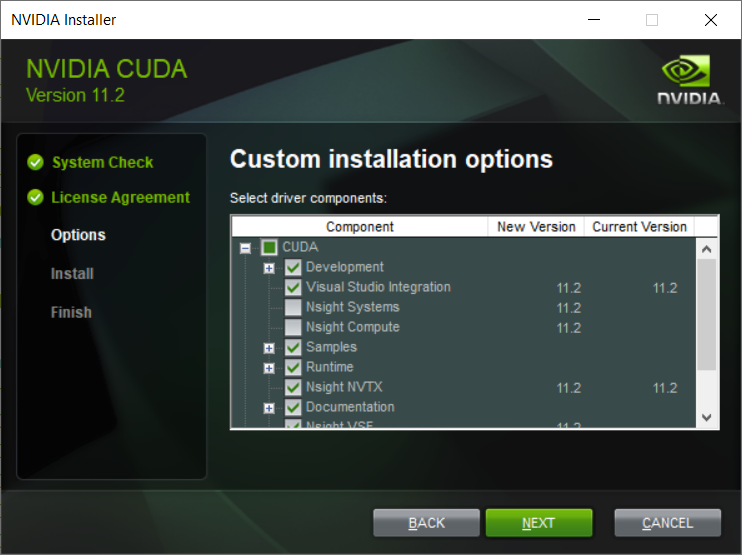
Run the installer. It will take a few minutes to scan your system. Once scanning is done, accept the license agreement and select Custom (Advanced) install.

Deselect the components you don’t need. For example, we likely won’t be developing custom CUDA kernels, so deselect Nsight Compute and Nsight Systems. I don’t have a 3D monitor, so I’ll deselect 3D Vision. I’ll keep PhysX selected for gaming, but feel free to deselect it, as it’s not needed by TensorFlow. You can leave everything else selected.

NVIDIA CUDA Toolkit installer

Click Next. Leave the installation directories as default (if you wish) and click Next again to download and install all of the drivers and toolkit. This will take a few minutes. Close the installer when it finishes.

Install cuDNN

GPU-accelerated TensorFlow relies on NVIDIA cuDNN, which is a collection of libraries used to run neural networks with CUDA.

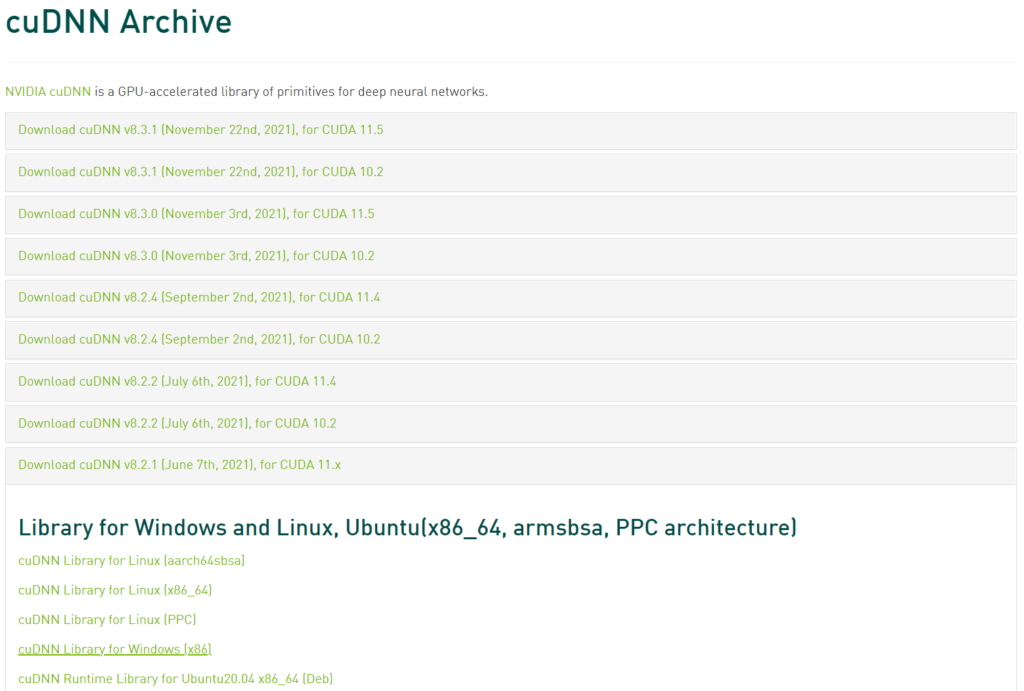
Head to https://developer.nvidia.com/rdp/cudnn-download. Create an NVIDIA Developer account (or login if you already have one). Ignore the cuDNN version listed in the TensorFlow version table (in the Prerequisites section). Instead, head to the cuDNN Archive and download the version that corresponds to the CUDA version you just installed.

For example, I just installed CUDA 11.2, so I’m going to download cuDNN v8.2.1 (which is the latest version that supports CUDA 11.x). Choose the cuDNN Library for your operating system (e.g. Windows).

Download NVIDIA cuDNN library

The next part is a bizarre and seemingly old-fashioned method of installing a library. The full instructions can be found on this NVIDIA page (see section 3: Installing cuDNN on Windows).

Unzip the downloaded archive. Navigate into the unzipped directory and copy the following files into the CUDA installation directory (* being any files found with the listed file extension, and vxx.x is the CUDA version you installed).

Copy <cuDNN directory>\cuda\bin\*.dll to C:\Program Files\NVIDIA GPU Computing Toolkit\CUDA\vxx.x\bin

Install NVIDIA cuDNN dll files

Copy <cuDNN directory>\cuda\include\*.h to C:\Program Files\NVIDIA GPU Computing Toolkit\CUDA\vxx.x\include

Install NVIDIA cuDNN header files

Copy <cuDNN directory>\cuda\lib\x64\*.lib to C:\Program Files\NVIDIA GPU Computing Toolkit\CUDA\vxx.x\lib\x64

Install NVIDIA cuDNN lib files

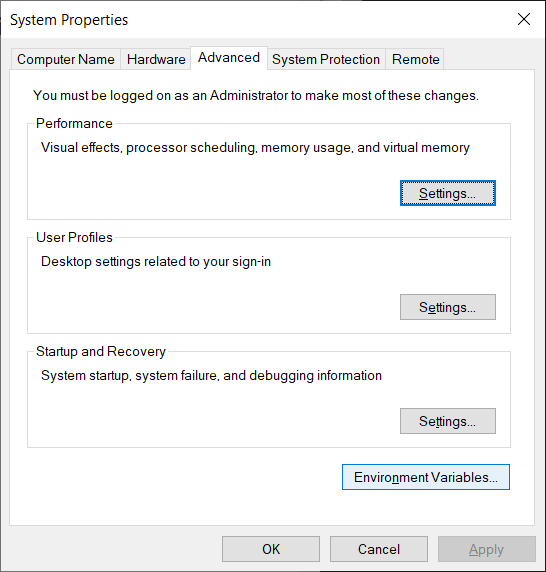
Next, we need to update our environment variables. Open Control Panel > System and Security > System > Advanced System Settings.

Edit system properties in Windows

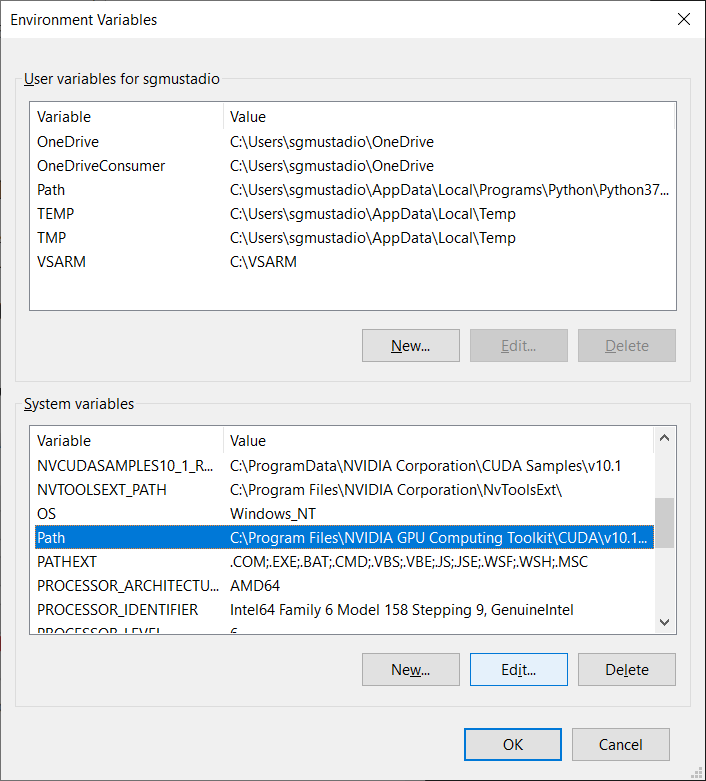
Click Environment Variables at the bottom of the window.

CUDA update environment variables

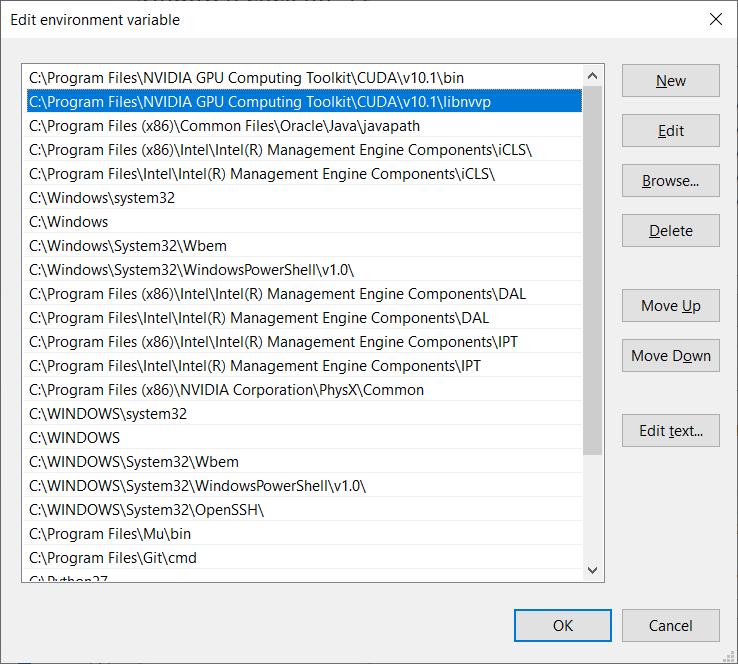
In the new window and in the System variables pane, select the Path variable and click Edit in the System variables pane.

You should see two CUDA entries already listed.

System path CUDA entries

If you do not see these listed, add the following directories to this Path list (where vxx.x is your CUDA version number):

  • C:\Program Files\NVIDIA GPU Computing Toolkit\CUDA\vxx.x\bin
  • C:\Program Files\NVIDIA GPU Computing Toolkit\CUDA\vxx.x\libnvvp

Click OK on the three pop-up windows to close out of the System Properties.

Install TensorFlow

You can install TensorFlow any way you wish, but I highly recommend doing so through Anaconda. It makes installing Python, various packages, and managing environments much easier.

Head to anaconda.com. Download the Individual Edition for your operating system (Windows x64). Anaconda comes pre-packaged with Python set at a particular version, so you will need to note the version of Python required by TensorFlow in the Prerequisites section. For me, I need something between 3.7-3.9. As a result, Python 3.9 that comes with Anaconda (at the time of this Feb 13, 2022 update) works fine.

Run the Anaconda installer, accepting all the defaults.

When it’s done, run the Anaconda Prompt (anaconda3).

The Anaconda Prompt

In the terminal, we’ll create a new Python environment, which will help us keep this version of TensorFlow separate from the non-GPU version. First, update conda with the following:

conda update -n base -c defaults conda

Then, enter the following commands to create a virtual environment:

conda create --name tensorflow-gpu
conda activate tensorflow-gpu

Install a version of Python supported by TensorFlow-GPU (as given by the table in the Prerequisites section) for your virtual environment (I’ll use Python version 3.9).

conda install python=3.9

Enter the following command to make sure that you are working with the version of Python you expect:

python --version

If you wish to also install Jupyter Notebook, you can do that with:

conda install jupyter

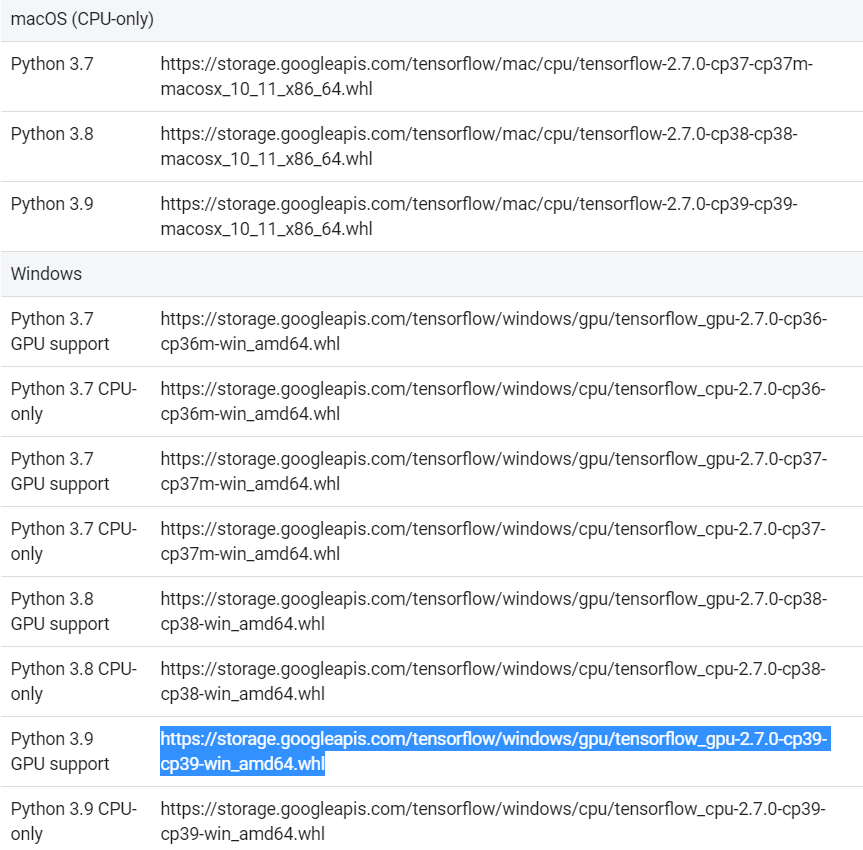
Rather than let pip try to figure out which version of TensorFlow you want (it will likely be wrong), I recommend finding the exact .whl file from TensorFlow’s site. Head to the TensorFlow Pip Installer page and look at the Package Location list.

Look under the Windows section for the wheel file installer that supports GPU and your version of Python. For me, this will be the wheel file listed with Python 3.9 GPU support. Note that GPU support (_gpu), TensorFlow version (-2.2.0), and supported Python version (-cp37) are listed in the filename. Highlight and copy the URL with the .whl file you want.

Download the correct TensorFlow wheel file

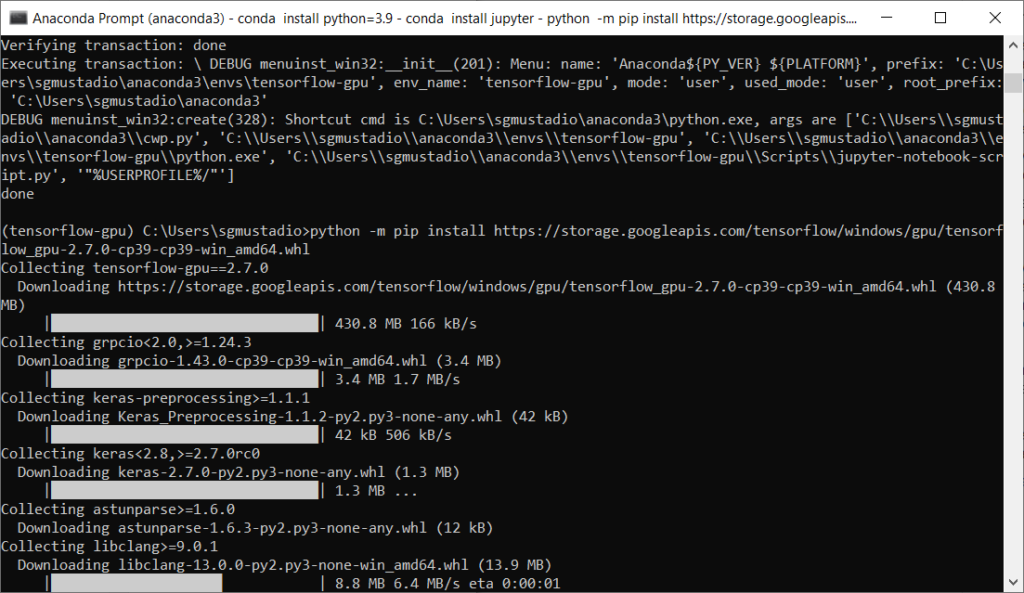
In Anaconda, enter the following command, replacing <wheel_url> with the URL that you copied in the previous step (i.e. paste it in).

python -m pip install <wheel_url>

Press ‘enter’ and let this run. It will take a few minutes.

Installing TensorFlow GPU wheel in Anaconda

When that’s done, go into the Python command line interface:

python

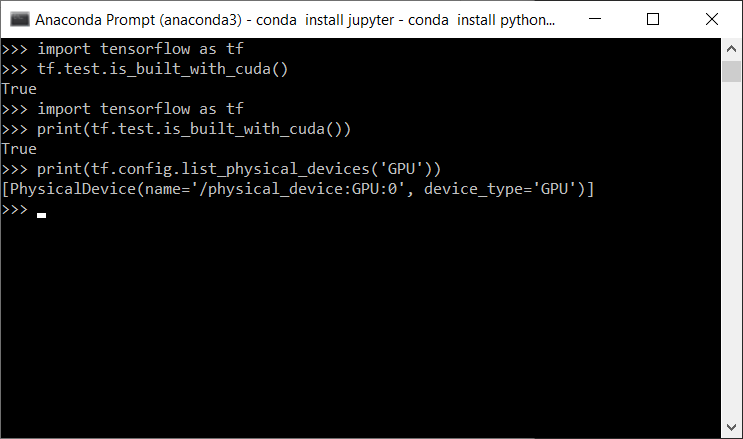
From there, enter the following commands (one at a time):

import tensorflow as tf 
print(tf.test.is_built_with_cuda()) 
print(tf.config.list_physical_devices('GPU'))

These will tell you if TensorFlow is capable of running on your graphics card. The first line imports TensorFlow, the second line makes sure it can work with CUDA (it should output “True”), and the third line should list the GPUs available to TensorFlow.

Test TensorFlow for GPU support in Python

Note that if you see any weird errors about missing Windows DLL files (whether in the Anaconda prompt, within Python, or in Jupyter Notebook), try the following from within Anaconda:

python -m pip install pypiwin32

Close the Anaconda prompt.

Running TensorFlow

When you’re ready to do some machine learning stuff, open the Anaconda Prompt and enter the following:

conda activate tensorflow-gpu

From there, you can use Python in Anaconda or start a Jupyter Notebook session (see here for a good overview of how to work with Jupyter Notebook):

jupyter notebook

If you wish to install a new Python package, like matplotlib, you can enter the following into the Anaconda Prompt (make sure you are in your environment, tensorflow-gpu, and exit Jupyter Notebook by pressing ctrl+c):

python -m pip install <name_of_package>

Alternatively, you can install a package from within Jupyter Notebook by running the following command in a cell:

!python -m pip install <name_of_package>

For example, here is how I installed matplotlib:

Install Python package from within Jupyter Notebook

Some libraries, like OpenCV, require you to install system components or dependencies outside of the Python environment, which means you can’t simply use pip. If so, check to see if the package is available in the conda-forge. If it is, you can install it in your Anaconda environment with:

conda install -c conda-forge <name_of_package>

Going Further

I hope this helps you get started using TensorFlow on your GPU! Thanks to Anaconda, you can install non-GPU TensorFlow in another environment and switch between them with the conda activate command. If the GPU version starts giving you problems, simply switch to the CPU version.

See the following videos if you are looking to get started with TensorFlow and TensorFlow Lite: