The NVIDIA Jetson Orin Nano is a powerful single-board computer built with an NVIDIA Ampere GPU for performing a variety of parallel-operation tasks, like cryptocurrency mining and AI. In this guide, we will walk you through the process of flashing NVIDIA’s Ubuntu image to the Orin Nano Development Kit.
The Jetson Orin Nano Developer Kit Getting Started Guide defaults to flashing an SD card with the pre-configured Ubuntu image (similar to how you might configure a Raspberry Pi). This has 2 issues:
- The SD card is much slower and offers less space than an NVMe M.2 SSD. If you are working with large AI models, I highly recommend purchasing and mounting an SSD in one of the available M.2 slots under the dev kit.
- Jetpack 6.0+ (with the newest Ubuntu OS) contains updated QSPI drivers. If you try to flash the SD card, you will likely find that your Orin Nano simply boots to a blank screen due to the outdated drivers. As a result, you must use the NVIDIA SDK Manager from a host computer to flash the OS directly to the dev kit (i.e. over a USB cable) the first time. See this post for more information.
To ensure that you can flash to either SSD or SD card as well as have the most up-to-date drivers, I recommend using the SDK Manager to flash directly to the board. The rest of this guide will show you how to use the SDK Manager to flash Ubuntu to the Orin Nano dev kit.
Required Hardware
You will need the following hardware:
- NVIDIA Jetson Orin Nano Developer Kit
- USB C cable
- SD Card (64GB UHS-1 or larger) or NVMe M.2 SSD
- (Optional) DisplayPort to HDMI Adapter and HDMI cable
- Keyboard, mouse, monitor
Insert the SD card on the underside of the Orin Nano (you can see the SD card slot between the Orin Nano card and carrier board) or attach the SSD to the underside of the dev kit carrier board. Connect keyboard, mouse, and monitor if desired. Note that the USB C connector (not the USB A ports) contains an Ethernet pass-through, which means you can SSH into the board via USB if you don’t want to connect other peripherals.
Install and Run Required Host Operating System
To flash the operating system (OS) onto the Orin Nano, you should use the NVIDIA SDK Manager running from a host computer. In my experience, you absolutely must use the supported host operating system to run the SDK Manager. See the supported OS chart on the SDK Manager page to figure out which host OS you need to use. For this guide, we will use the SDK Manager to install JetPack 6.0, which means we must use exactly Ubuntu 20.04 or Ubuntu 22.04 (not Linux Mint or any other derivative–it must be the official Ubuntu distro).
If you happen to be running either Ubuntu 20.04 or Ubuntu 22.04, great! If not, I recommend creating a bootable USB drive that you can use to try Ubuntu without installing it.
- Download ubuntu-22.04.4-desktop-amd64.iso from this page
- Follow these instructions to create a bootable USB drive with the Ubuntu image
Boot your host computer into Ubuntu 22.04 from the USB drive. Note that you may need to adjust the boot order or permissions in your BIOS.
Install NVIDIA SDK Manager
The SDK Manager is a program that allows you to install operating systems, libraries, and additional software onto a connected NVIDIA single-board computer.
Boot and log into your host OS (Ubuntu 22.04, if you followed the above instructions). Open Software & Updates and enable Community-maintained free and open-source software (universe) and Proprietary drivers for devices (restricted) options.

Open a browser and navigate to https://developer.nvidia.com/sdk-manager. Click the .deb Ubuntu link at the top-right of the page to download the latest SDK Manager package. Take a look at the filename of the .deb file you just downloaded. It will contain version and build numbers, which we need for the next step. For example, if the file is named sdkmanager_2.1.0-11669_amd64.deb, then the version is 2.1.0 and the build is 11669.
Open a terminal and install some dependencies:
sudo apt update
sudo apt install -y libcanberra-gtk-module
From there, install the .deb package (replace [version] and [build] with the version and build numbers in the actual filename):
sudo dpkg -i sdkmanager_[version]-[build]_amd64.debConnect Orin Nano
To flash the Orin Nano using the SDK Manager, it must first be put into “recovery mode.” To do that, attach a jumper or jumper wire between the FC_REC and GND pins (pins 2 and 3) on the underside of the Orin Nano card.
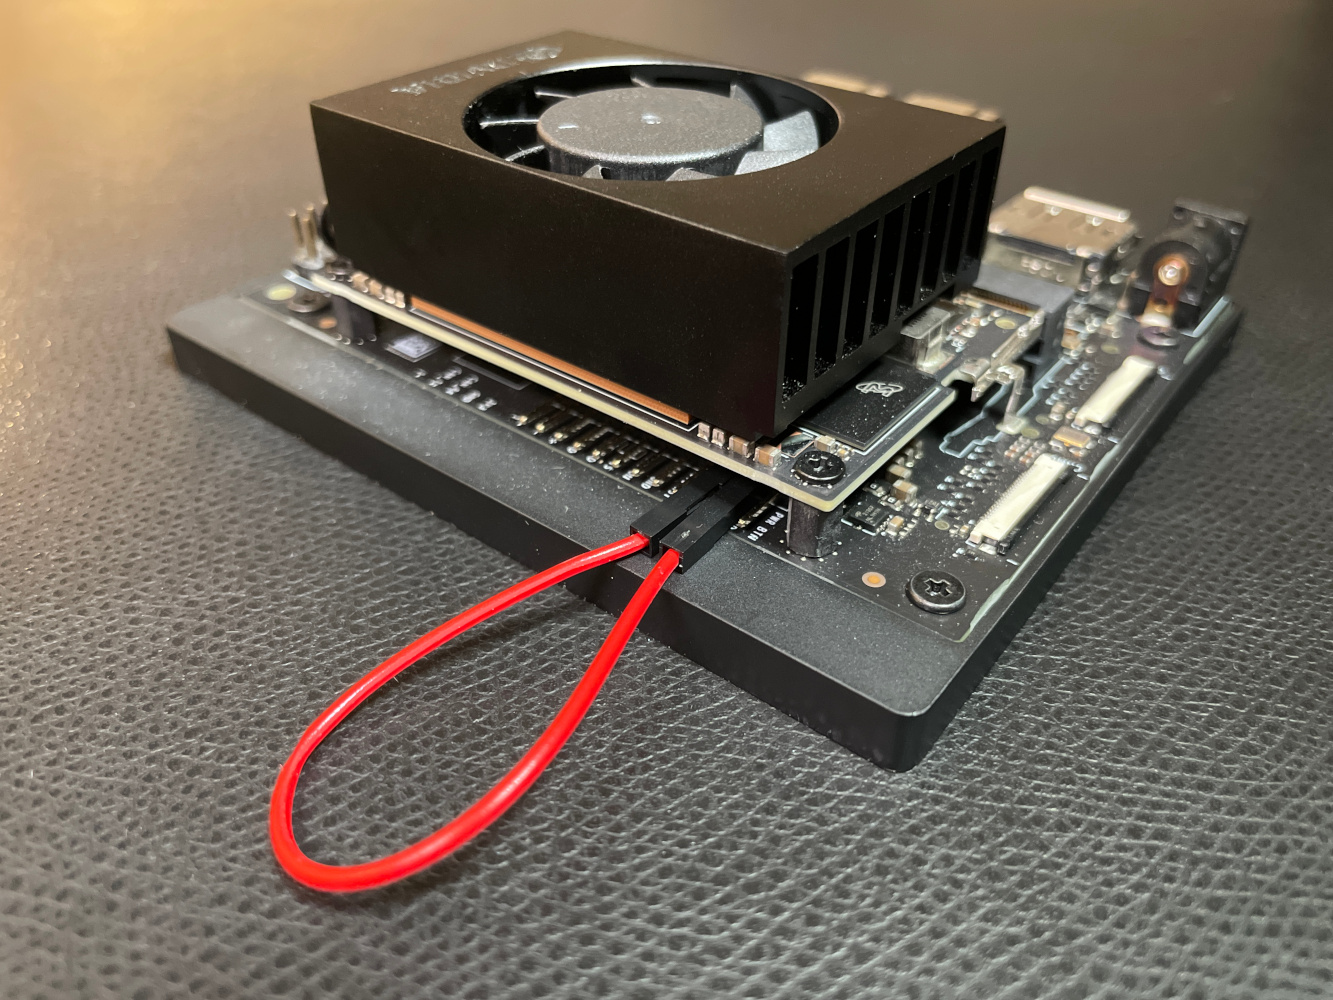
Connect a cable between the USB-C port on the dev kit and a USB port on your host computer. Plug the power adapter into the dev kit.
In a terminal on the host computer, enter the following command:
lsusbYou should see ID 0955:7523 NVIDIA Corp. APX as one of the items. This ID and name is important! If you do not see this ID/name, it means the board is not in recovery mode, not connected, or not powered. The SDK Manager looks for this exact name to find the board in recovery mode.
Flash OS With the SDK Manager
Enter the following command to run the SDK Manager:
sdkmanagerYou should be presented with a new SDK Manager window. Click Login in to bring up a browser and log in to your NVIDIA account (create one if you do not already have one).
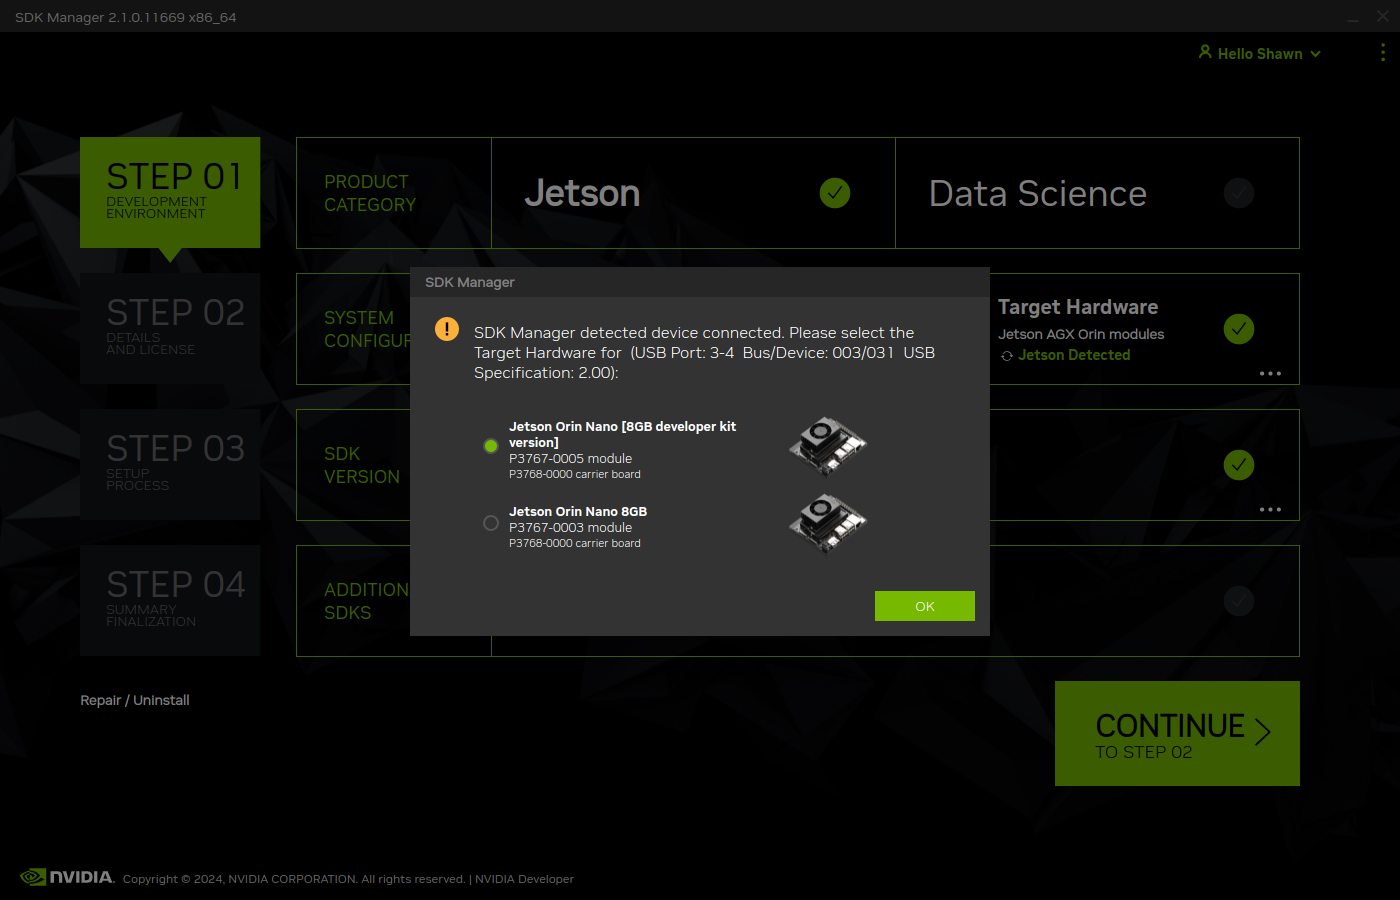
If you get a pop-up in the SDK Manager asking you to select a board, select Jetson Orin Nano [8GB developer kit version] and click OK.
Next, select the latest JetPack (6.0 for me), and select any additional SDKs, like DeepStream, if required (none for me).
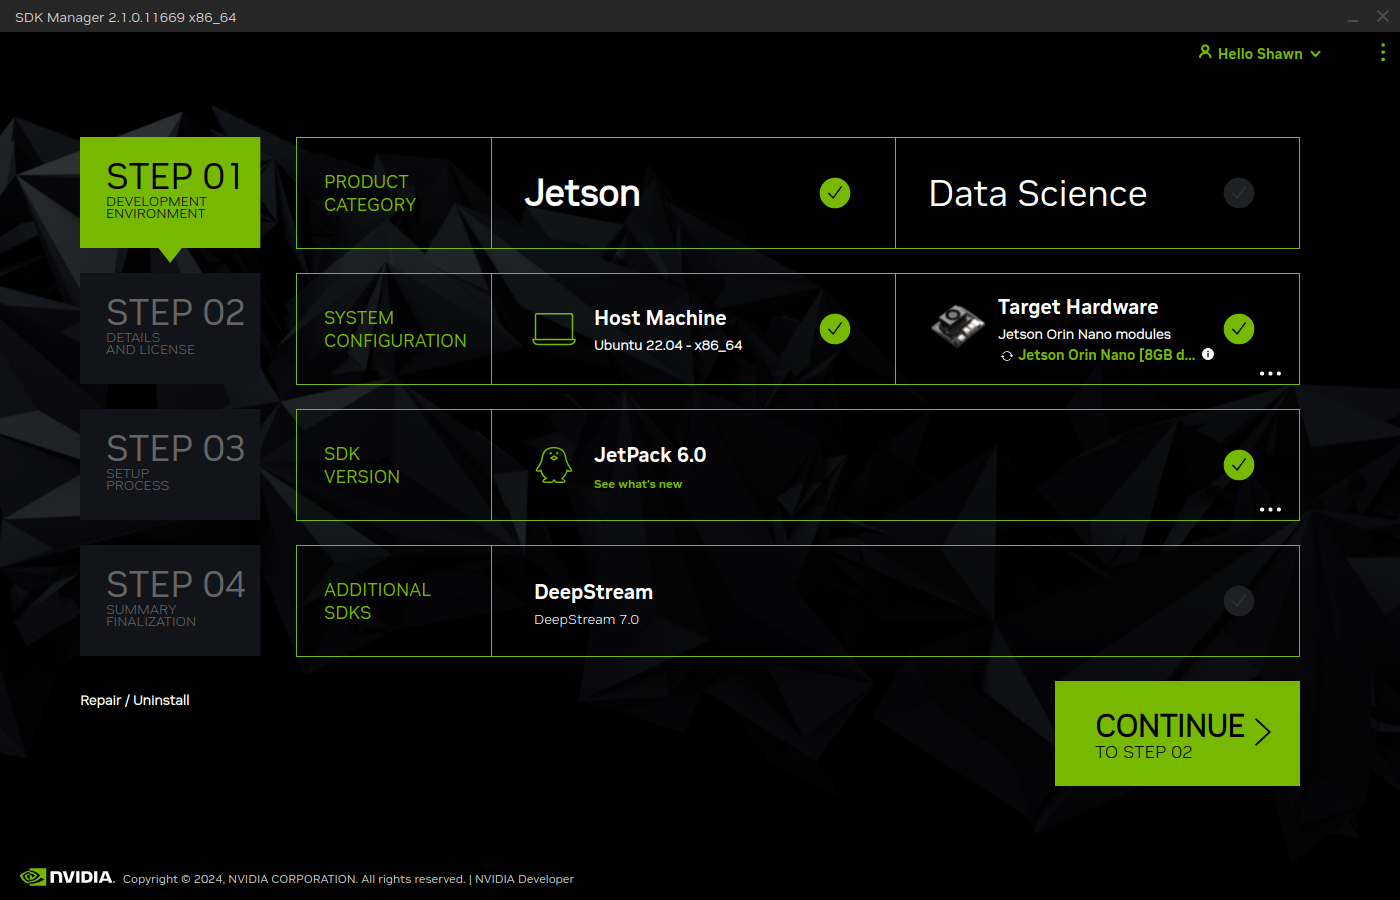
Click Continue. Add additional components as needed. In theory, you should be able to download/install these components on the Jetson board once you have it up and running.
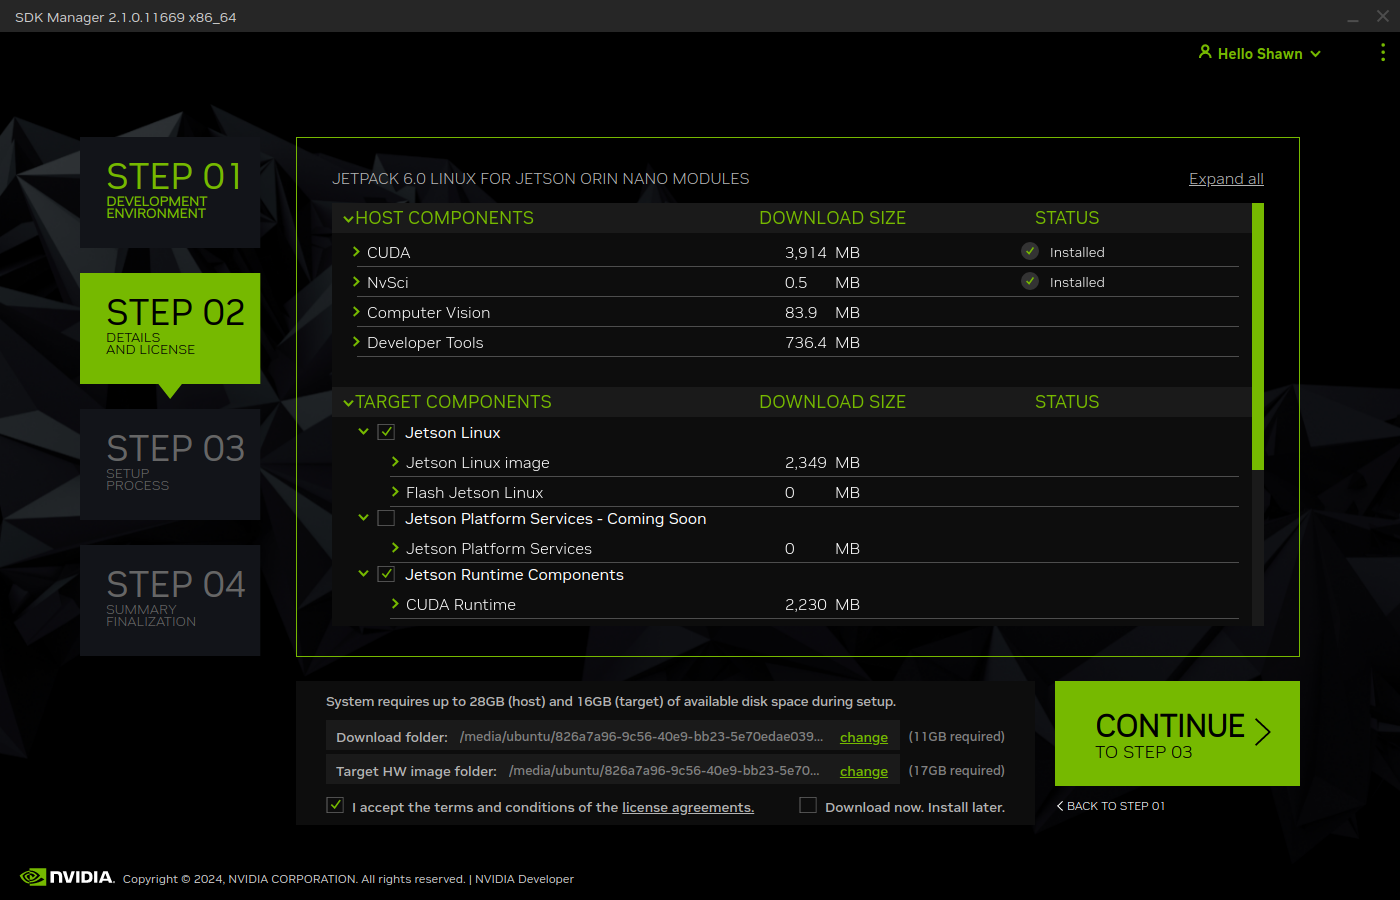
Note that the SDK Manager will download a LOT of data! You’ll need ~50 GB of free space to make this all happen:
- If you’re running Ubuntu natively and have the available space, just leave the target locations as their defaults.
- If you are running from an Ubuntu Live USB/CD and don’t have the space to download everything, mount additional storage and change the Download folder and Target HW image folder locations (as I have done in the image below). Note that you might need to re-mount the drives in read/write mode. You must use a partition formatted with ext4, as the installation script attempts to use Linux permissions when configuring files/executables.
Click Continue and wait. And wait. And wait. You’ll download a lot of data.
After the download is done, select any desired SDK components you might want for development (you can install them later from the Orin Nano if you wish). I left mine at the defaults. You will also be asked where you would like to flash the OS and SDK components:
- Selected device: Jetson Orin Nano [8GB developer kit version]
- OEM Configuration: Runtime (this will run System Configuration Wizard on first boot)
- Storage Device: choose SD card or SSD (depending on what hardware you installed)
Note: If you chose Pre-config for OEM Configuration, you will be asked to provide username/password details to configure the Orin Nano OS. It will skip the System Configuration Wizard on first boot, which means you don’t need to attach a keyboard, mouse, and monitor to finish the installation process.

Click Flash. Wait some more. Eventually, the Orin Nano should boot, and you should be presented with the Ubuntu System Configuration Wizard
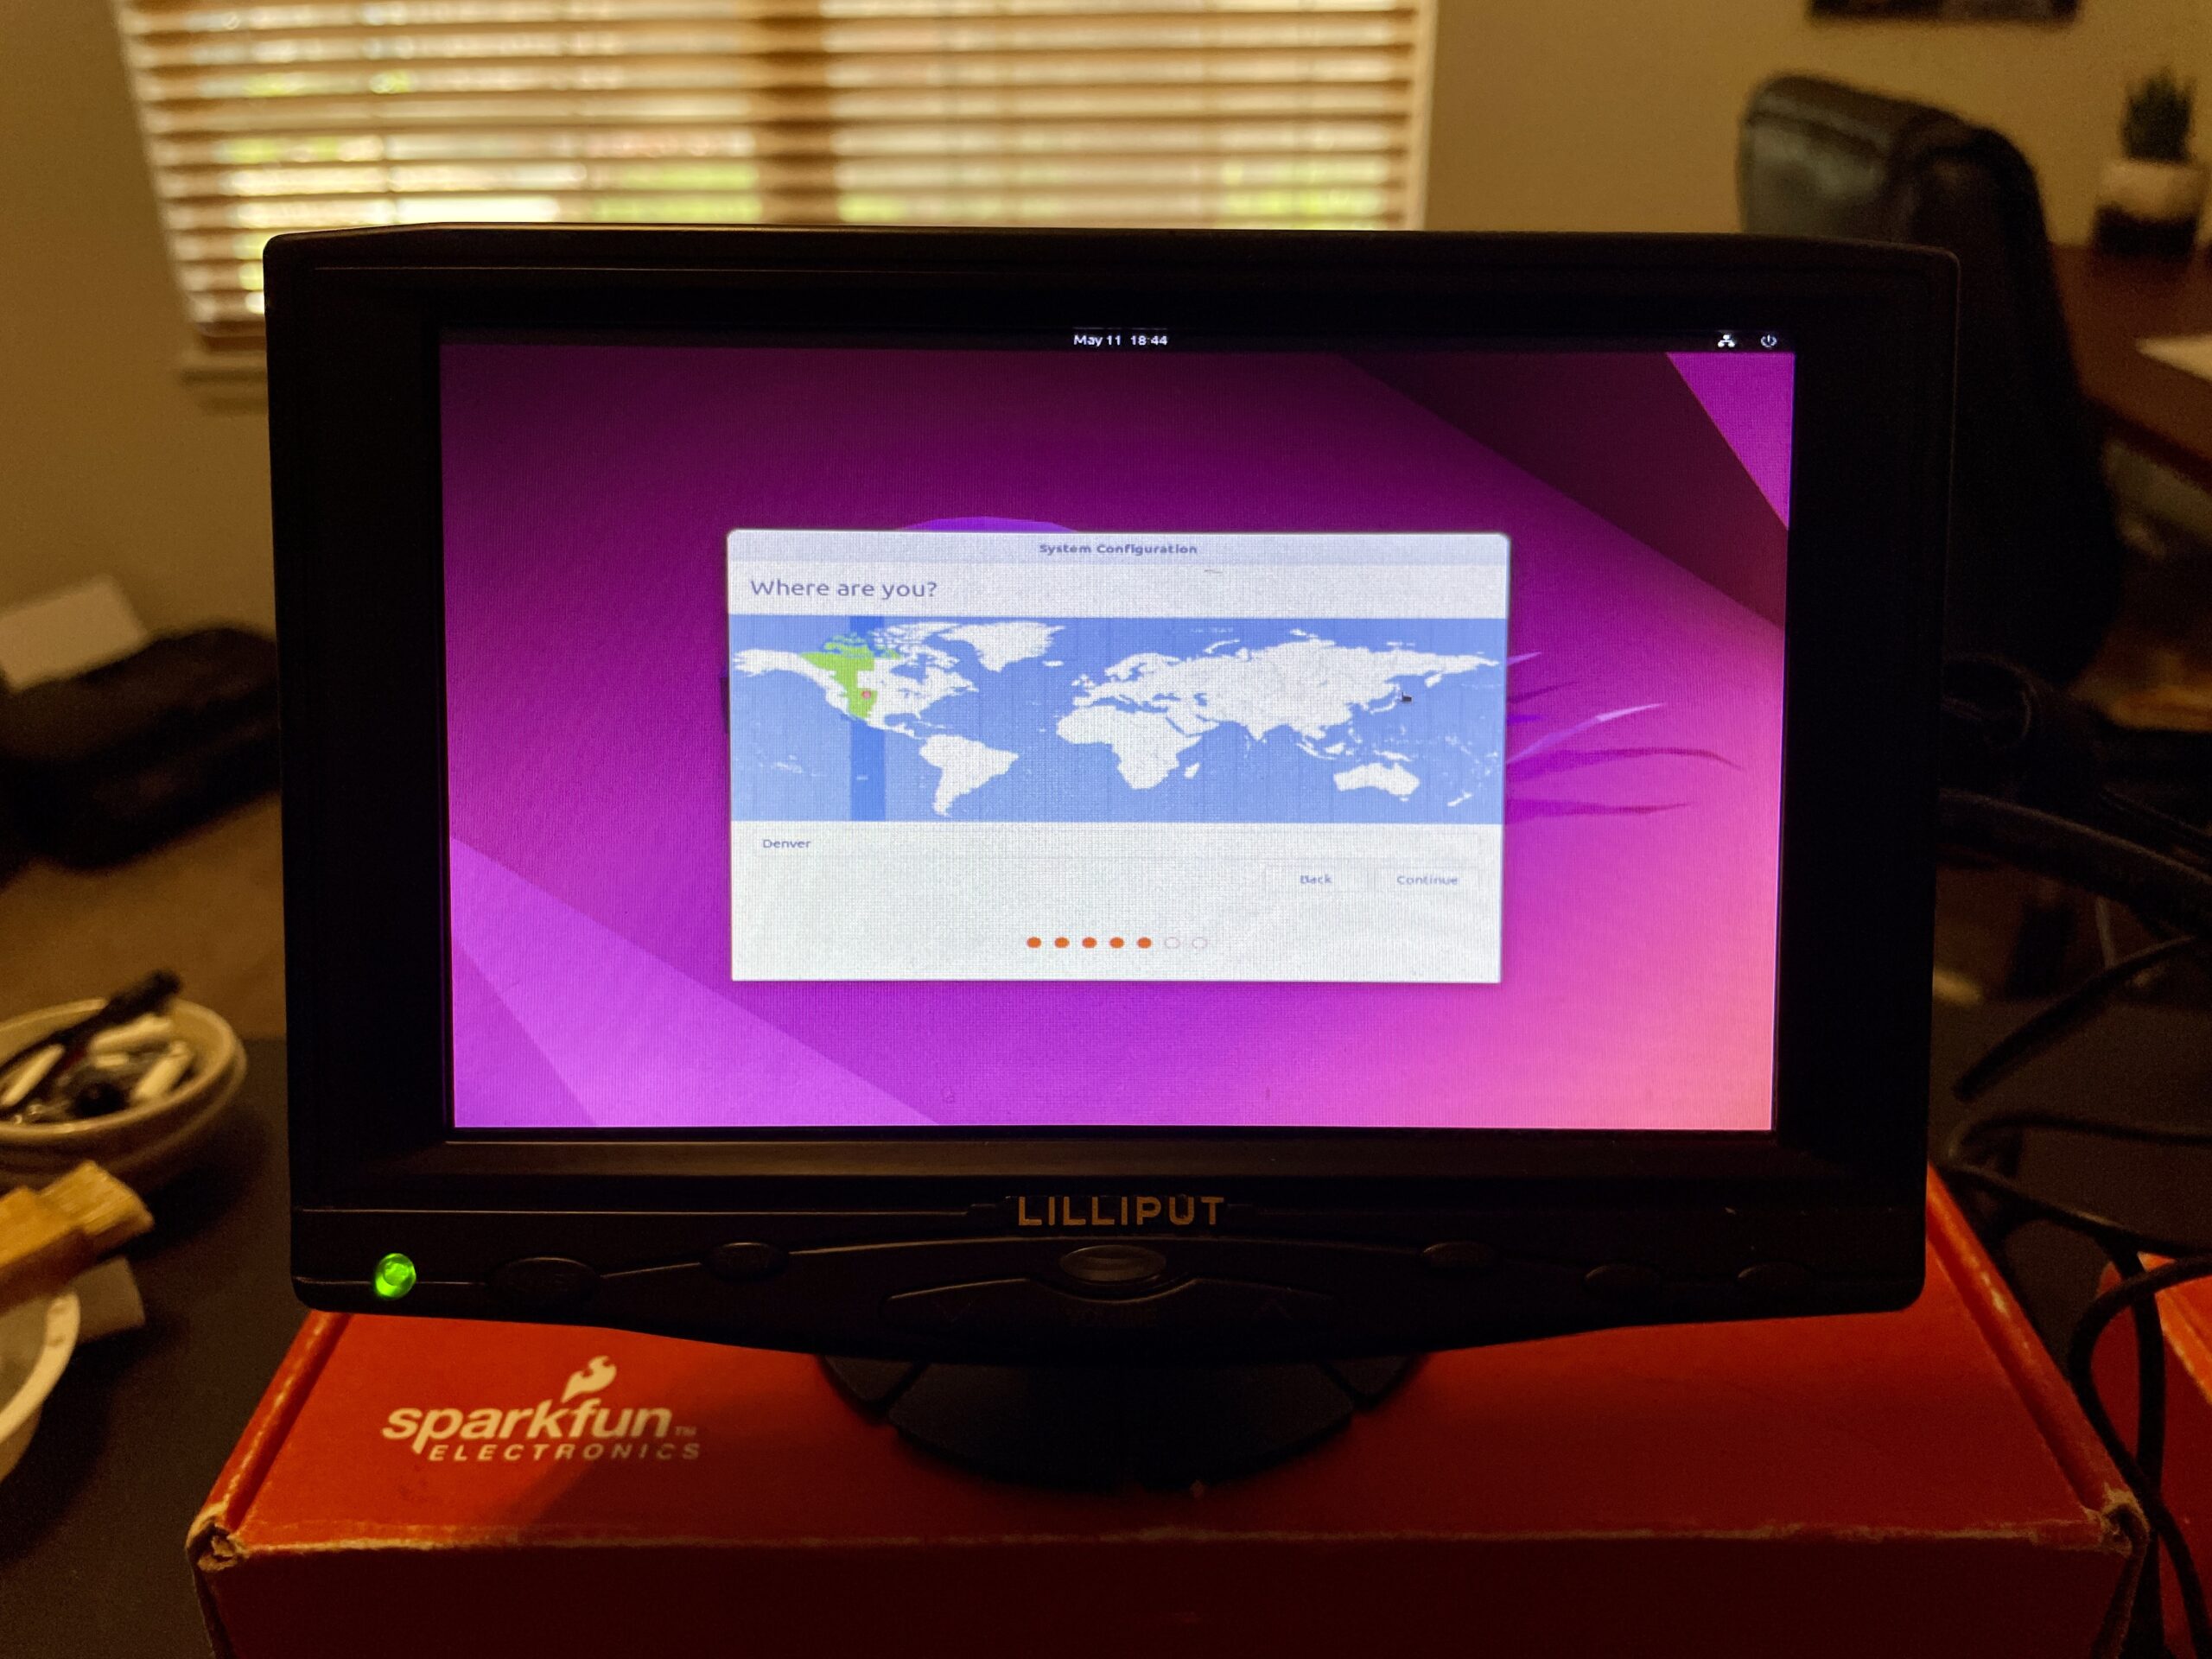
When finished with the configuration wizard, log in to Ubuntu. At this point, the USB-C port will expose an ethernet port (l4tbr0) with the default IP address of 192.168.55.1. That means you can ping or SSH into your Orin Nano over USB (e.g ssh [username]@192.168.55.1).
Shut down the Orin Nano and remove the power adapter. Remove the “Recovery Mode” jumper.
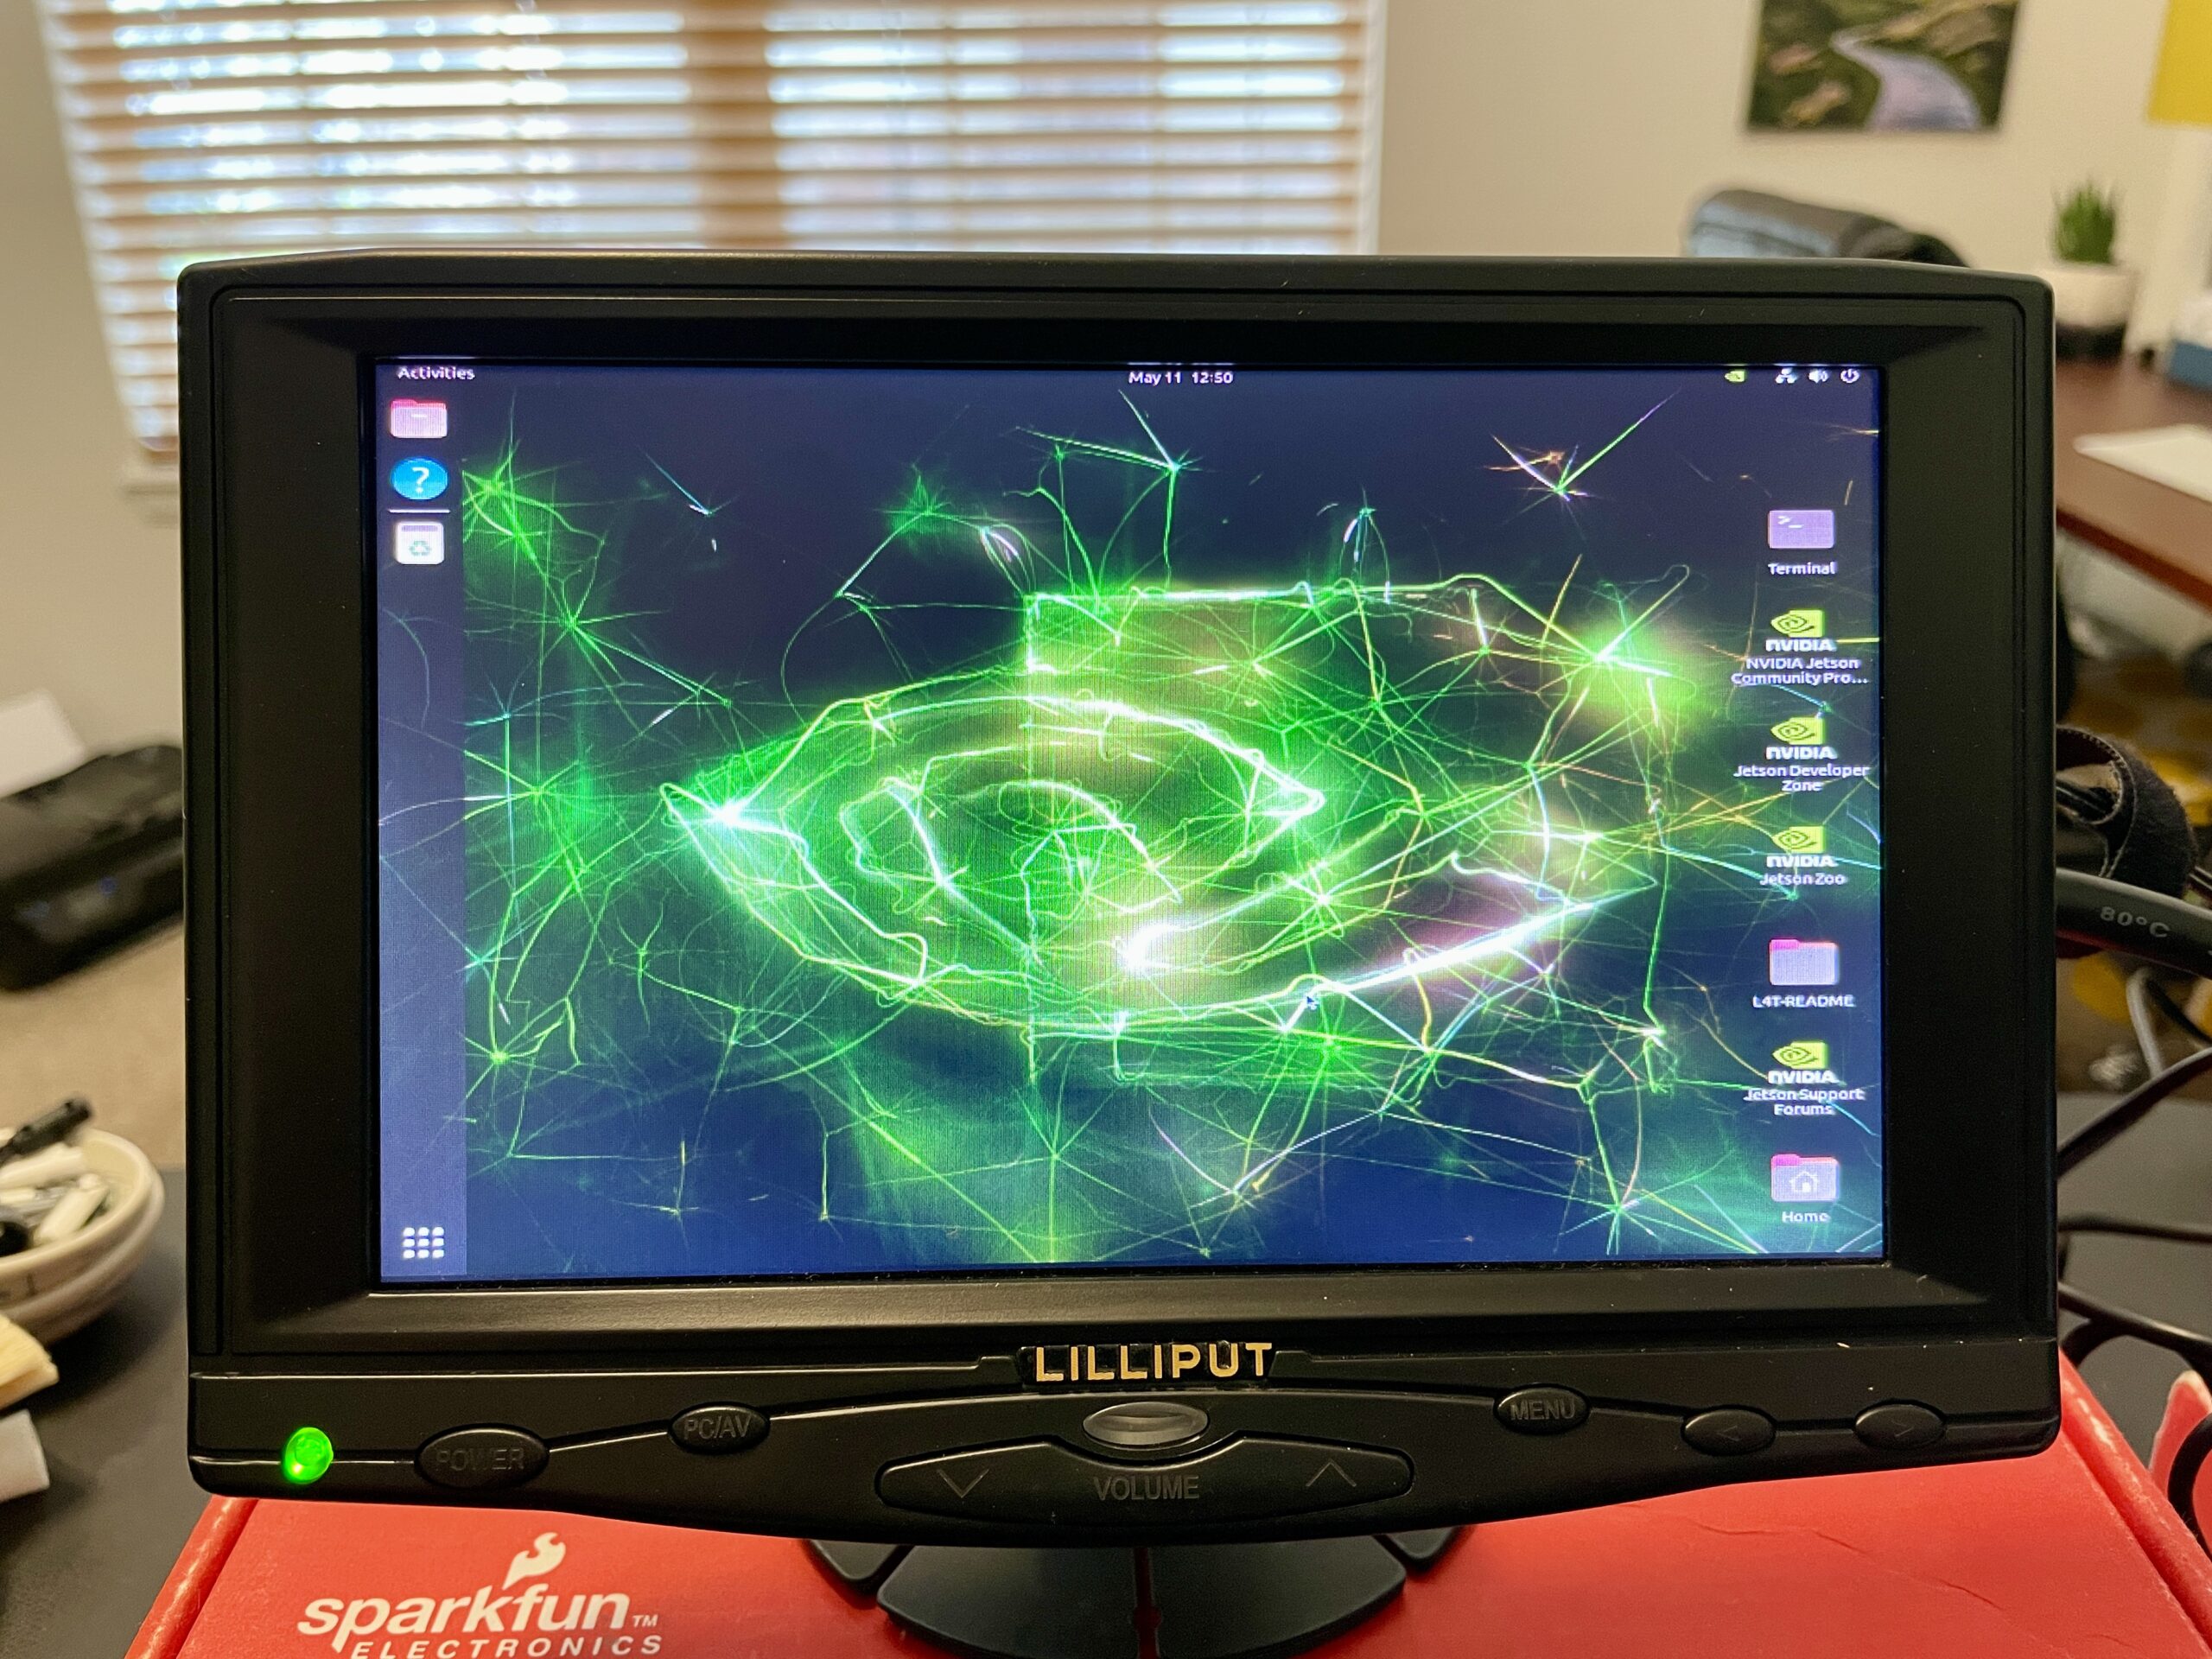
Run the Orin Nano
Attach the power adapter to the Orin Nano and wait for it to boot. You should be presented with a login screen. Enter your username and password to start using Ubuntu!
Troubleshooting
If the SDK Manager gives you any trouble (like making it so you can’t change the download folders), you can close the SDK Manager and delete the cache. Note that you will need to re-login once you start the sdkmanager again.
rm -rf ~/.nvsdkm/
rm -rf ~/Downloads/nvidia
sdkmanager
If the SDK fails on download/install, check the logs. If you see the error chroot: failed to run command 'dpkg': Exec format error it means that qemu is not installed or running correctly (see here for more info). Run the following commands and restart the SDK Manager.
sudo apt-get install qemu-user-static
sudo update-binfmts --import qemu-aarch64
Going Further: Local LLM
The Orin Nano contains a powerful (for its size) GPU, but it means carefully installing and configuring software to take advantage of that GPU. If you want to run a local LLM (think ChatGPT, but smaller), check out these great tutorials on the NVIDIA Jetson AI Lab site.
In a future post, I will show how to install Ollama and Piper-TTS on the Orin Nano to run my hopper-chat project for a complete voice assistant.
IS THERE ANY RESTRICTION OF WHICH TARGET HW IMAGE FOLDER I CAN USE?
Thank you so much Shawn – took about 3 days for me (and nights) to get it running – without your advice I would have been lost. I also have to thank “https://itsfoss.com/intsall-ubuntu-on-usb/” – trying to get UBUNTU 22.04 on a stick I deleted my Mint from the harddrive – this article explained why – should have known that before. Being no hardware guy it was pure luck that I had a jumper – long story. thanks again so much Shawn! – Rainer
I’m really glad it helped! It took me a few days to figure out, too (after fighting with Mint wondering why some things were failing).