A few months ago, I created a video showing how to use WebSockets with an ESP32. WebSockets have proven to be very fast (relatively speaking) at controlling hardware over WiFi. They still rely on TCP, but they have little overhead, so the latency is much less than other methods (e.g. using separate web pages). However, I’ve had a few requests to show how to implement a web server on the ESP32. So, this tutorial will cover exactly that (but I’m still keeping WebSockets, because they’re cool).
If you like your tutorials in video format, here you go:
Overview
Rather than just host a simple web page, we’re going to build on the WebSocket idea. Let’s have our ESP32 be an access point (AP) and host a web page. When a browser requests that page, the ESP32 will serve it. As soon as the page loads, the client will immediately make a WebSocket connection back to the ESP32. That allows us to have fast control of our hardware connected to the ESP32.
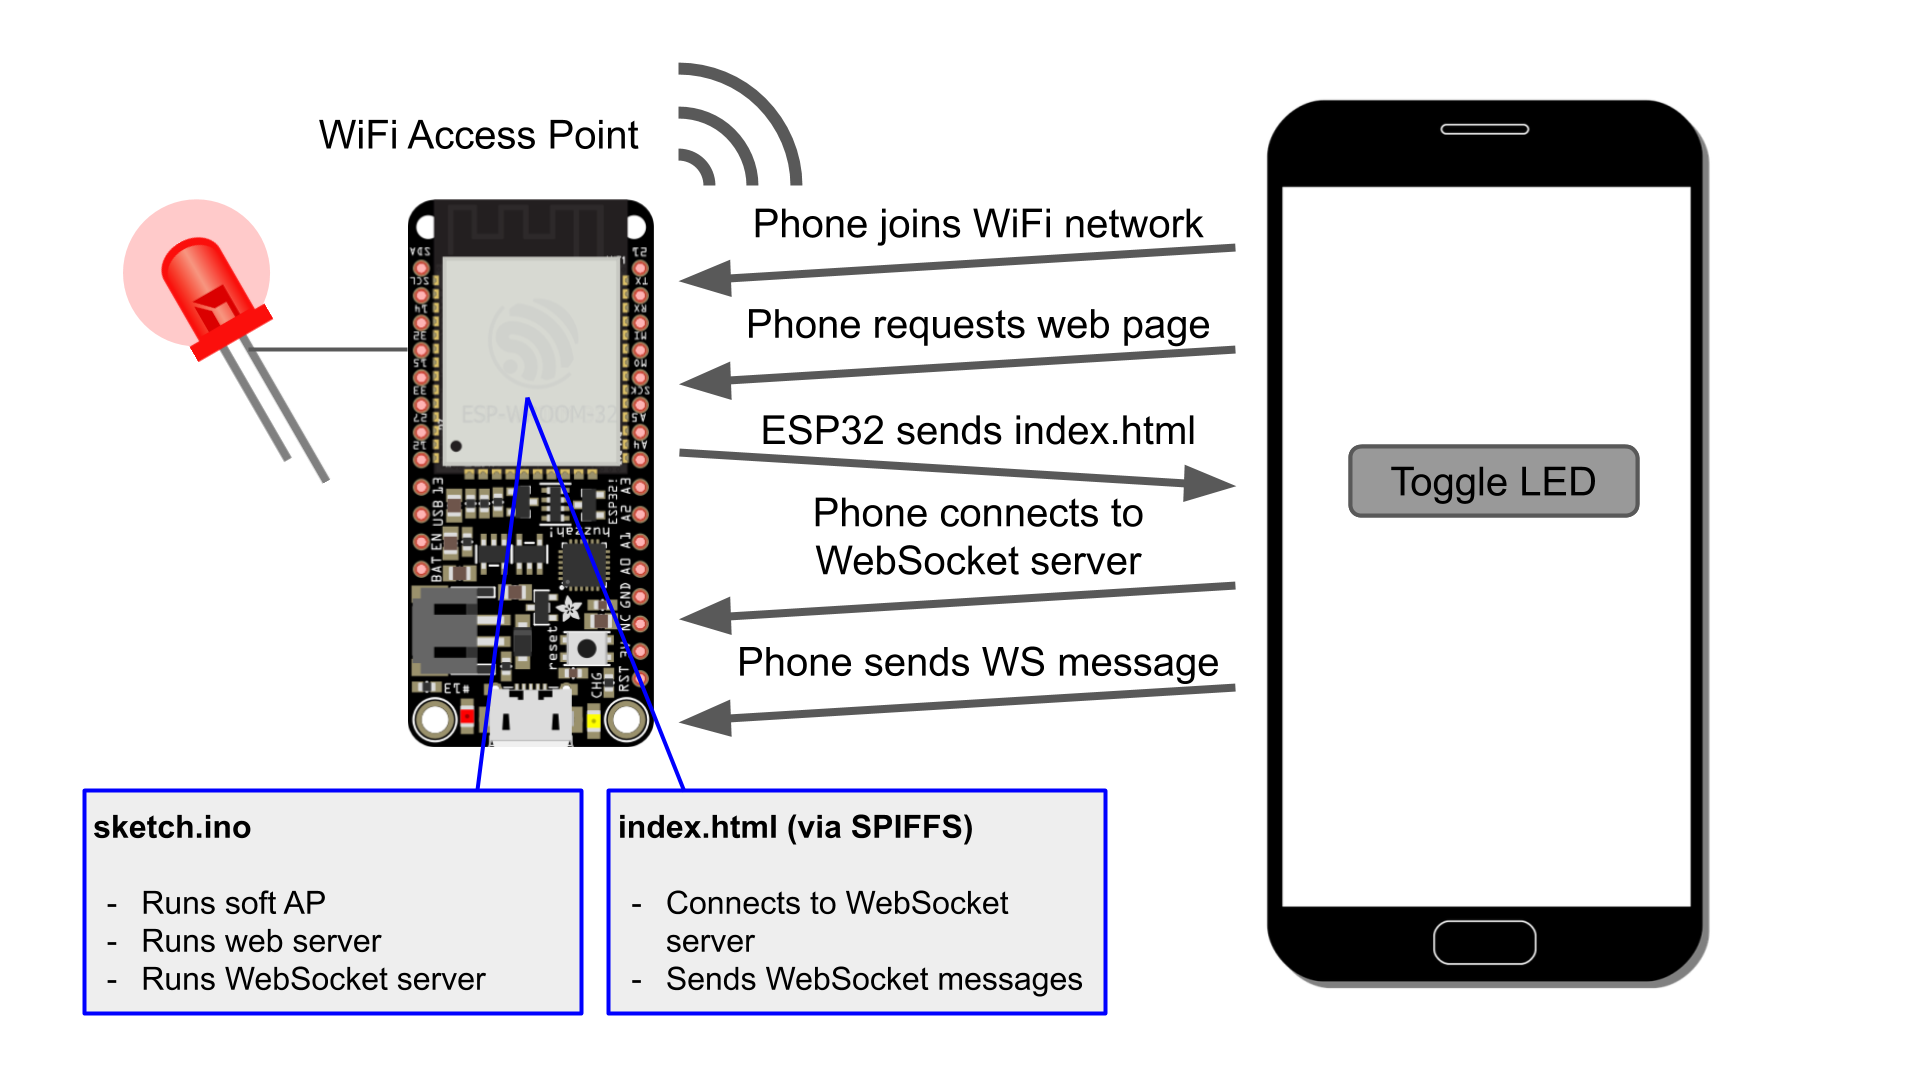
The WebSocket connection is two-way. Whenever the page loads, it first inquires about the state of the LED from the ESP32. If the LED is on, the page will update a circle (fill in red) to reflect that. The circle on the page will be black if the LED is off. Then, whenever a user presses the “Toggle LED” button, the client will send a WebSocket packet to the ESP32, telling it to toggle the LED. This packet is followed by another request asking about the LED state so that the client can keep the browser updated with the state of the LED.
Hardware Hookup
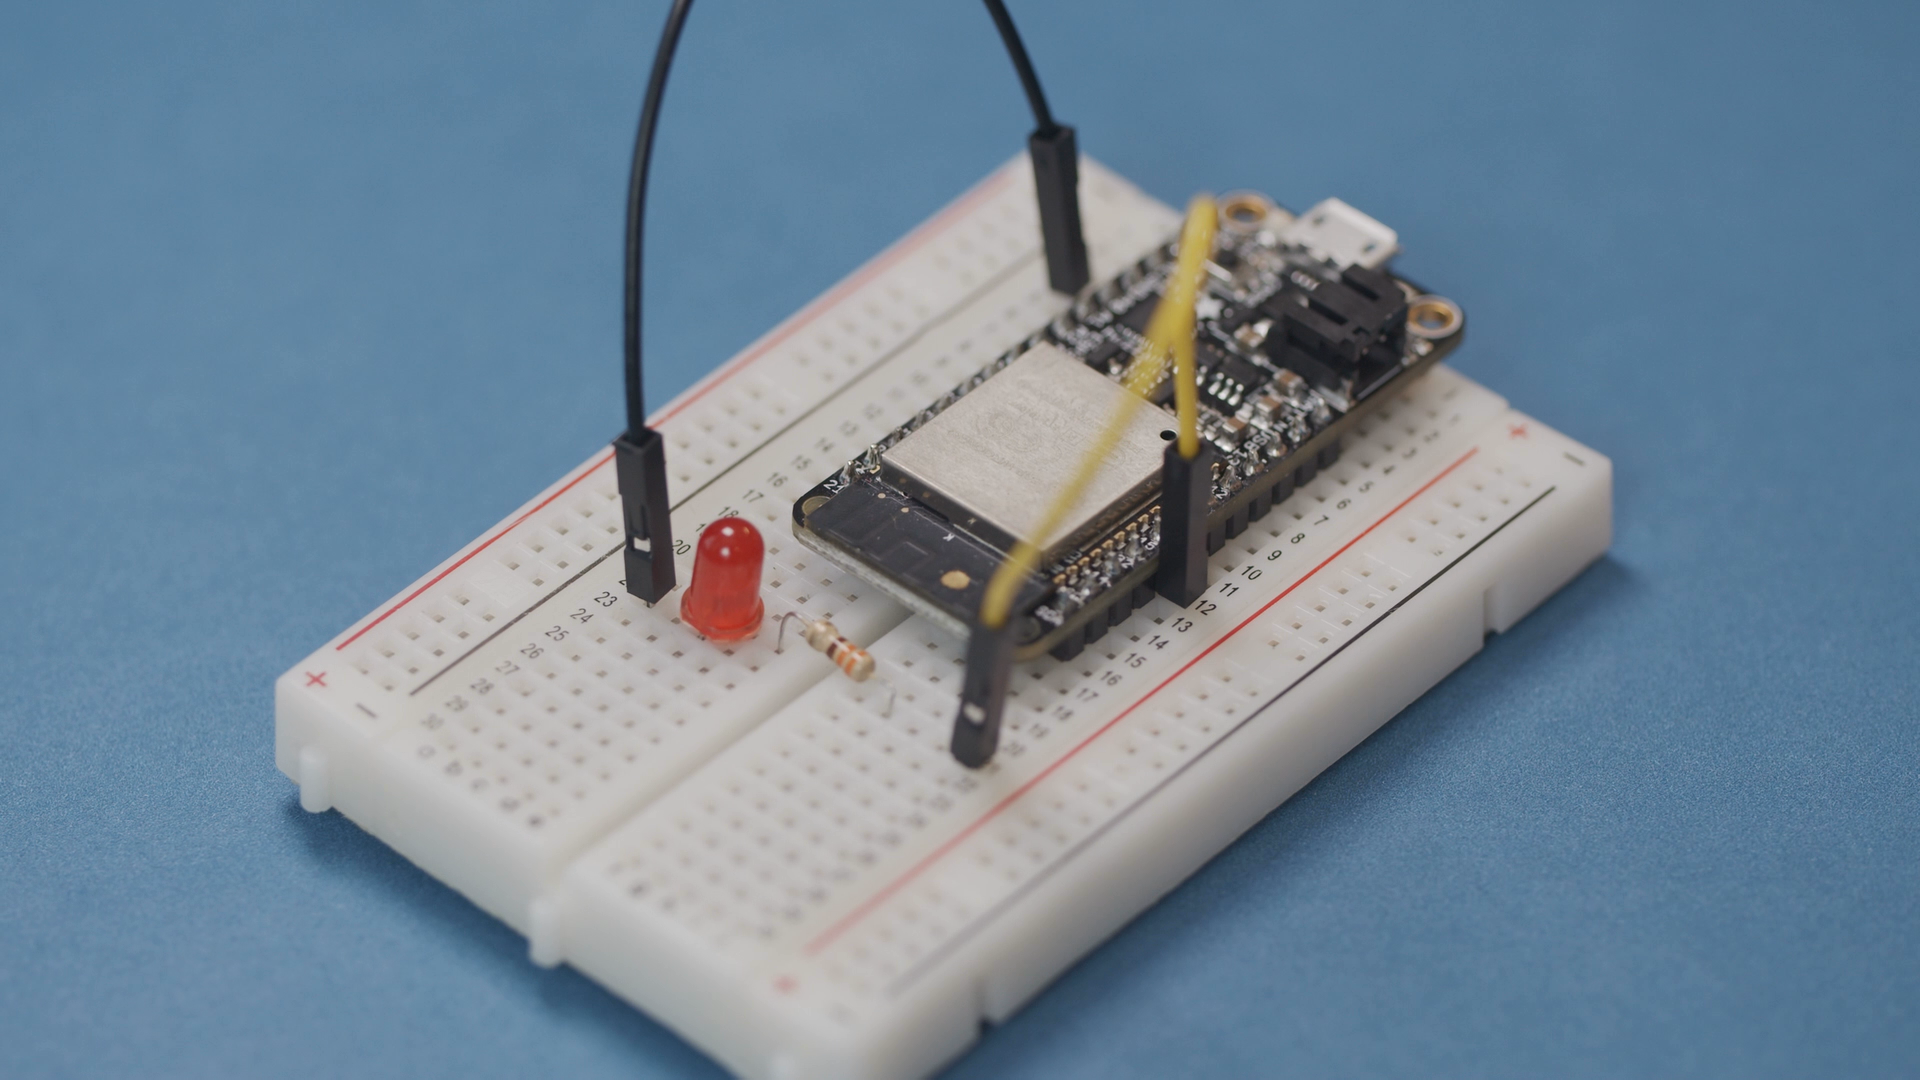
Connect an LED to pin 15 of your ESP32 (don’t forget a limiting resistor! Something like 330Ω should work). Note that I’m using an Adafruit Feather HUZZAH32, so your pin numbering might be different.
Install SPIFFS Plugin
An ESP32 with an attached flash storage chip, like our HUZZAH32, can be configured to hold files, much like a mass storage device. However, it uses a very basic file system (there are no folders–files are just stored in a flat structure). This file system is known as the “Serial Peripheral Interface Flash File System” (SPIFFS). You can read more about SPIFFS here.
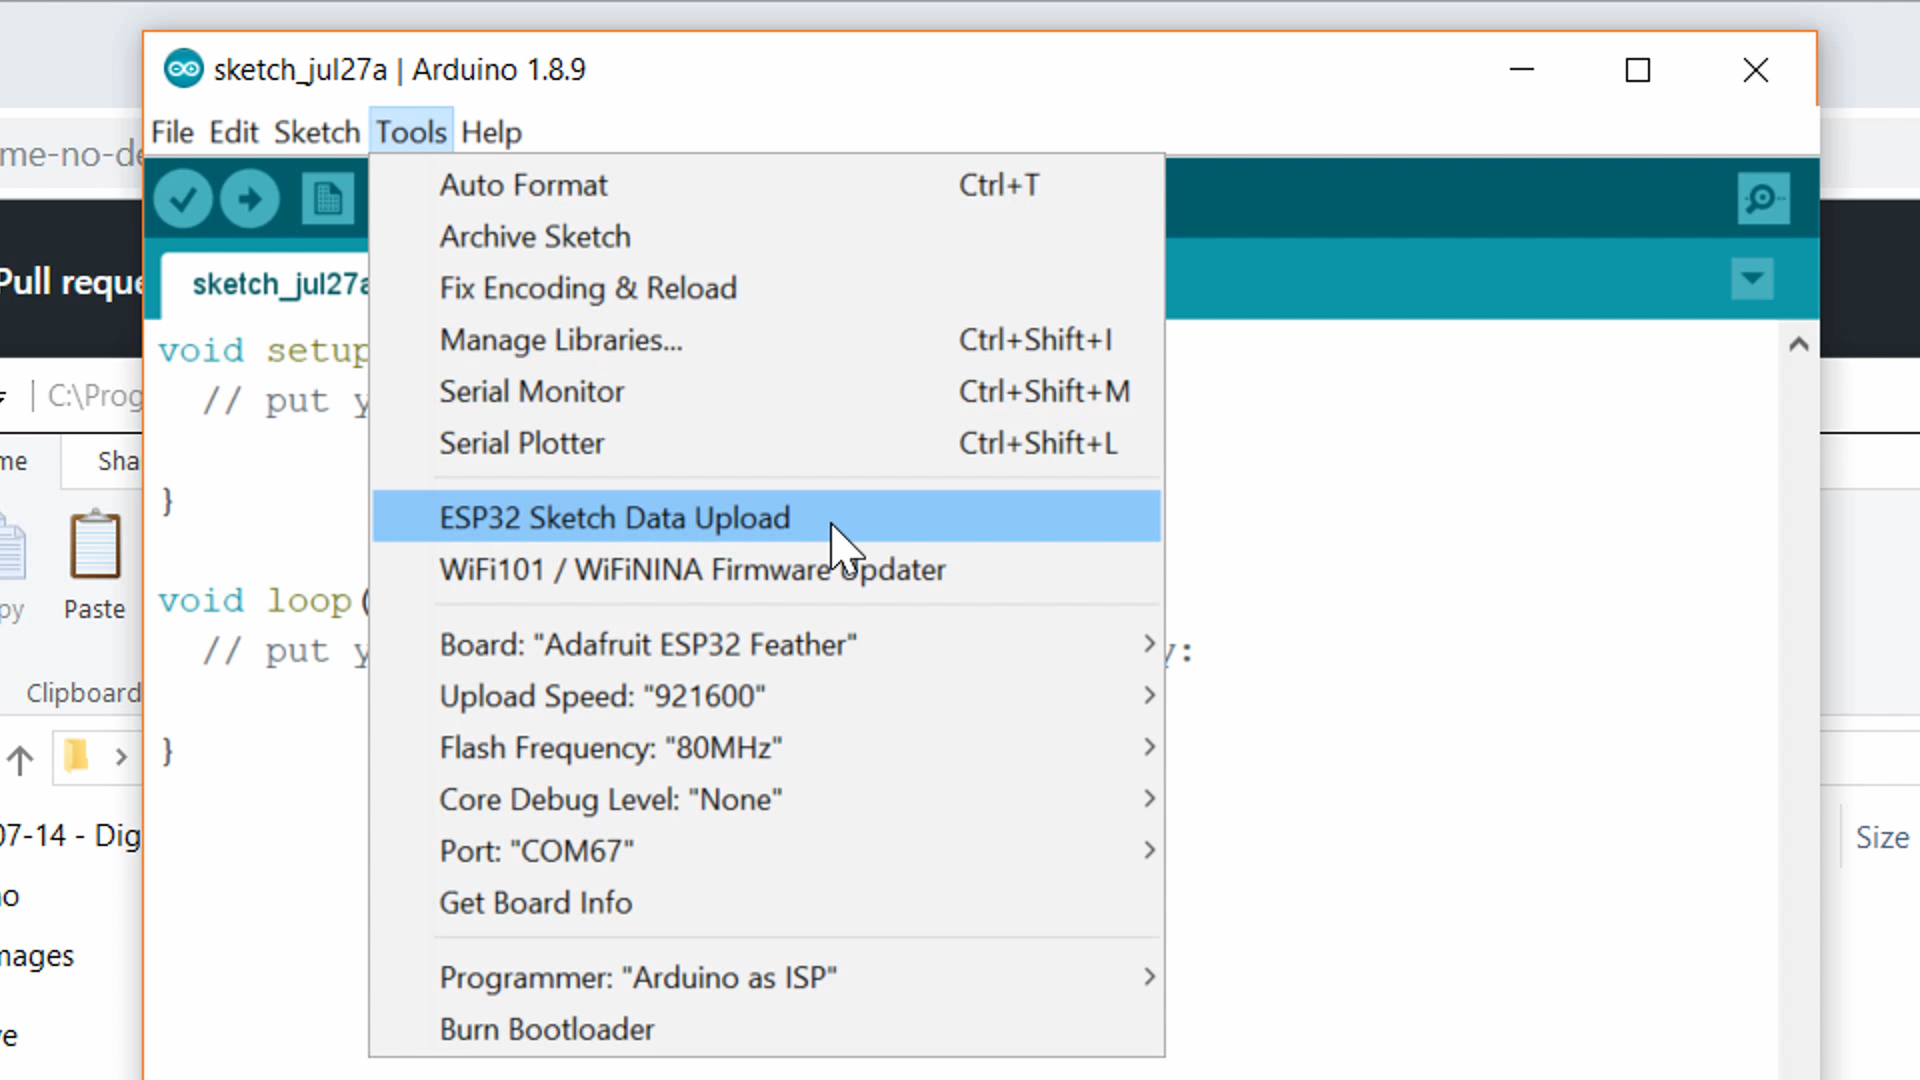
We need to use a special program to upload files over SPI. Head to https://github.com/me-no-dev/arduino-esp32fs-plugin and follow the instructions to install the Arduino plugin. Once done, restart Arduino, and you should see the option ESP32 Sketch Data Upload in the Tools menu.
Install Arduino Libraries
Make sure you have the ESP32 board definition installed for your particular board. If you’re using a board that’s supported by the Espressif Arduino board manager (such as the Adafruit HUZZAH32), you can follow the directions here.
Download the .zip files for the following libraries and install them in Arduino.
Arduino Code
Enter the following code into a new Arduino sketch. Take note of the SSID and password–we’ll need these to connect our phone/computer to the ESP32’s AP.
#include <WiFi.h>
#include <SPIFFS.h>
#include <ESPAsyncWebServer.h>
#include <WebSocketsServer.h>
// Constants
const char *ssid = "ESP32-AP";
const char *password = "LetMeInPlz";
const char *msg_toggle_led = "toggleLED";
const char *msg_get_led = "getLEDState";
const int dns_port = 53;
const int http_port = 80;
const int ws_port = 1337;
const int led_pin = 15;
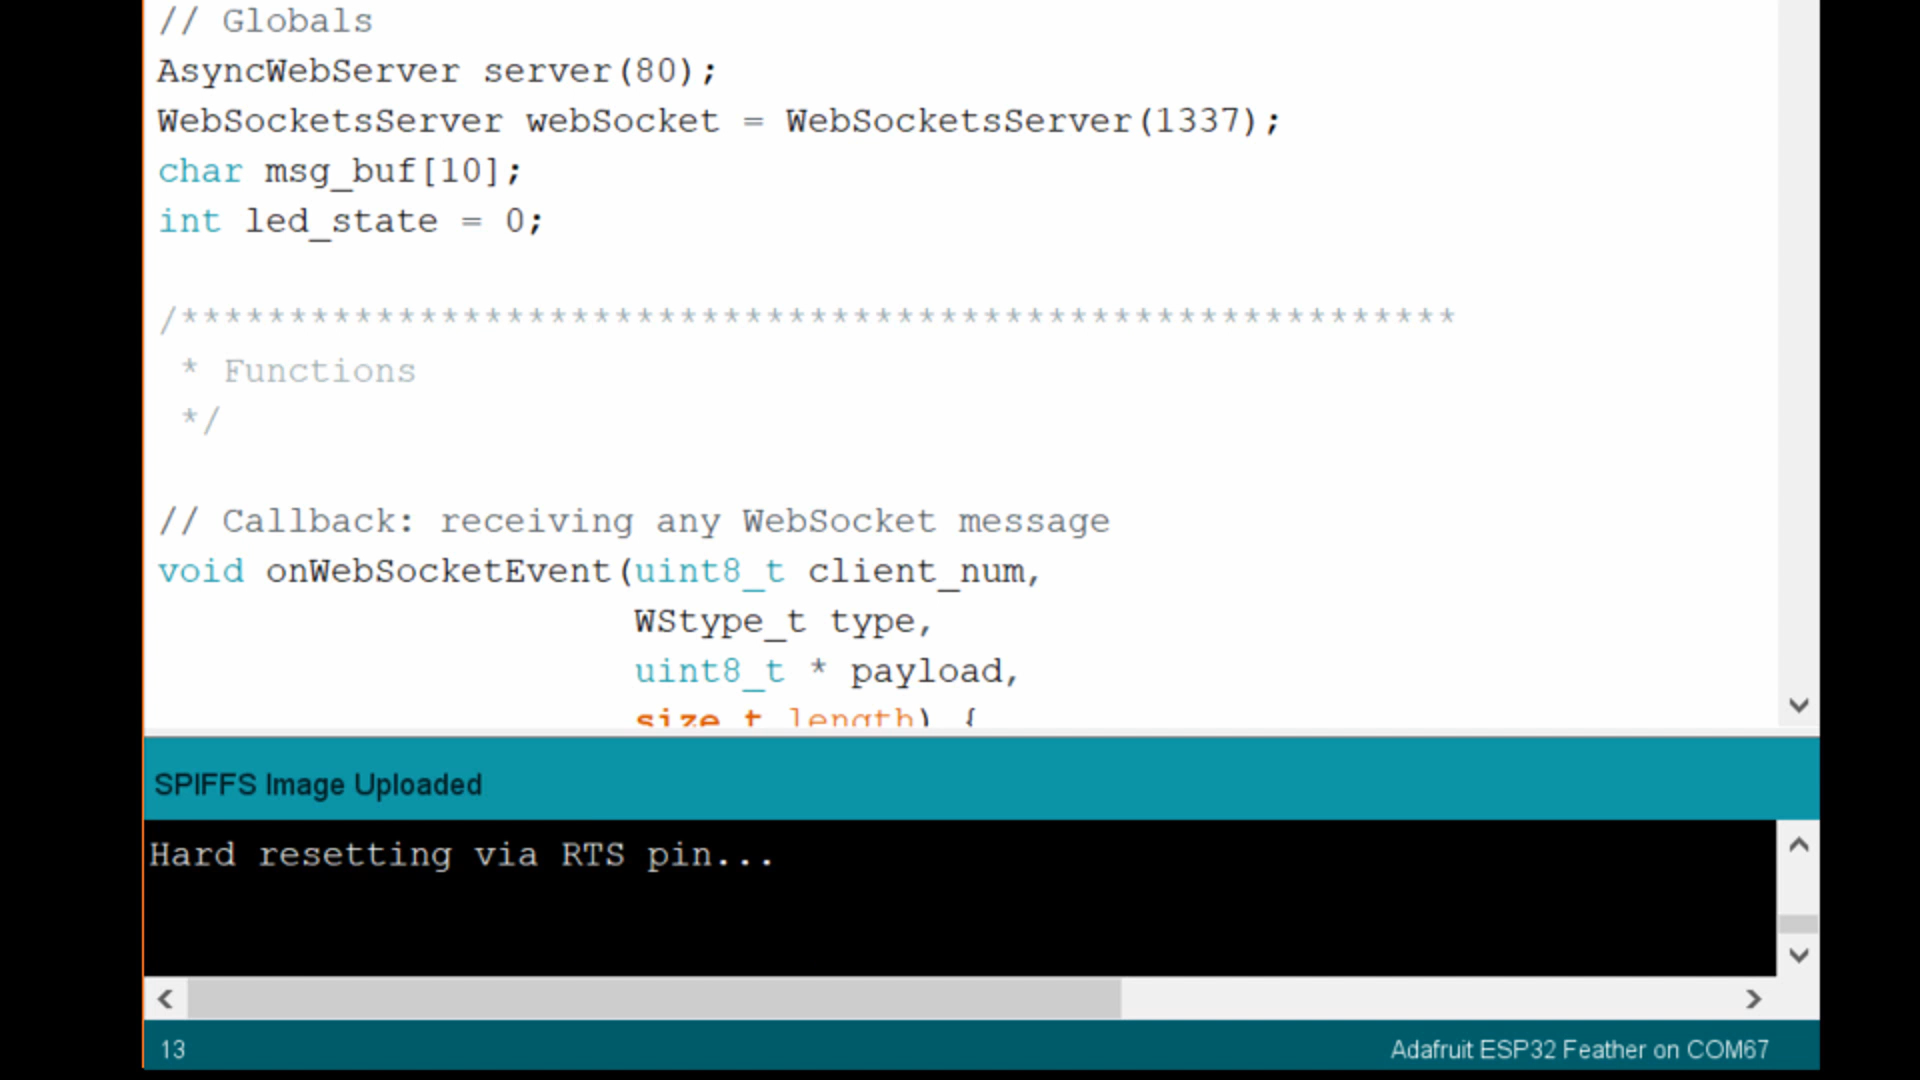
// Globals
AsyncWebServer server(80);
WebSocketsServer webSocket = WebSocketsServer(1337);
char msg_buf[10];
int led_state = 0;
/***********************************************************
* Functions
*/
// Callback: receiving any WebSocket message
void onWebSocketEvent(uint8_t client_num,
WStype_t type,
uint8_t * payload,
size_t length) {
// Figure out the type of WebSocket event
switch(type) {
// Client has disconnected
case WStype_DISCONNECTED:
Serial.printf("[%u] Disconnected!\n", client_num);
break;
// New client has connected
case WStype_CONNECTED:
{
IPAddress ip = webSocket.remoteIP(client_num);
Serial.printf("[%u] Connection from ", client_num);
Serial.println(ip.toString());
}
break;
// Handle text messages from client
case WStype_TEXT:
// Print out raw message
Serial.printf("[%u] Received text: %s\n", client_num, payload);
// Toggle LED
if ( strcmp((char *)payload, "toggleLED") == 0 ) {
led_state = led_state ? 0 : 1;
Serial.printf("Toggling LED to %u\n", led_state);
digitalWrite(led_pin, led_state);
// Report the state of the LED
} else if ( strcmp((char *)payload, "getLEDState") == 0 ) {
sprintf(msg_buf, "%d", led_state);
Serial.printf("Sending to [%u]: %s\n", client_num, msg_buf);
webSocket.sendTXT(client_num, msg_buf);
// Message not recognized
} else {
Serial.println("[%u] Message not recognized");
}
break;
// For everything else: do nothing
case WStype_BIN:
case WStype_ERROR:
case WStype_FRAGMENT_TEXT_START:
case WStype_FRAGMENT_BIN_START:
case WStype_FRAGMENT:
case WStype_FRAGMENT_FIN:
default:
break;
}
}
// Callback: send homepage
void onIndexRequest(AsyncWebServerRequest *request) {
IPAddress remote_ip = request->client()->remoteIP();
Serial.println("[" + remote_ip.toString() +
"] HTTP GET request of " + request->url());
request->send(SPIFFS, "/index.html", "text/html");
}
// Callback: send style sheet
void onCSSRequest(AsyncWebServerRequest *request) {
IPAddress remote_ip = request->client()->remoteIP();
Serial.println("[" + remote_ip.toString() +
"] HTTP GET request of " + request->url());
request->send(SPIFFS, "/style.css", "text/css");
}
// Callback: send 404 if requested file does not exist
void onPageNotFound(AsyncWebServerRequest *request) {
IPAddress remote_ip = request->client()->remoteIP();
Serial.println("[" + remote_ip.toString() +
"] HTTP GET request of " + request->url());
request->send(404, "text/plain", "Not found");
}
/***********************************************************
* Main
*/
void setup() {
// Init LED and turn off
pinMode(led_pin, OUTPUT);
digitalWrite(led_pin, LOW);
// Start Serial port
Serial.begin(115200);
// Make sure we can read the file system
if( !SPIFFS.begin()){
Serial.println("Error mounting SPIFFS");
while(1);
}
// Start access point
WiFi.softAP(ssid, password);
// Print our IP address
Serial.println();
Serial.println("AP running");
Serial.print("My IP address: ");
Serial.println(WiFi.softAPIP());
// On HTTP request for root, provide index.html file
server.on("/", HTTP_GET, onIndexRequest);
// On HTTP request for style sheet, provide style.css
server.on("/style.css", HTTP_GET, onCSSRequest);
// Handle requests for pages that do not exist
server.onNotFound(onPageNotFound);
// Start web server
server.begin();
// Start WebSocket server and assign callback
webSocket.begin();
webSocket.onEvent(onWebSocketEvent);
}
void loop() {
// Look for and handle WebSocket data
webSocket.loop();
}
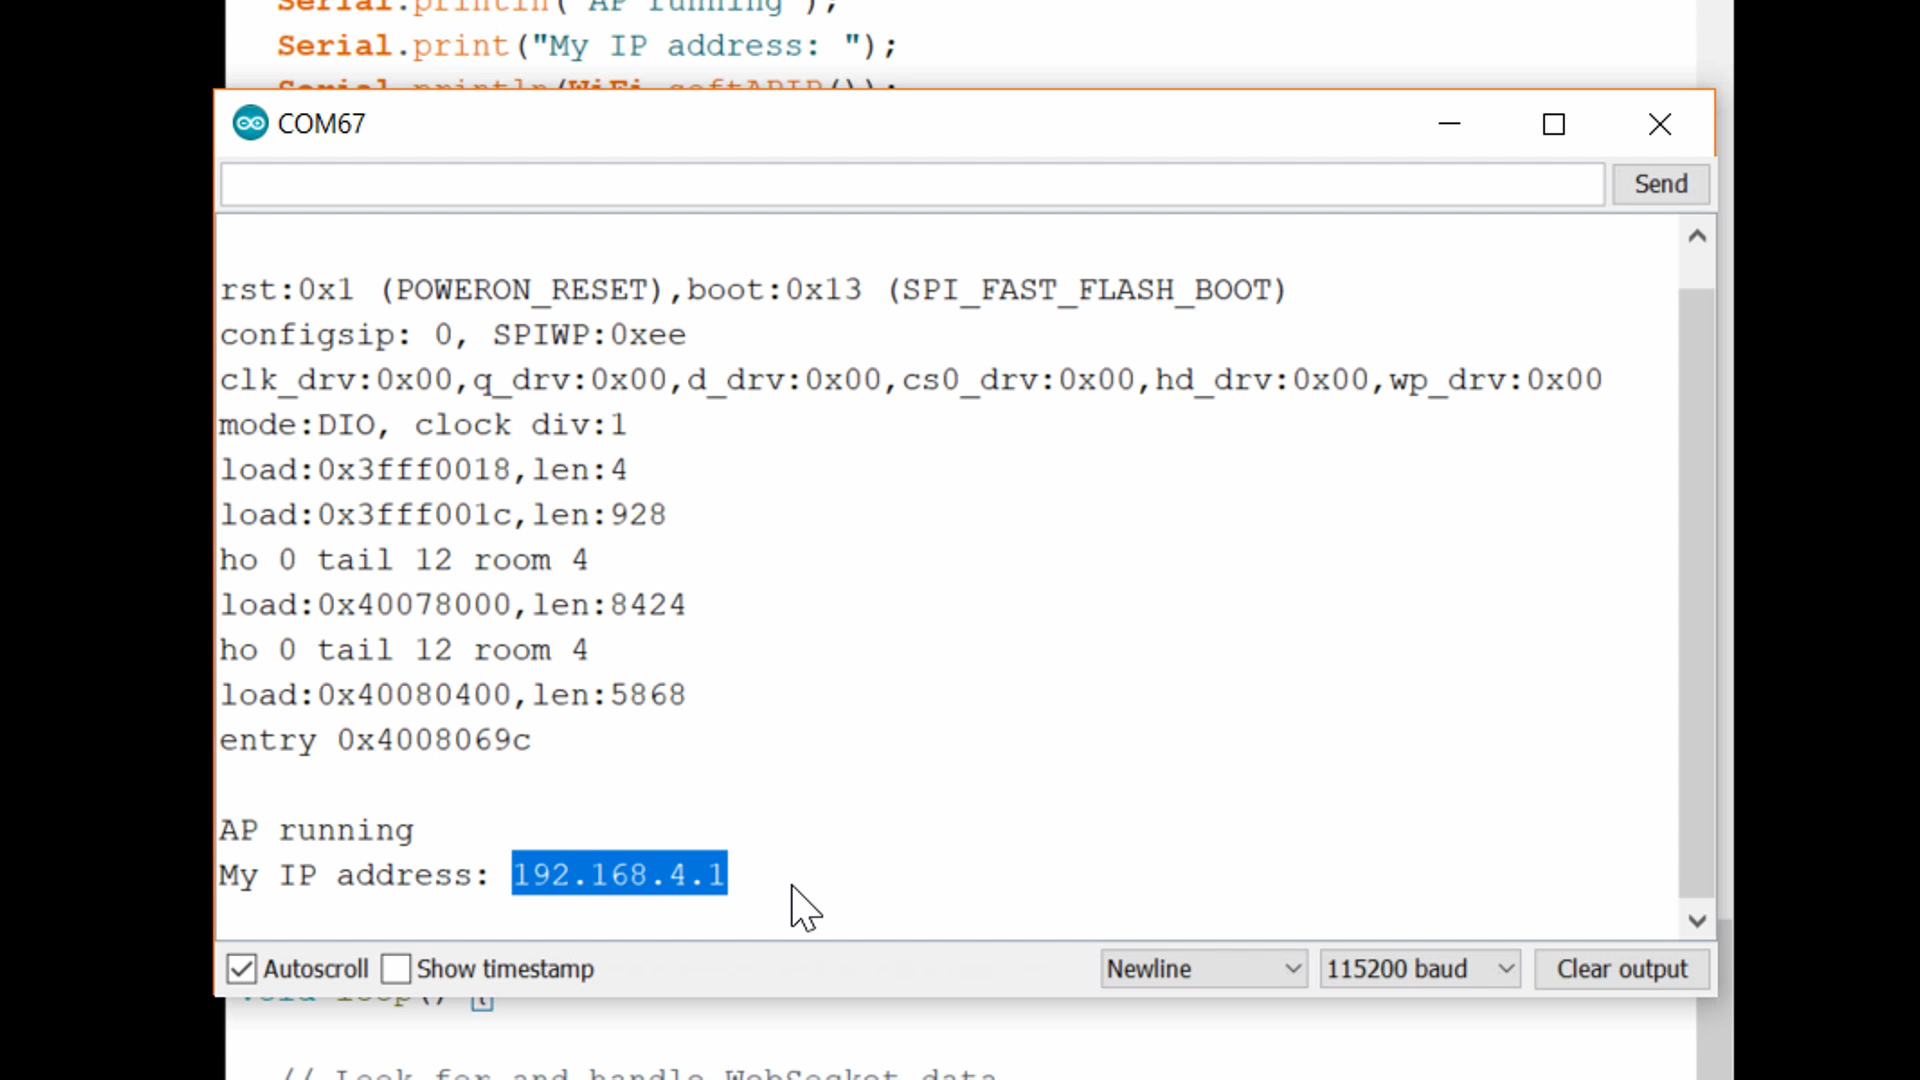
Save your code (we’ll need the Arduino directory structure for SPIFFS in an upcoming step). I’ll give my program a name like “esp32_websocket_host.” Upload the program to your ESP32 and open a serial console with a baud rate of 115200. You should see the IP address of the ESP32 printed to the screen. When you run the Arduino soft access point software on the ESP32, the default IP address is 192.168.4.1.
Web Page Code
Let’s write a simple web page! Like most modern pages, it will contain a mixture of HTML and JavaScript. We leave out CSS, but you’re welcome to create your own .css file, if you wish to make the page look a little nicer. If you look back up in the Arduino code, you’ll see that we have a function to serve up a .css file. However, we will not be making a .css file for the sake of simplicity in this tutorial.
For SPIFFS to work, we need to put the files we wish to upload to the ESP32 in a folder named data/ inside the Arduino project directory:
esp32_websocket_host
 |_ esp32_websocket_host.ino
 |_ data
     |_ index.html
In Arduino, click Sketch > Show Sketch Folder to navigate to your project directory. Create a folder named data and create a new file named index.html inside that new folder. Open index.html with your favorite editor.
In index.html, paste the following code:
<!DOCTYPE html>
<meta charset="utf-8" />
<title>WebSocket Test</title>

<script language="javascript" type="text/javascript">

var url = "ws://192.168.4.1:1337/";
var output;
var button;
var canvas;
var context;

// This is called when the page finishes loading
function init() {

    // Assign page elements to variables
    button = document.getElementById("toggleButton");
    output = document.getElementById("output");
    canvas = document.getElementById("led");

    // Draw circle in canvas
    context = canvas.getContext("2d");
    context.arc(25, 25, 15, 0, Math.PI * 2, false);
    context.lineWidth = 3;
    context.strokeStyle = "black";
    context.stroke();
    context.fillStyle = "black";
    context.fill();

    // Connect to WebSocket server
    wsConnect(url);
}

// Call this to connect to the WebSocket server
function wsConnect(url) {

    // Connect to WebSocket server
    websocket = new WebSocket(url);

    // Assign callbacks
    websocket.onopen = function(evt) { onOpen(evt) };
    websocket.onclose = function(evt) { onClose(evt) };
    websocket.onmessage = function(evt) { onMessage(evt) };
    websocket.onerror = function(evt) { onError(evt) };
}

// Called when a WebSocket connection is established with the server
function onOpen(evt) {

    // Log connection state
    console.log("Connected");

    // Enable button
    button.disabled = false;

    // Get the current state of the LED
    doSend("getLEDState");
}

// Called when the WebSocket connection is closed
function onClose(evt) {

    // Log disconnection state
    console.log("Disconnected");

    // Disable button
    button.disabled = true;

    // Try to reconnect after a few seconds
    setTimeout(function() { wsConnect(url) }, 2000);
}

// Called when a message is received from the server
function onMessage(evt) {

    // Print out our received message
    console.log("Received: " + evt.data);

    // Update circle graphic with LED state
    switch(evt.data) {
        case "0":
            console.log("LED is off");
            context.fillStyle = "black";
            context.fill();
            break;
        case "1":
            console.log("LED is on");
            context.fillStyle = "red";
            context.fill();
            break;
        default:
            break;
    }
}

// Called when a WebSocket error occurs
function onError(evt) {
    console.log("ERROR: " + evt.data);
}

// Sends a message to the server (and prints it to the console)
function doSend(message) {
    console.log("Sending: " + message);
    websocket.send(message);
}

// Called whenever the HTML button is pressed
function onPress() {
    doSend("toggleLED");
    doSend("getLEDState");
}

// Call the init function as soon as the page loads
window.addEventListener("load", init, false);

</script>

<h2>LED Control</h2>

<table>
    <tr>
        <td><button id="toggleButton" onclick="onPress()" disabled>Toggle LED</button></td>
        <td><canvas id="led" width="50" height="50"></canvas></td>
    </tr>
</table>
Save this file. With your ESP32 plugged into your computer, open Arduino and click Tools > ESP32 Sketch Data Upload. Wait a moment, and all the files in the data/ folder (well, just the 1 file, index.html, for this example) should be uploaded to the ESP32.
Run It!
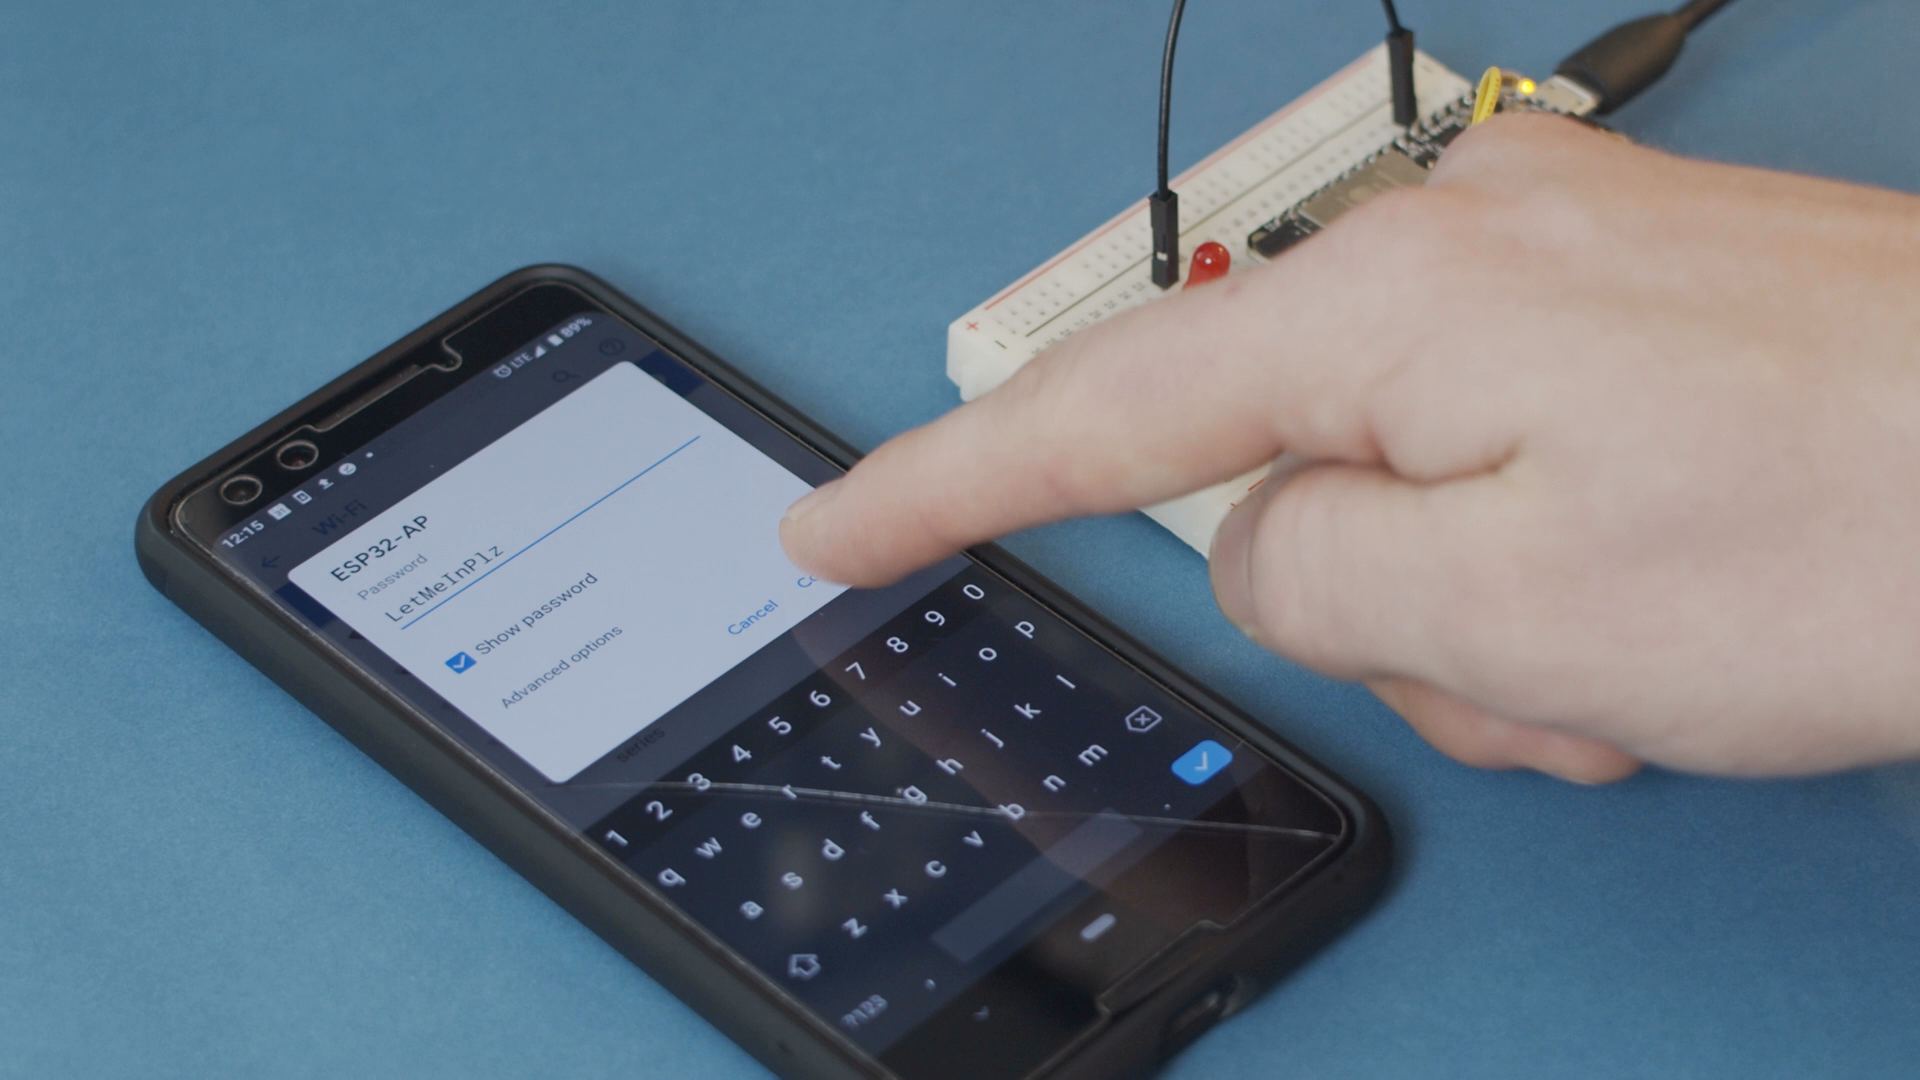
With the index.html file uploaded and the Arduino code running, you should be able to connect to the ESP32’s access point. Using your phone or computer, search for open WiFi access points and connect to the one named ESP32-AP. When asked for a password, enter LetMeInPlz (or whatever you set the AP password to in the Arduino code).
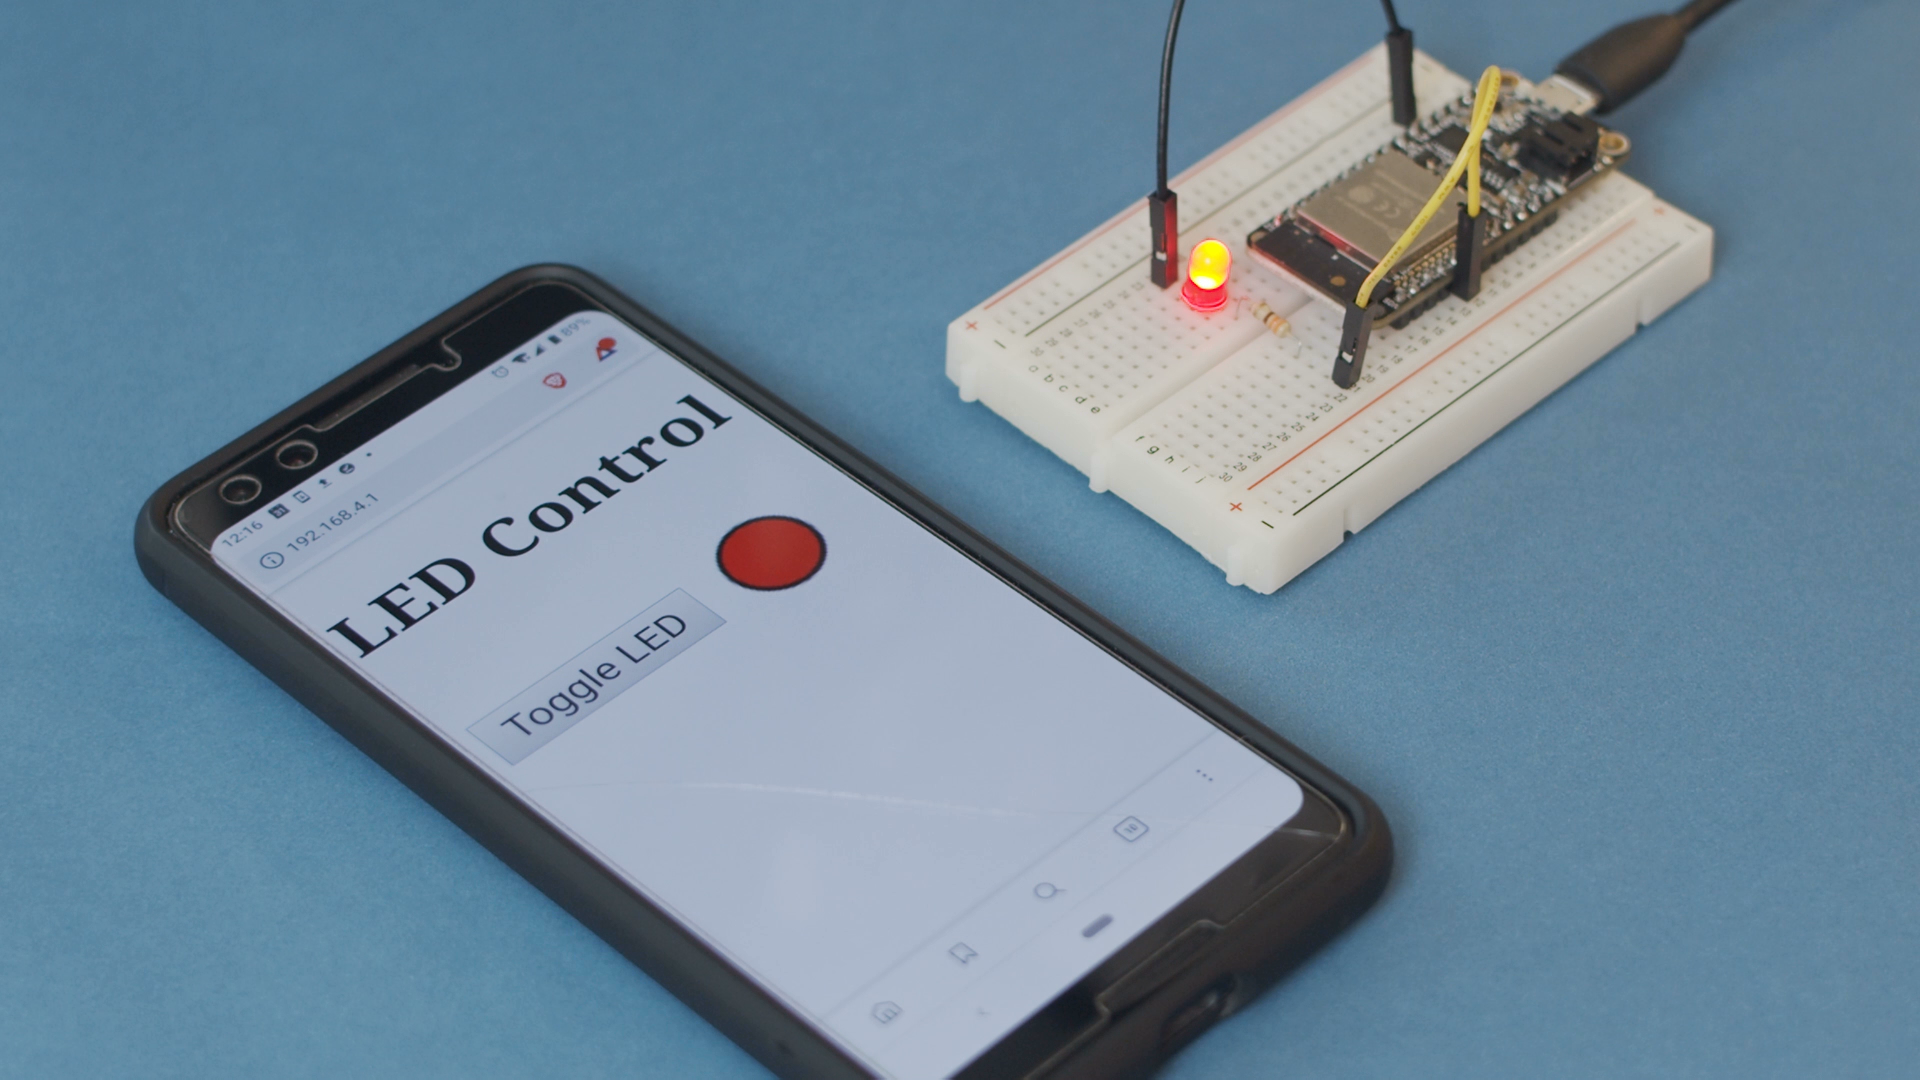
Since we are not running a captive portal, we will need to specifically browse to the IP address of the ESP32. Open a browser and enter 192.168.4.1 (or whatever you discovered the IP address of the ESP32 to be). You should be served the index.html page from the ESP32, which looks like a button and a circle. Zoom in, if needed (as we’re not doing any fancy formatting or CSS here).
Press the Toggle LED button, and you should see the LED connected to the ESP32 flicker to life. The circle on the page should also turn red to denote the state of the LED.
Going Further
Feel free to use this as the basis for your next Internet-controlled hardware project. I suppose it fits in the category of “IoT,” and WebSockets can be super useful for controlling hardware with much less latency than many other methods. You can also use them to get fast updates, if you wish to create a custom dashboard showing sensor data.
Nice tutorial! Helpful and written very well.
I have an EXP32 and want to send pots data to a webpage. My client connects and receives confirmation via sendTXT from the WebSocket event, but how do I send the serial stream? I tried sendTXT but had issues with types. AnalogRead works and I can println() to the serial monitor…
Thanks.
Your client will need to send a request to the ESP32 server. Take a look at how the getLEDState request is handled for an example. You then need to use sprintf to convert the raw ADC value to a string, which you can send back to the client via sendTXT.
Very well done, I’m new to VSC & Platformio, a bit more explanation maybe with a picture or two that can show the way to where the ‘Upload File System image’ button can be found.
But overall it was a great help, thank you for your work.
To others, I found guidance here
http://wei48221.blogspot.com/2018/09/platformio-how-to-upload-sketch-data-to.html
I covered strictly Arduino in this post, and the image for how to upload files via SPIFFS can be found just under the “Install SPIFFS Plugin” header. Thanks for linking to how to use SPIFFS with PlatformIO! More information on how to use it with different IDEs is always good.
I just made the leap from Arduino to VSC & Platformio as I have also started using GitHub https://github.com/sekt1953, in my teaching in our senior house, right now I’m teaching 3D with FreeCad, but have an idea about building a robot with others in retirement, so I am doing the teaching material.
@Svenn, I too have just started using Platformio, but I am not clear about what to do with all of the third-party libraries.
It is a much more robust environment. Above My head!
I’m running into issued where the json library has moved from v5 to v6, and it is different in the way you set it up and call things. Fighting with those changes.
This project just crashed with that error – “StaticJsonBuffer is a class from ArduinoJson 5. Please see arduinojson.org/upgrade to learn how to upgrade your program to ArduinoJson version 6”
Have you dealt with that?
Thanks,
Bill
So when multiple clients connect to the esp32 server should’nt they all get the update message about the led state?
Or what if I want to add a button to the project that is also able to ‘toggle’ the led.. should’nt the sockets make sure that the message get send to the connected clients? or am I missing something?
Forget about my earlier comment. I already understand what I was doing wrong.
You can send the status to every connected client but the currently it was only sending to the ‘current’ client that is messaging about the button state.
Glad to hear you got it! I saw your first message and started looking at the code–you’re right, it does only send to one client. How did you solve it? Do you maintain a global list/array of connected IP addresses and then for every update, you just cycle through that list/array to send out an update message?
Hi nice tutorial but why not use the AsyncWebSocket together with the AsyncWebServer?
I honestly didn’t see that there was an AsyncWebSocket library in that same suite, so thank you for pointing that out! I suppose you could totally use it with AsyncWebServer.
Thank you for this tutorial.
Could you complete it so that we can apply the principle of WebSockets to perform Web OTA updates?
I don’t have plans at the moment to keep working with WebSockets on the ESP32, but good to know there’s interest in doing OTA updates!
Fantastic tutorial. So many tutorials pack in so many features they are impossible to follow. This one is simple enough for me to understand – excellent!
Thank you .
Glad it helped!
I have 2 questions.
1., Why Port 1337? According to my quick resource, it’s kind of red flagged port.
2., Where can I find proper details about the libraries? (Wifi, SPIFFS, webserver etc)
Port 1337 was arbitrarily chosen (something above 1023 so as not to be a reserved port). It’s an old “leet speak” number, so I’m not surprised there would be viruses/bots that use it. There should be no problems using it on your local network, but you might want to change it to something else if you plan to open the ESP32 to the larger Internet.
The links I provided in the tutorial should give you more information about the individual libraries (server, SPIFFS, etc.). If it’s a github repo, you’ll probably need to look at the README. The WiFi library comes with the ESP32 Arduino board definition, so the best documentation for it is probably here: https://www.arduino.cc/en/Reference/WiFi
Shawn,
Thanks for the note about websockets!
I am trying to compile the example in this article.
Keep having a problem with libraries… seems like the biggest problem I have with Arduino!
So I have installed the
https://github.com/me-no-dev/AsyncTCP
https://github.com/me-no-dev/ESPAsyncWebServer
Found and loaded the Libs, but keep getting missing files.
Found a GitHub for async_config.h at https://github.com/me-no-dev/ESPAsyncTCP/tree/master/src, but it was not at the library link you posted above.
Now it’s:
In file included from C:\Users\Bill\Documents\Arduino\libraries\ESPAsyncWebServer-master\src/ESPAsyncTCP.h:21:0,
from C:\Users\Bill\Documents\Arduino\libraries\ESPAsyncWebServer-master\src/ESPAsyncWebServer.h:36,
from C:\Users\Bill\Documents\Arduino\ESP_Websockets-Shawn_Hymel-v090919\ESP_Websockets-Shawn_Hymel-
v090919.ino:18:
C:\Users\Bill\Documents\Arduino\libraries\ESPAsyncWebServer-master\src/async_config.h:26:30: fatal error:
DebugPrintMacros.h: No such file or directory
#include
Makes me think they are not the same. But it will not compile without the async_config.h file.
These libs are making me crazy!
Thanks,
Bill
What version of Arduino IDE are you using? Can you run any of the stock examples provided in AsyncTCP and ESPAsyncWebServer?
RESOLVED!
Thanks Shawn,
I’m running Platformio as the IDE, not Arduino. Verified your 2 lib links, fooled around with where things were, then got this error message. Searching for it there is another definition
Found this, where SPIFFS was a conflicting declaration. While the note in the link github.com/esp8266/Arduino/issues/6133 said that FS.h already invokes SPIFFS, I am not running FS, explicity. I remarked out the #include ,SPIFFS.h> and it compiled and works!!
Yeah!
Great little program! I’m new to reading the header files and chasing those issues.
In file included from lib\spiffs/SPIFFS.h:14:0,
from src\main.cpp:4:
lib\spiffs/spiffs_config.h:21:17: error: conflicting declaration ‘typedef int32_t s32_t’
typedef int32_t s32_t;
^
Files below for information. (edit as desired)
Thanks,
Bill
The include statements are:
#include
//#include // Try the ESP8266WiFi. No difference.
#include
#include // from your Github link.
#include // from your Github link.
#include
#include // WHERE is this? I have it for the Arduino libs, ???
Glad you were able to get it! I’m not quite following your next error message. Since I don’t use PlatformIO, I don’t know how much help I’ll be. It does look like this is a potential bug in the ESP library (similar to this: https://github.com/esp8266/Arduino/issues/6133).
Hey Shawn, I appreciate the effort you put into this tutorial! It works perfectly.
I’ve got two questions about optimization though.
Now we have to manually enter the ip adress and port:
var url = “ws://192.168.4.1:1337/”;
Is there a way to retrieve the ip and port from the initial 1.1 http get request from a client to a webserver. such as:
var ip = ……;
var port = ……;
var url is “ws://” + ip + “:” + port + “/”;
Perhaps by creating another spiffs file, from where it retrieves that data? Because the port and IP address are known when the esp32 runs, so if we could safe those to a spiffs file or else? – Excuse me if this is not possible, I’m just barely understanding what I’m talking about.
And second question, is there a way we can send something from within the arduino loop function to the client?
Now this function: webSocket.sendTXT(client_num, msg_buf); is defined in onWebSocketEvent(..), in which client_num is declared, what if we access webSocket.sendTXT in the loop function, what to enter as client_num ?
The only way I can think of to dynamically get the IP address of another machine on the network is to use DNS (https://en.wikipedia.org/wiki/Domain_Name_System). That’s a whole separate project to set up a local DNS server (https://www.wired.com/2010/02/set_up_a_dns_name_server/) so that you can name your ESP32 with a hostname and the DNS server will tell other machines the IP address of that particular named device.
See this post I made where I show how to echo things back over WebSockets using sendTXT: https://shawnhymel.com/1675/arduino-websocket-server-using-an-esp32/. client_num is the websocket connection, as you can have a number of websockets open to different devices at any given time. My understanding is that if you only have 1 websocket connection, client_num should be 0. So, I recommend trying to set client_num to 0 to see if that works.
Your comment is awaiting moderation. ( sorry i replied in the wrong item)
in de html in the spiffs , change i removed the given parameter in the function
function wsConnect() {
// Connect to WebSocket server
// websocket = new WebSocket(url);
websock = new WebSocket(‘ws://’ + window.location.hostname + ‘:8887/’);
i have a link to github with the changes and also included a broadcast if multple clients were connected
https://github.com/v12345vtm/ESP32-Webserver-Socket-Spiffs
Hi Shawn, thank you for putting me in the right direction. I never knew exactly what DNS is for, but it’s wonderful and it works. Client num appears 0 most of the time, but occasionally serial monitor prints 1 as well, perhaps because of the DNS..
Anyway for those having the same question, and using an ESP32:
WebSocketsServer webSocket = WebSocketsServer(81);
#include
…..initialize either softAP mode or via your router….
void setup (){
if (!MDNS.begin(“esp32”)) {
Serial.println(“Error setting up MDNS responder!”);
while(1) {
delay(1000);
}
}
Serial.println(“mDNS responder started”);
// Start TCP (HTTP) server
server.begin();
Serial.println(“TCP server started”);
// Add service to MDNS-SD
MDNS.addService(“ws”, “tcp”, 81);
// Start WebSocket server and assign callback
webSocket.begin();
webSocket.onEvent(onWebSocketEvent);
}
Out this in your index.html file: var url = “ws://esp32.local:81/” — in my case this works both for soft AP mode as wel as via the router.
Instead of browsing to an IP address you enter: esp32.local/ and it connects.
The source/ info I used: https://github.com/espressif/arduino-esp32/blob/master/libraries/ESPmDNS/examples/mDNS_Web_Server/mDNS_Web_Server.ino
The only downside is that adding an additional library will of course consume precious memory.
Thanks and have a nice day!
The #include failed to display well, So once more, include the ESPmDNS . h library, of course between left and right angle brackets.
Awesome! Thanks for sharing that!
Hi, Shawn,
I’ve wanted to thank you for a while now for this tutorial that got me started when I started discovering what could be done with ESP32, especially with its WiFi interface.
Since then, I’ve been digging a little deeper into the question, and in particular with the excellent library **ESPAsyncWebServer** written by Hristo Gochkov (https://github.com/me-no-dev/ESPAsyncWebServer). Reading its documentation carefully, I saw that it also included WebSockets handling. It is therefore not useful to use the **arduinoWebSockets** library (https://github.com/Links2004/arduinoWebSockets) which adds an extra layer and makes the firmware heavier for nothing. Moreover, the WebSocket layer is much better managed in ESPAsyncWebServer. For example, there is no need to open an extra port. All `ws://` streams go through the HTTP port and all `wss://` streams go through the HTTPS port.
I myself recently wrote a complete tutorial on how to handle WebSockets with ESP32. So I wanted to share it with you here to complement your work and thank you in my own way. I’ve tried to detail things in such a way that everyone can easily use it in their own projects. I also discussed the possibility of formatting the messages exchanged between the clients and the server with JSON. For this, I rely on the excellent **ArduinoJson** v6 library by Benoît Blanchon (https://github.com/bblanchon/ArduinoJson).
By quickly going through the comments of your tutorial, I realize that most of the problems raised find a solution in the way I treated things in my own tutorial. It is also for this reason that I insert here a reference to my work:
**ESP32 Remote Control with WebSocket**
https://m1cr0lab-esp32.github.io/remote-control-with-websocket/
My intention is not to overshadow your work, quite the contrary, but rather to complement it. I hope that my approach will be well received by you.
Thank you for the info! I didn’t realize that WebServer could handle WebSockets. I’ll have to keep that in mind for my next project.
Hi Shawn,
Thanks so much for this tutorial. It pulled together all of the pieces I needed for my current project (wireless rep counter for some exercise equipment). It has:
* Web Server w/ESPAsyncWebServer
* Web Sockets
* Web Access Point (bonus)
* SPIFFS
These are the core features for many other projects I plan to do with my collection of ESP32 chips. Your code example and explanations were perfect. Clean and simple, but results in a fully functional example with all the features I was looking for.
Glad it helped! As Stéphane notes above, you don’t need a separate WebSockets library, as the ESPAsyncWebServer comes with WebSockets abilities. This might help make the code a little smaller if you can use 1 library instead of 2.
I’d like to add another update; I’ve not read through Stéphane Calderoni’s tuturial, so perhaps it’s covered there as well, or this solution becomes obsolute with his knowledge.
Anyhow, in addition to setting up an mDNS, which in conjunction with driving LEDs with FastLED which can easily result in flickering of LEDs. It’s much better to set up the html file with place holders.
in the html file:
var IPaddr = String(‘%IP_HOLDER%’);
var url = IPaddr;
Now when the browser connects to the server (esp32 or esp8266), it will send the acquired IP address to the browser and display the page.
Include among other details this in your arduino script:
String processor(const String& var)
{
Serial.println(var);
if(var == “IP_HOLDER”){
String pref = “ws://”;
String suf = “:81/”;
String IPaddrs = pref + WiFi.localIP().toString() + suf; // WIFI
Serial.println(IPaddrs);
return IPaddrs;
}
return String();
}
You don’t need to deal with this at the server level. Just detect it at the client level with Javascript:
var gateway = `ws://${window.location.hostname}:${window.location.port}/ws`;
If you read my tutorial (and maybe you should take a look at it anyway), you will see that the ESPAsyncWebServer library even prevents you from opening an extra port to manage the WebScoket protocol. Everything goes through the HTTP port you defined (80 by default). So the line above comes down to:
var gateway = `ws://${window.location.hostname}/ws`;
Hi Stéphane Calderoni,
Thanks for your input, I very much appreciate it! I am studying your blog already indeed, great content and very clear explanations; just what I need to understand all this on a deeper level.
Hi again Stéphane,
Thanks again for your work. I implemented websockets like the way you described. I currently don’t have an esp32 at hand, so the following comments relate to an esp8266.
Although there are less libraries involved, for example and are not required anymore and thus less overhead, the benefit with regards to memory is limited. For me it frees about 1500 bytes dynamic memory and about 2500 bytes program space, it sure is welcome memory of course, but I had expected more. Perhaps the benefit is more for an esp32.
Two downsides: (1) the received (WS_EVT_DATA) is a little more tricky to process (as you also mentioned in your blog), and (2) I had more errors/ resets due stack memory overload, which I didn’t have with the ‘old’ (aforementioned) websockets library. I don’t think this is an issue for esp32 boards though.
All in all, I’m happy with this improvement because I like cleaner code. The var gateway = `ws://${window.location.hostname}/ws`; works great too. The message handling and errors required some code adjustments, but these are solved now.
Again that brackets issue. I typed: for example ESPAsyncTCP and WebSocketsServer are not required anymore*. my apologies.
Hello Princiej,
Thank you for your kind feedback.
I’m glad my tutorial was able to help you figure some things out.
As far as I’m concerned, I don’t have ESP8266 on hand. I went straight to ESP32. And, you’re right to point out, my code is only compatible with ESP32, yes. Substantial adjustments have to be made to it before it can be ported to ESP8266. I’m sorry I can’t be of more help… But you should try the ESP32, it’s really great!
Thanks again for your interest in my work.
And thanks to Shawn for agreeing to let me post a reference to my tutorial here.
I think that our respective work will be able to help as many people as possible 🙂
Hey Stéphane, well I actually got it working fine on an esp8266..
Originally I developed my code for an esp32; however since I (actually someone else) burned my only esp32, I needed to order more. Unfortunately Aliexpress is very slow at the moment, so after one month I decided to order more esp32’s and some esp8266’s. Those esp8266’s arrived recently, which made me update my code with #ifdef 8266, so it’s both compatible for esp32 and esp8266 now. And to be honest, and I always programmed with esp32 before, I am very pleased with the esp8266 (wemos d1 r1 type 4Mb flash, 80/ 160mhz). They certainly don’t deceive!
Long story short, the amount of adjustments to run both esp32 and esp8266 with the same code is very very limited, if websockets is concerned. They both use the same ESPAsyncWebServer. Regarding wifi, the only difference is that esp32 use wifi .h library and the esp8266 .h library.
SPIFFS, EEPROM and it’s smaller stack memory (and the watchdog) are issues unrelated to websockets. Once your figured those issues, the combination of esp8266 and websockets is simply amazing. Next step will be an update to json.
What I meant with the WS_EVT_DATA is a little more difficult to process, is that with your websocktets library (ESPasyncWebserver) the messages are sent in decimal numbers, while the WebSocketsServer library sents the messages in pure strings (chars), so I had to update that.
Very nice and helpful tutorial!
I noticed the same thing. It appeared to be sending the update to 1 client so if many clients had the page up and someone changed it the others were not updated. I looked at the c++ libraries being used and found a method to send to all. broadcastTXT.
// Toggle LED
if ( strcmp((char *)payload, “toggleLED”) == 0 ) {
led_state = led_state ? 0 : 1;
sprintf(msg_buf, “%d”, led_state);
Serial.printf(“Toggling LED to %u\n”, led_state);
digitalWrite(LED_BUILTIN, led_state);
//webSocket.sendTXT(client_num, msg_buf);
//changed to send to all clients
//need to update all clients the current led status change
webSocket.broadcastTXT(msg_buf);
Good find! I didn’t know about broadcastTXT().
Hi, I want to start a servo motor and flame sensor with esp32, but send instructions to the motor for a game that is used in a very long way via internet connection. Truth wanted me to enter a separate IP remotely and see and control the information sent by esp32.
How to proceed if i want to add hardware button as well, when i press that button status in client will also be updated.
Listen for a button press using Arduino code and then use the webSocket.sendTXT() function to send a message to your client(s).
Shawn, thank you very much for such a wonderful tutorial. Your tutorial helped me multiple times in my project. I have made some changes and made project with 10 relay which can be Operated using ir or touch button or wifi. Project is working flawlessly now. To update state in all clients when relay is operated through touch button or through ir, I’m sending “webSocket.broadcastTXT(msg_buf)” and all clients will be updated at once.
Once again thank you very much for sharing this project it helped me to construct base of my project.
Awesome! I’m really glad to hear it helped you!
Hi Shawn,
I’ve been following your videos on the ESP32 and web socket integration. Nicely done!
In one of your videos you experiment with turning an LED on through an output of the ESP32
using a mobile device.
I have that portion of it working nicely thanks to your instructive video.
What I am trying to do now is to go in reverse….have the ESP32 take an input and send the message to
the html on the mobile device which in turn lights up a dashboard LED on my phone
I am wondering if this is possible? If so, can you point me in a direction?
Thank you for your time
Should be very similar to what I’ve shown in the demo and video. You’ll need to listen for a button press (or whatever else on the ESP32) and then use the webSocket.sendTXT() function to send messages to the phone.
hi!
I did all
but on that page I see “page can not be found”
can you help me please?
That can be caused by a variety of things. I would start by making sure your phone/computer is on the same network as the ESP32.
I get this error:
ESPAsyncWebServer.h: No such file or directory
What to do ? I installed the required libraries in ESP32 directory.
OK I solved the first problem.
Now I’m getting this error:
WebSocketsServer.h not found.
You’ll need to follow the directions in [this tutorial](https://shawnhymel.com/1675/arduino-websocket-server-using-an-esp32/) to install the websockets library by Links2004.
Hello!
I tried your sketch with websockets. I’ve found one problem; basically it works but when connecting 2 Android phones and 1 Win10 PC problems start. Problem shows up when randomly those 3 clients connects/disconnects to/from ESP32 multiple times (first time all 3 devices connect and everything works perfectly). Then those 3 devices are still able to connect to ESP32 but the ESP32 is “not responding” (I got this information on old G2 LG Android phone (Chrome), other 2 don’t post anything). I am refreshing the website in Chrome and “Toggle LED” button is still “grey”. When checking the serial monitor it writes this:
[192.168.4.2] HTTP GET request of /
[192.168.4.2] HTTP GET request of /
[192.168.4.4] HTTP GET request of /
[192.168.4.4] HTTP GET request of /
[192.168.4.4] HTTP GET request of /
[192.168.4.4] HTTP GET request of /
[192.168.4.2] HTTP GET request of /
[192.168.4.2] HTTP GET request of /
[192.168.4.3] HTTP GET request of /
[192.168.4.3] HTTP GET request of /
[192.168.4.3] HTTP GET request of /
[192.168.4.4] HTTP GET request of /
[192.168.4.4] HTTP GET request of /
when refresh in Chrome is activated!?!? You can see IPs for those 3 connected devices. After reset it works again.
Can you find the issue and correct the sketch/code?
Why this is important? Imagine that I want to control the light in my living room and other family members also. And the light stops responding and the light can’t be reseted easily.
Another interesting information:
Your code is anyway the most stable I’ve found, others hang very quickly in such case, even those “official” included in ESP32 “examples” don’t work in this case. Conclusion: I’ve tried 15+ different sketches for turning on/off things and not even single one works in this case and I’ve tried different development boards.
Thank you very much!
Dejan
New discovery (additional to my previous post):
In the meantime I discovered that a client can be connected and disconnected 5 times (can be different clients – the sum of connections is 5 and then it stops working) and then the program stops working.
In serial monitor this can be observed:
10:01:12.912 -> [0] Received text: toggleLED
10:01:12.912 -> Toggling LED to 1
10:01:12.945 -> [0] Received text: getLEDState
10:01:12.945 -> Sending to [0]: 1
10:01:30.542 -> [1] Connection from 192.168.4.2
10:01:30.542 -> [1] Received text: getLEDState
10:01:30.542 -> Sending to [1]: 1
10:01:49.824 -> [2] Connection from 192.168.4.2
10:01:49.824 -> [2] Received text: getLEDState
10:01:49.824 -> Sending to [2]: 1
10:02:11.417 -> [3] Connection from 192.168.4.2
10:02:11.417 -> [3] Received text: getLEDState
10:02:11.417 -> Sending to [3]: 1
10:02:36.951 -> [4] Connection from 192.168.4.2
10:02:36.951 -> [4] Received text: getLEDState
10:02:36.951 -> Sending to [4]: 1
10:03:08.637 -> [192.168.4.2] HTTP GET request of /
10:03:10.056 -> [192.168.4.2] HTTP GET request of /
10:03:24.708 -> [192.168.4.2] HTTP GET request of /
10:03:24.945 -> [192.168.4.2] HTTP GET request of /
10:03:25.113 -> [192.168.4.2] HTTP GET request of /
10:03:25.317 -> [192.168.4.2] HTTP GET request of /
WiFi connects but web page doesn’t work anymore.
It seems that your code is not recognizing when the client disconnects.
As I would like to make a living room WiFi light controll this code can’t be accepted 🙂
Can you repair the code?
Thank you in advance.
Dejan
Not look network…((((
After upload i do not get IP I get:
ets Jun 8 2016 00:22:57
rst:0x1 (POWERON_RESET),boot:0x13 (SPI_FAST_FLASH_BOOT)
flash read err, 1000
ets_main.c 371
ets Jun 8 2016 00:22:57
rst:0x10 (RTCWDT_RTC_RESET),boot:0x13 (SPI_FAST_FLASH_BOOT)
configsip: 0, SPIWP:0xee
clk_drv:0x00,q_drv:0x00,d_drv:0x00,cs0_drv:0x00,hd_drv:0x00,wp_drv:0x00
mode:DIO, clock div:1
load:0x3fff0018,len:4
load:0x3fff001c,len:1044
load:0x40078000,len:10124
load:0x40080400,len:5856
entry 0x400806a8
E (23) SPIFFS: mount failed, -10025
Error mounting SPIFFS
It looks like SPIFFS is not working. I recommend following this guide to make sure you can get the SPIFFS filesystem to work first: https://randomnerdtutorials.com/install-esp32-filesystem-uploader-arduino-ide/
Shawn Thank you for your response. Got SPIFFS working (it was a bad download) and I get serial monitor to report IP 192.168.4.1 . my network gateway is 10.0.0.0 … I get no response to 192.168.4.1 ..Is there a way to change the default IP into the 10.0 range?
Hi Shawn ,
i’ve some trouble with the websocket library :
‘class WebSocketsServer’ has no member named ‘remoteIP’
I use Arduino IDE 1.8.19 and Websockets port 2.3.5 (Markus Sattler )
Something wrong with my uses ?
Best regards
Make sure you have an ESP32 board selected as your board. Please open File > Examples > WebSockets > WebSocketServer and see if it will compile (which includes a call to remoteIP()). I just checked with Arduino v1.8.19 and WebSockets library v2.3.5, and it compiled for me.
Shawn, great video and learning a lot.
I am attempting to do this example and have good success reproducing. I am attempting to make a second page on the same ESP32 and seem to be missing something about how to listen for the second page and parse the response to send the right page back. I have the second page (index.html and led3Page.html) uploaded to the ESP32. Any ideas about how I can learn this?
hi,
websockets works great! THANKS!!
from your code, you also start this server: “AsyncWebServer _server(80);” I believe i it’s an http server running on port 80.
how do i monitor client connections on that server?
thanks! 🤓👍
DOAH 🥴,
The answer is in your code example. I just needed to read it again.
This is fantastic… I have a functional http: AND ws: server running now!!
Is it possible to have multiple ws: servers running on different ports?
Thanks so much Shawn. Excellent Tutorial! You were the only SPIFFs tutorial that explicitly mentioned _not_ to use the serial monitor when uploading the html files to the esp32; and also the only one to include the possibility of using a css file, which can make web apps rich and beautiful. The thing you did emphasize is that by using WebSockets, you also make the apps fast. So many other tutorials use http (REST) which is slow and also clumsy to code, by comparison! Thanks so much!!
Hey Shawn ,this seems to be the only video Ive found so far that goes into any detail about buttons and linking them to function for arduino use. I’m pretty good at hacking code to add buttons to the html source and adding additional gpios but what I cant find out there is java script detail explaining the linkage .For instance linking a dht 11/22 to a css circular progress bar. and this is 4 years after your video. are certain topics being gatekept?
Hi warren,
I don’t think the information is being gatekept–I just think that connecting embedded devices to JavaScript clients is not a very popular topic, so there’s not much information out there. You should be able to feed sensor data to a graph pretty easily. Whenever the server (ESP32) takes a reading, it sends it out over the websocket. Your JavaScript client can then read and get that value. For example:
function onMessage(evt) {
// Print out our received message
console.log(“Received: ” + evt.data);
// Do something with evt.data
…
}
There are plenty of JavaScript libraries for displaying graphs. I don’t have much experience with them, but this might be a good start: https://www.chartjs.org/docs/latest/charts/bar.html. Hope that helps!
Hi, Shawn.
How can I host the ESP32 web-server so that I can send in requests from anywhere in the world to control the LED blinking (I assume your current WebSockets method can only receive requests from a client which is connected to the same network as your ESP32 Server).
Thanks in advance.
If I want to control the light blinking from anywhere in the world, how can I do so? (I’m assuming that your method requires both the client and ESP32 devices connected to the same network).
Great tutorial btw.
If I want to control the light blinking from anywhere in the world, how can I do so? (I’m assuming that your method requires both the client and ESP32 devices connected to the same network).
Great tutorial btw.