Building Debian Linux for the Olimex A13-OLinuXino-MICRO
References
https://www.olimex.com/forum/index.php?topic=790.0
Install required packages
I like sudo, as it prevents me from doing stupid stuff. However, feel free to use “sudo su” if you don’t feel like typing “sudo” for half the commends. If you just copy and paste the commands, however, it really doesn’t matter.
sudo apt-get install gcc-4.6-arm-linux-gnueabi
For older than Ubuntu 10.10 you might get an error trying to install the ARM compiler (“E: Unable to locate package gcc-arm-linux-gnueabi”). You’ll need to add a Linaro PPA repository:
sudo add-apt-repository ppa:linaro-maintainers/toolchain
sudo apt-get update
sudo apt-get install gcc-arm-linux-gnueabi
sudo apt-get install ncurses-dev uboot-mkimage build-essential git-core
Download and Compile the Bootloader
Create a directory somewhere to hold the image:
mkdir ~/Projects/olinuxino-a13
cd ~/Projects/olinuxino-a13
In that directory, clone the u-boot-sunxi repository (we want to use the branch “sunxi”)
git clone -b sunxi https://github.com/linux-sunxi/u-boot-sunxi.git
cd u-boot-sunxi
Make the bootloader (note the “M” after OLinuXino for the MICRO variant of the board)
make A13-OLinuXinoM_config
make
[EDIT 10/04/13] If you run into errors during the “make” phase, you may want to try make with a specific target (Credit: Lawrence):
make A13-OLinuXinoM
If make can’t seem to find arm-linux-gcc or other arm-linux commands (e.g. “arm-linux-gcc: command not found” or “arm-linux-ld: command not found”), you’ll have to create links to the compiler/linker. Find arm-linux-gnueabi-gcc. In Ubuntu, this is /usr/bin. Go there, create some links, and try make again:
cd /usr/bin
sudo ln -s arm-linux-gnueabi-gcc arm-linux-gcc
sudo ln -s arm-linux-gnueabi-ld arm-linux-ld
sudo ln -s arm-linux-gnueabi-ar arm-linux-ar
sudo ln -s arm-linux-gnueabi-objdump arm-linux-objdump
sudo ln -s arm-linux-gnueabi-objcopy arm-linux-objcopy
sudo ln -s arm-linux-gnueabi-nm arm-linux-nm
cd ~/Projects/olinuxino-a13/u-boot-sunxi/
make
Wait while the giant wall of Make text flies by your screen. If it all went well, you should not see any errors. If you have errors, Google is your friend. Don’t worry, there are enough people trying to cross compile Linux and U-Boot for ARM. Surprising, I know.
Download and Compile the Linux Kernel
Move up one directory (to ~/Projects/olinuxino-a13) and clone the linux-sunxi repository. This is a pretty big download (around 1GB), so make sure you have the space.
git clone https://github.com/linux-sunxi/linux-sunxi
Note that this tutorial worked for version sunxi-3.4. If you’re having trouble, you may want to try checking out the specific branch “sunxi-3.4” from git.
Configure some stuff for make. Note that we want to add a special config file for the MICRO board, as it does not have some of the peripherals as its larger cousins.
cd linux-sunxi
gedit arch/arm/configs/a13om_defconfig
Copy the text from the config file found at https://github.com/iso9660/olinuxino-A13-micro/blob/master/a13_olimex_micro_defconfig and paste it into the a13om_defconfig file. Save and close the file.
[EDIT 01/04/14] As some of the readers pointed out, the config file above does not enable VGA. If you want VGA out from the OLinuXino, you’ll have to set the correct kernel options. I recommend the options file here: https://docs.google.com/file/d/0ByOKWTCf95tua2J4U1BDS3BVSzQ/edit. This file comes from the Linux Journal entry about the A13-OLinuXino (http://porky.linuxjournal.com:8080/LJ/234/11538.html).
make ARCH=arm a13om_defconfig
make ARCH=arm menuconfig
The last commands generates a .config file. Edit the file and choose which modules you want installed (or not installed). To be honest, the default looked OK to me, so I would just leave the file alone.
gedit .config
Don’t laugh. I like gedit. Use vi if that suits you (masochist…). Wait, I just realized I probably won’t have gedit on the OLinuXino board. Crap. Guess I’d better start learning it…
Save and exit the file. Now, it’s time to compile. Once again, this will take a while. For the record, I didn’t intend for that to rhyme. I’m just awesome like that. Wut.
make ARCH=arm CROSS_COMPILE=arm-linux-gnueabi- uImage
make ARCH=arm CROSS_COMPILE=arm-linux-gnueabi- INSTALL_MOD_PATH=out modules
make ARCH=arm CROSS_COMPILE=arm-linux-gnueabi- INSTALL_MOD_PATH=out modules_install
Configure SD Card
First, figure out where the SD card device resides. This involves entering the command
ls /dev
before and after inserting the SD card. Whichever device appears after insertion is the SD card. This might be something like /dev/sdc. For me, it was /dev/mmcblk0 because my laptop has an internal SD/MMC card reader. Whatever device it is, it will be noted as /dev/X from now on.
Ubuntu also has a habit of auto-mounting things. Make sure that the SD card has been unmounted before running fdisk.
[EDIT 09/28/13] You may want to perform an all-zeros wipe of the SD card first, which will allow for better compression if you want to make a backup image of the card later. See my blog post on wiping the SD card.
sudo fdisk -u /dev/X
List partitions
> p
Delete them (make sure there’s nothing you want on the SD card!)
> d 1
Create a new partition
> n
Primary partition
> p
Partition number
> 1
Starting from sector
> 2048
Ending at
> 34815
Create another partition
> n
Primary partition
> p
Partition number
> 2
Starting from sector
> 34816
Ending at default (using the rest of the card)
> <enter>
Check the new partitions
> p
You should see something like
Disk /dev/mmcblk0: 3904 MB, 3904897024 bytes
100 heads, 35 sectors/track, 2179 cylinders, total 7626752 sectors
Units = sectors of 1 * 512 = 512 bytes
Sector size (logical/physical): 512 bytes / 512 bytes
I/O size (minimum/optimal): 512 bytes / 512 bytes
Disk identifier: 0x00000000
Device Boot Start End Blocks Id System
/dev/mmcblk0p1 2048 34815 16384 83 Linux
Partition 1 does not end on cylinder boundary.
/dev/mmcblk0p2 34816 7626751 3795968 83 Linux
Write the partitions to the card
> w
Make the first partition vfat (note that X1 might be something like sdc or mmcblk0p1).
sudo mkfs.vfat /dev/X1
Make the second partition ext3.
sudo mkfs.ext3 /dev/X2
Put Debian Rootfs on SD Card
Download a basic Debian rootfs, such as this one by hands.com: http://hands.com/~lkcl/mele_debian_armhf_minimal.cpio.gz
Mount the SD card (if not done so already)
sudo mount /dev/X2 /mnt
Navigate to the SD card partition and unzip the rootfs to the card.
cd /mnt
sudo gunzip -c ~/Downloads/mele_debian_armhf_minimal.cpio.gz | sudo cpio -i
cd ..
sync
sudo umount /mnt
Put Uboot and the Kernel on the SD Card
Mount the first partition
sudo mount /dev/X1 /mnt
Copy the kernel image to the SD card
cd ~/Projects/olinuxino-a13
sudo cp linux-sunxi/arch/arm/boot/uImage /mnt
Olimex has created a script file the contains things like GPIO port mappings, video resolution, etc. Pretty handy. Download it from (click “RAW” in GitHub to get the actual file) https://github.com/OLIMEX/OLINUXINO/blob/master/SOFTWARE/A13/script.bin and place it on the SD card.
IMPORTANT: Click on the link to the script.bin in a browser and then download the file listed on the github repository. If you use github, you’ll get an html file, which is not what we want. Check the file to make sure it’s a proper binary file (random 1s and 0s) before copying it to the SD card.
sudo cp ~/Downloads/script.bin /mnt
Copy uboot to the empty space before the first partition on the SD card
sudo dd if=u-boot-sunxi/u-boot-sunxi-with-spl.bin of=/dev/sdX bs=1024 seek=8
sync
sudo umount /mnt
Copy the required kernel modules into the second partition
sudo mount /dev/X2 /mnt
sudo cp -a linux-sunxi/out/lib/modules/3.4.61+/ /mnt/lib/modules/
sudo umount /mnt
Run Linux!
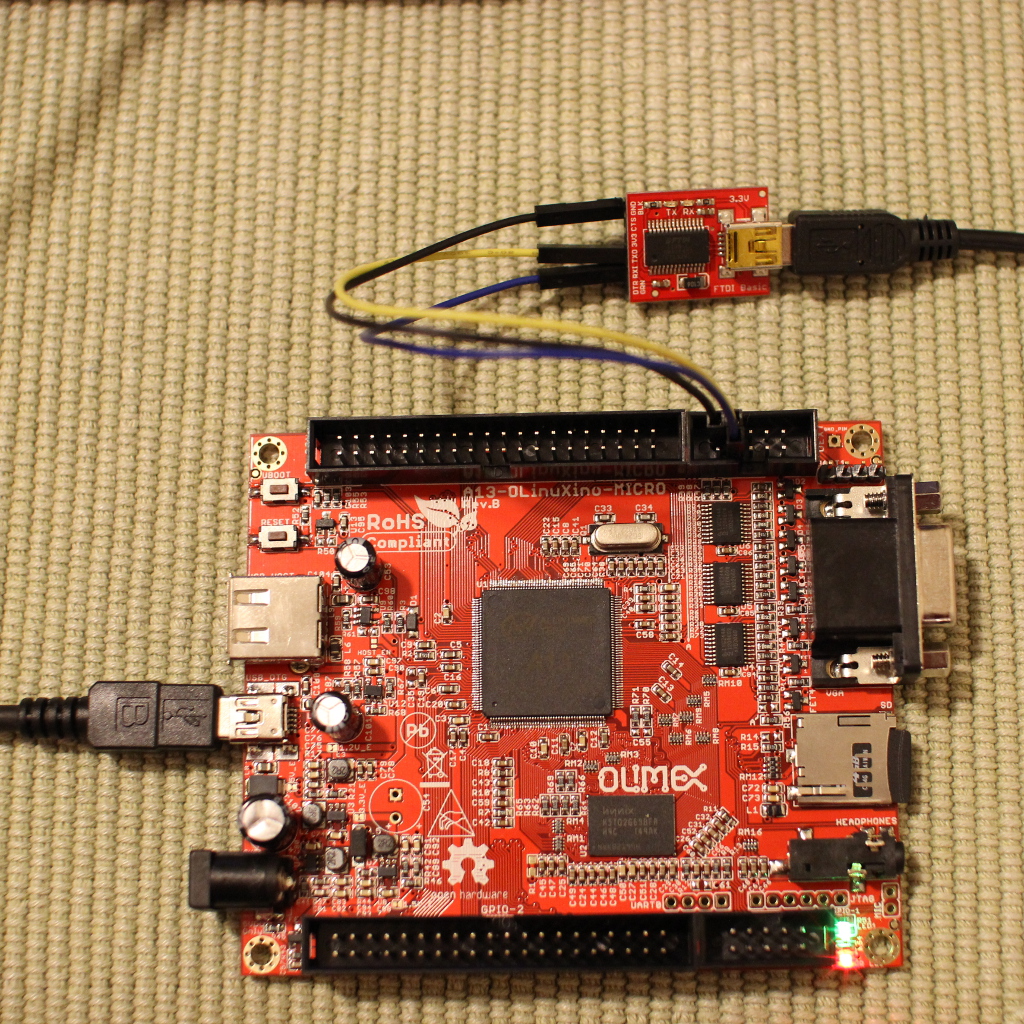
At this point, you should be able to hook up a VGA monitor and a USB keyboard to the OLinuXino board and watch Linux boot once you power the board. We take a bit more pleasure in pain than that, don’t we? We’re going to use a serial cable to control our board from Linux. Yo dawg, I heard you like Linux, so we gave you a serial cable to control your Linux from Linux.
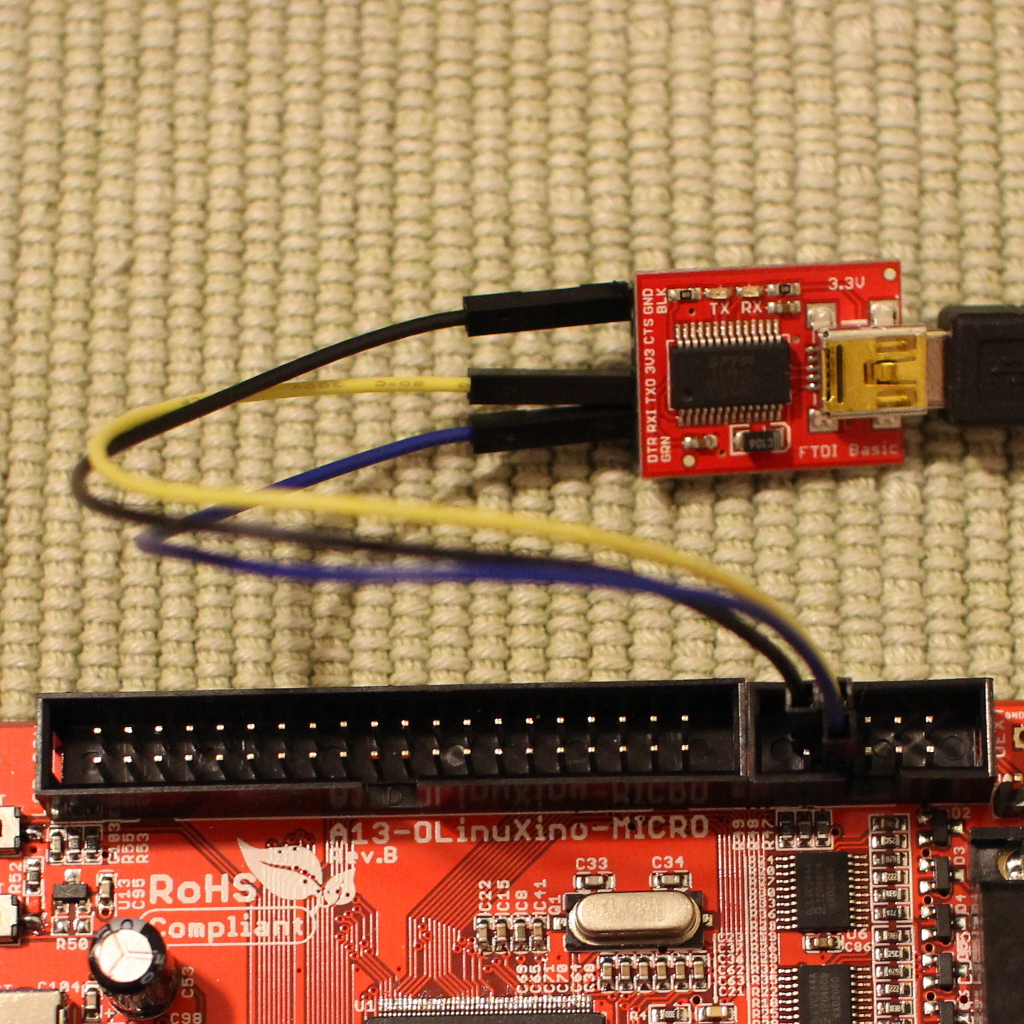
Since no one really has a serial port anymore, you’ll need a 3.3V FTDI breakout board from Sparkfun, a USB mini cable, and some male-female jumper wires (Sparkfun has those, too). Hook up the FTDI breakout board to the Olimex UEXT port:
FTDI (3.3V) UEXT
————————————
TXO <——————-> RXD
RXI <——————-> TXD
GND <——————-> GND
To interact with Linux on the Olimex board, we use the screen command and attach it to the serial port, which is likely located at /dev/ttyUSB0 (you may want to use “ls /dev” to verify which tty port is associated with the FTDI breakout board). Note that the default baudrate is 115200
screen /dev/ttyUSB0 115200
Plug in power to the Olimex board (5V to the USB mini port or using a wall adapter), and you should see some text appear in the console.
Use “ctrl-a k” to exit the screen.
With any luck, you should see a prompt asking you for “debian login: “
Enter “root” for the username and “password” for the password.
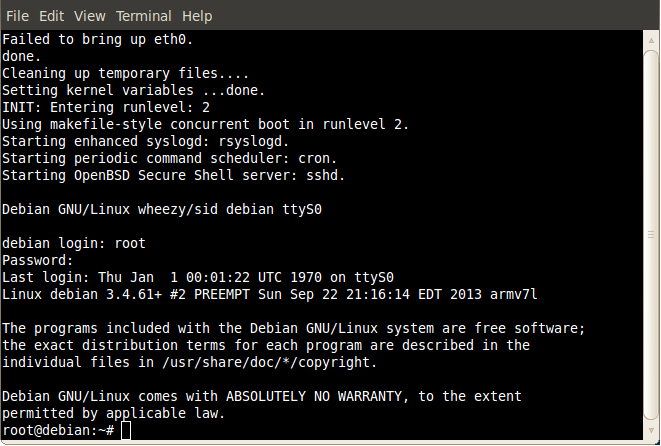
Bam. The power of Linux is now yours to command. Mostly.
I think the uboot build should be, otherwise i get build errors.
$ make A13-OLinuXinoM_config
$ make A13-OLinuXinoM
Just make worked for me, but it’s entirely possible that Sunxi has been updated in the past week, or I had something pre-configured for make and forgot to mention it. Thanks for the heads up, I’ll put in an edit!
Hi, Thanks for this tutorial. I did all the steps but when I plug my screen VGA I see nothing
Glad it helped! If you don’t see anything through the VGA, there’s likely an issue with Linux booting up (and possibly not loading the VGA drivers). Are you able to use an FTDI or serial cable to the Olimex’s UART pins to get a serial prompt? I’ve found that this is the best way to get more information out of the Linux boot process.
I have sd card class 4 and i use only usb otg cable only without PWR cable because the red led is on so no probleme i think. i will try to build sd card from the first step
Correct. You do not need an external power connection. The USB cable should be good enough. Do you see any of the other LEDs flashing when you plug it in? If not, then it sounds like an issue with your boot partition.
I would recommend re-building the SD card from the beginning like you said.
both LEDs (red and green) are lit, but when i push UBOOT button … i don’t see anything on my screen
I’ve been looking into the VGA issue, and it seems that the configuration file does not have video enabled by default – which means that you’ll have to recompile the kernel. The part where it asks you to copy a config file from GitHub (right before the command $ make ARCH=arm a13om_defconfig), try using this config file instead:
https://docs.google.com/file/d/0ByOKWTCf95tua2J4U1BDS3BVSzQ/edit
(Source: http://porky.linuxjournal.com:8080/LJ/234/11538.html)
I’m working on testing this right now. I’ll make an edit to the post if it works out. Let me know if it works for you!
Thank you very much Shawn , it works correctly
I’m glad it worked! I noticed that they didn’t have any networking options selected – let me know if you have any issues with that. I’m working on a separate blog post that covers how to get VGA working and X Windows on the board.
I’ll reconfigure the kernel for an IP address and if there is a problem I tell you. Shawn i wanna ask you is that the multi usb works on the board? and how i can make an application to test gpio
I have the MICRO version of the board, which only has 1 USB port.
I have not played with GPIO yet. There are Kernel configuration options that will enable GPIO, but I have not figured out what is needed to control them. Once I do, I will certainly write a tutorial.
Hi,..I have bought A13 olinuxino micro board, and
I want to boot LINUX operating system having GUI in it….
Could you please help me how to do that…..??
The kernel options config file I listed does not enable VGA, so you’re going to have to re-compile the kernel using this config file:
https://docs.google.com/file/d/0ByOKWTCf95tua2J4U1BDS3BVSzQ/edit
As for a GUI, you may want to look into LXDE. See the bottom of this post:
http://porky.linuxjournal.com:8080/LJ/234/11538.html
I’m working on a separate blog post that goes over getting a GUI installed on the A13-OLinuXino, so stay tuned 🙂
Thanks a lot Shawn !
Hi,
Thanks for this simplified tutorial of sd card build process.
Do you know if GUI debian can be boot with A13-OLinuXino-MICRO. I have a requirement of playing some video on this board.
Any other idea would be great
Thanks
Tej
You are welcome. I’m glad it helped.
The A13-OLinuXino can easily run a GUI. You’ll need to re-compile the kernel with this config file to enable VGA output:
https://docs.google.com/file/d/0ByOKWTCf95tua2J4U1BDS3BVSzQ/edit
Checkout this post on Linux Journal for installing a GUI:
http://porky.linuxjournal.com:8080/LJ/234/11538.html
I’ll post a VGA and GUI tutorial in the next few days, once I get it running on my board.
Hey,
I have 7″ LCD which does not show Linux login promt. I have done everything mentioned in your blogs. Does LCD need any different kernel/uboot configuration
Thanks
Tej
Tej,
Yes, you need to configure the kernel options a bit differently. Take a look at this config file:
https://docs.google.com/file/d/0ByOKWTCf95tua2J4U1BDS3BVSzQ/edit
To get a GUI, look at this entry in Linux Journal:
http://porky.linuxjournal.com:8080/LJ/234/11538.html
I’ll post a VGA and GUI tutorial in the next few days, once I get it running on my board.
Shawn why python command doesn’t work ?
Python isn’t installed by default. With an Internet connection, issue the command:
$ sudo apt-get install python2.7
i have only loop interface 127.0.0.1 localhost, i don’t have internet connexion
You can manually install the python packages, which usually requires downloading and installing many dependencies. The best place to start is the Debian package page for Python: http://packages.debian.org/search?keywords=python
Still not able to boot using the blog mentioned in LinuxJournal. Not sure where is the issue. Prebuilt image for A13-Micro is working fine, but not one which I built.
Any pointers?
Thanks
Tej
Can you use a serial connection (such as an FTDI) to verify that Linux is booting?
Ok, I got Linux booting, but display is only VGA, LCD still not working, even though I have SUNXI_LCD enabled in kernel.
Not sure what to do. Let me keep working on it.
Do you have any recommendation for GUI based tool on A13-Micro board (QT etc..)
Any suggestion would be really appreciated.
Thanks
Tej
I have not tried an LCD with the OLinuXino. I recommend taking a look at the SunXi wiki: http://linux-sunxi.org/Display.
I also haven’t done much GUI development – I would start with QT, like you mentioned (assuming you want to program in C++).
Thanks for the helpful post!
Just a note – per the LinuxJournal article, you can get away without making any symbolic links when making uboot if you use the CROSS_COMPILE (variable/option) like this:
make -j8 CROSS_COMPILE=arm-linux-gnueabihf-
-j8 just makes it do more jobs to use all my cores, and please note I use hf for hard float when compiling.
Not done yet, but the SD Card with pre-built image I got from Mouser for the Micro didn’t want to boot at all. Can’t get the pre-built image at OLIMEX (I just get a text file outlining how to build) and other images for the A13 fail (which isn’t suprising since they are for a different board, but at least I got serial out for them – I didn’t at all for the ‘prebuilt’ one from mouser)
Good to know! Thank you 🙂