By default, most microcontrollers have no concept of a console, so you have to help them out a bit. When it comes to debugging, outputting information to some kind of console can be extremely useful. One option is to use semihosting with STM32CubeIDE.
However, semihosting can be extremely slow. Another good option is to output debug information over the serial port (UART). We can call the STM32 HAL functions (e.g. HAL_UART_Transmit), but sometimes it’s easier to use the standard C library functions printf, scanf, and so on. To do that, we need to re-write the underlying functions.
Note: the code for this section is taken from Carmine Noviello’s Mastering STM32 book. I am simply updating the process for how to get retargeting working in STM32CubeIDE. All credit goes to Carmine Noviello for his code. You are welcome to write your own retarget.h and retarget.c files, if you wish.
Start a new STM32 project with all the defaults. I am using a Nucleo-L476RG for this example. Enable UART, if needed. For almost all the Nucleo boards, UART2 is tied to the ST-LINK microcontroller, which gives us a virtual COM port over USB. Save and generate code.
The first thing we need to do is disable syscalls.c. This file defines many of the same functions that we are trying to make. If you do not disable it, you will likely get a “multiple definition” error when you try to compile and link. For example:
multiple definition of `_isatty'
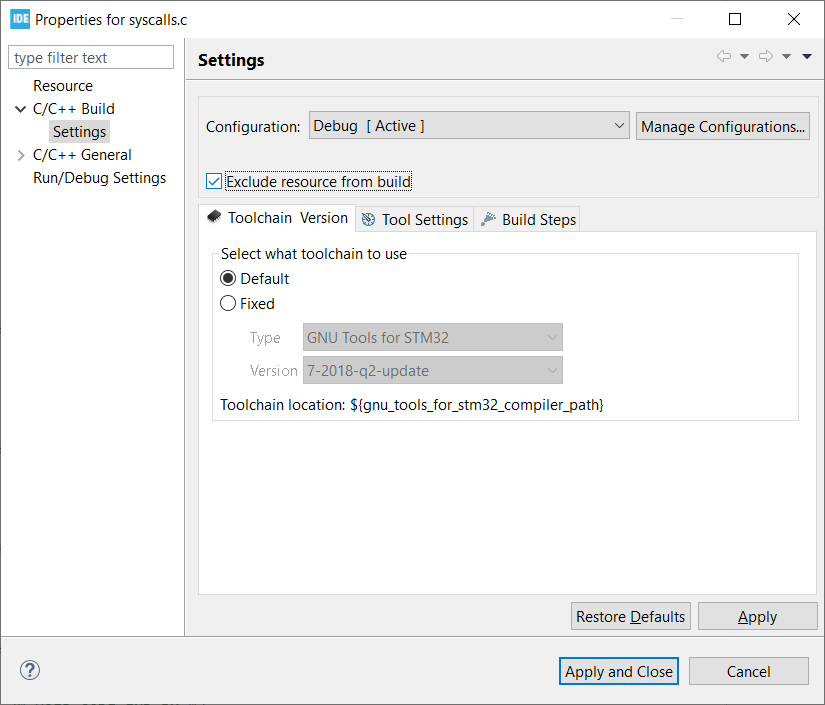
Right-click on the syscalls.c file and select Properties. Under C/C++ Build > Settings, check Exclude resource from build.
Click Apply and Close. The file name in the project browser should now be grayed out.
This will allow us to not include a file (or folder) when we compile and link in STM32CubeIDE. The process is similar for most other Eclipse-based IDEs.
Create a new file in the Inc directory called retarget.h. Copy the following code into this file:
// All credit to Carmine Noviello for this code
// https://github.com/cnoviello/mastering-stm32/blob/master/nucleo-f030R8/system/include/retarget/retarget.h

#ifndef _RETARGET_H__
#define _RETARGET_H__

#include "stm32l4xx_hal.h"
#include <sys/stat.h>

void RetargetInit(UART_HandleTypeDef *huart);
int _isatty(int fd);
int _write(int fd, char* ptr, int len);
int _close(int fd);
int _lseek(int fd, int ptr, int dir);
int _read(int fd, char* ptr, int len);
int _fstat(int fd, struct stat* st);

#endif //#ifndef _RETARGET_H__
Save this file.
Create a new file in the Src directory called retarget.c. Copy the following code into this file:
// All credit to Carmine Noviello for this code
// https://github.com/cnoviello/mastering-stm32/blob/master/nucleo-f030R8/system/src/retarget/retarget.c

#include <_ansi.h>
#include <_syslist.h>
#include <errno.h>
#include <sys/time.h>
#include <sys/times.h>
#include <limits.h>
#include <signal.h>
#include <../Inc/retarget.h>
#include <stdint.h>
#include <stdio.h>

#if !defined(OS_USE_SEMIHOSTING)

#define STDIN_FILENO  0
#define STDOUT_FILENO 1
#define STDERR_FILENO 2

UART_HandleTypeDef *gHuart;

void RetargetInit(UART_HandleTypeDef *huart) {
  gHuart = huart;

  /* Disable I/O buffering for STDOUT stream, so that
   * chars are sent out as soon as they are printed. */
  setvbuf(stdout, NULL, _IONBF, 0);
}

int _isatty(int fd) {
  if (fd >= STDIN_FILENO && fd <= STDERR_FILENO)
    return 1;

  errno = EBADF;
  return 0;
}

int _write(int fd, char* ptr, int len) {
  HAL_StatusTypeDef hstatus;

  if (fd == STDOUT_FILENO || fd == STDERR_FILENO) {
    hstatus = HAL_UART_Transmit(gHuart, (uint8_t *) ptr, len, HAL_MAX_DELAY);
    if (hstatus == HAL_OK)
      return len;
    else
      return EIO;
  }
  errno = EBADF;
  return -1;
}

int _close(int fd) {
  if (fd >= STDIN_FILENO && fd <= STDERR_FILENO)
    return 0;

  errno = EBADF;
  return -1;
}

int _lseek(int fd, int ptr, int dir) {
  (void) fd;
  (void) ptr;
  (void) dir;

  errno = EBADF;
  return -1;
}

int _read(int fd, char* ptr, int len) {
  HAL_StatusTypeDef hstatus;

  if (fd == STDIN_FILENO) {
    hstatus = HAL_UART_Receive(gHuart, (uint8_t *) ptr, 1, HAL_MAX_DELAY);
    if (hstatus == HAL_OK)
      return 1;
    else
      return EIO;
  }
  errno = EBADF;
  return -1;
}

int _fstat(int fd, struct stat* st) {
  if (fd >= STDIN_FILENO && fd <= STDERR_FILENO) {
    st->st_mode = S_IFCHR;
    return 0;
  }

  errno = EBADF;
  return 0;
}

#endif //#if !defined(OS_USE_SEMIHOSTING)
Save this file.
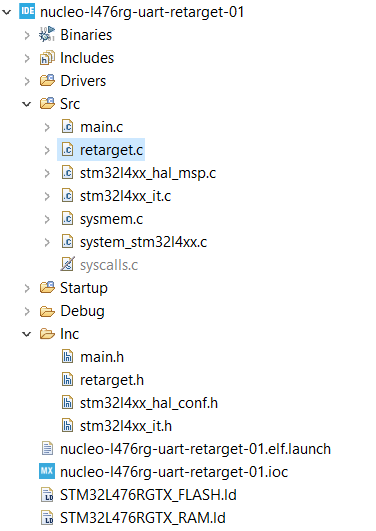
Your project directory structure should look like the following:
 Notice that we’ve added retarget.h and retarget.c. We also removed syscalls.c from the build, but the file still exists in our project directory.
Include stdio.h and retarget.h in your main.c file. You can now use printf and scanf, as shown here:
/* Includes ------------------------------------------------------------------*/
#include "main.h"

/* Private includes ----------------------------------------------------------*/
/* USER CODE BEGIN Includes */
#include <stdio.h>
#include "retarget.h"
/* USER CODE END Includes */

/* Private typedef -----------------------------------------------------------*/
/* USER CODE BEGIN PTD */

/* USER CODE END PTD */

/* Private define ------------------------------------------------------------*/
/* USER CODE BEGIN PD */

/* USER CODE END PD */

/* Private macro -------------------------------------------------------------*/
/* USER CODE BEGIN PM */

/* USER CODE END PM */

/* Private variables ---------------------------------------------------------*/
UART_HandleTypeDef huart2;

/* USER CODE BEGIN PV */

/* USER CODE END PV */

/* Private function prototypes -----------------------------------------------*/
void SystemClock_Config(void);
static void MX_GPIO_Init(void);
static void MX_USART2_UART_Init(void);
/* USER CODE BEGIN PFP */

/* USER CODE END PFP */

/* Private user code ---------------------------------------------------------*/
/* USER CODE BEGIN 0 */

/* USER CODE END 0 */

/**
  * @brief  The application entry point.
  * @retval int
  */
int main(void)
{
  /* USER CODE BEGIN 1 */
  char buf[100];
  /* USER CODE END 1 */


  /* MCU Configuration--------------------------------------------------------*/

  /* Reset of all peripherals, Initializes the Flash interface and the Systick. */
  HAL_Init();

  /* USER CODE BEGIN Init */

  /* USER CODE END Init */

  /* Configure the system clock */
  SystemClock_Config();

  /* USER CODE BEGIN SysInit */

  /* USER CODE END SysInit */

  /* Initialize all configured peripherals */
  MX_GPIO_Init();
  MX_USART2_UART_Init();
  /* USER CODE BEGIN 2 */
  RetargetInit(&huart2);
  /* USER CODE END 2 */

  /* Infinite loop */
  /* USER CODE BEGIN WHILE */
  while (1)
  {
    printf("\r\nYour name: ");
    scanf("%s", buf);
    printf("\r\nHello, %s!\r\n", buf);
    /* USER CODE END WHILE */

    /* USER CODE BEGIN 3 */
  }
  /* USER CODE END 3 */
}

// ***REST OF INITIALIZATION CODE NOT SHOWN***
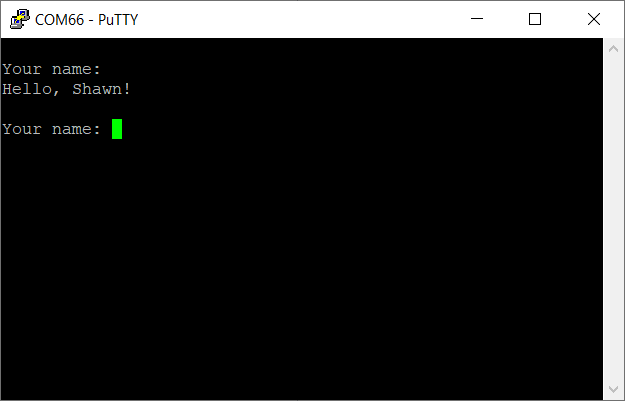
Build this project and open a debugging session in STM32CubeIDE. Open your favorite serial terminal program and connect to the Nucleo’s COM port (baud rate of 115200, 8-N-1). You should be greeted by a query. Type out some answer and press enter. Note that you will not be able to see what you typed. However, the program should append your entered text to a “Hello” message.
Try not to overflow your assigned character buffer. Bad things happen if you do. Or you could write some kind of bounds checking in your code. Anyway, this is just a starting point to hopefully help you with debugging on your STM32 project.


Best alternative to STM32CubeIDE:
http://www.emcu.eu/how-to-implement-printf-for-send-message-via-usb-on-stm32-nucleo-boards-using-atollic/
how it is best alternative ? Did you understand what it is written correctly ?
Another alternative: “debugging using either a UART or the SWO trace cell” https://ralimtek.com/stm32_debugging/
And how to un”Exclude resource from build”?
If you’re looking to include a source file, you can add the header file in Project > Properties > C/C++ General > Paths and Symbols > Includes > GNU C. To add the .c (or other source), click on the Source Location tab in Paths and Symbols.
Hi Shawn, thanks for this blog! I am having trouble getting this to work with picocom or mincom on my ubuntu. I have a l432 hooked up on USB. I am wondering if you have any insight onto why this isnt working?
Thanks
I think the issue is that UART isnt multiplexed to my pinout on the board….
Do you have an oscilloscope or logic analyzer that you could use to verify that the UART is communicating?
How can I use printf and scanf with float or integer value? It always returns 0 when I input the value.
Hello,
how can we write sensor data into a txt file
You either need to write a program on your computer that captures incoming serial data and stores it to a txt file (e.g. using something like PySerial) or you need to add an SD card to your microcontroller project and use something like FATFS to write data directly to a txt file on the SD card.
Edit: Alternatively, you could also spit your sensor data out over serial to a device like this: SparkFun OpenLog.
Hello shawn and thank you for this
i’ve got the printf “your name”, but when i try to send data, it doesn’t do anything and the code stucks
using this on discovery f407
What serial terminal program are you using? If you can, try having it send both \r and \n characters when you press the enter key to see if that helps.
Thanks, Shawn!
Works like a dream, straight from the page.
Had to modify slightly – the Nucleo 32f429 board uses USART3 for the ST-Link – but it just works beautifully. As ever, well written and deceptively simple to implement.
Major advance in debugging!
Cheers!
Richard
I changed from STM32 F334 to L562 and I was stuck with printf. This worked wonderful for me. This is great, you are awesome! Thank you so much.
Hi, thanks for the perfect guide. I have applied this method for my code running on STM32EWB55. At first I couldn’t get the print function working on the serial monitor but the scan was working when I have checked the buffer expression. So, I have used the oscilloscope in the RS232 mode to verify the issue. Oscilloscope got the print data. After rebooting the serial monitor app I was able to see printed messages as well. %100 success.
Hi Shawn,
how to use HAL_UART_Trasnmit_IT() or HAL_UART_Receive_IT() fucntion in this case.
I think all you need to do is enable the USART global interrupt in the NVIC Settings (in CubeMX) and use the appropriate _IT() function (https://www.waveshare.com/wiki/STM32CubeMX_Tutorial_Series:_USART). I don’t think printf() works with receiving, though. I have not tried it, so I could be wrong.
Hi,
Is there no problem on disabling the syscalls.c file.
Or it may impact on the future code.
From my understanding, most (all?) of the function calls in syscalls.c are replicated elsewhere (https://www.openstm32.org/forumthread6814), which is why you need to disable that file to avoid duplication. While I have not seen any issues with it impacting other code, I can’t promise that it is 100% safe, as I have not tested it thoroughly.
Hi
How to send (transmit) float values?
If you’re getting no output when trying to print floating point values, you likely need to add “-u _printf_float” to the LDFLAGS in the options. This post shows you where to add it in STM32CubeIDE: https://community.st.com/s/question/0D50X0000B0AEJb/uprintffloat-where-to-set-for-clinker-in-stm32cubeide
Does this guide also work for C++?
I followed this guide step-by-step but I still get an error when I build my code:
undefined reference to `RetargetInit(__UART_HandleTypeDef*)’
Any suggestions are greatly appreciated.
I have not seen that error, but this thread might help: https://community.st.com/s/question/0D50X0000AIeIqo/undefined-reference-to-haluartinit
Hi @Martin,
This problem is because you are calling C code from within CPP.
Check this article: https://embeddedartistry.com/blog/2017/05/01/mixing-c-and-c-extern-c/
The solution here is to enclose the retarget.h with:
#ifdef __cplusplus
extern “C”
{
#endif
//C code goes here
#ifdef __cplusplus
} // extern “C”
#endif
Hello,
I am seeing these build errors…
undefined reference to `_exit’
undefined reference to `_getpid’
undefined reference to `_kill’
Any ideas as to what the problem could be?
Thanks
I have not seen these errors personally. You might need to add
-specs=nosys.specs
to the linker flags as per this thread: https://www.openstm32.org/forumthread2449
Thanks for the blog post Shawn, this helped a lot just getting up and running. I later found that its actually much simpler to do, or at least for the transmit side (didn’t try receiving yet).
All I had to add was to add this in function in my project (easiest is in the main function for access to huart2). Of course change the reference if using a different uart handle.
int __io_putchar (int ch)
{
(void)HAL_UART_Transmit(&huart2, (uint8_t *)&ch, 1, HAL_MAX_DELAY);
return ch;
}
Thanks a lot, this worked like a charm!
Saludos, ¿cómo enviar (transmitir) una matriz n*n?
I am having error can not firn _ansi.h
Works perfect but printing to console takes quite some time, so has severe impact on the firmware timing.
But certainly a nice addition to debug STM32 code.
I’m getting the following error for both files in STM32F7 (#include “stm32f7xx_hal.h”):
unknown type name ‘UART_HandleTypeDef’; did you mean ‘I2C_HandleTypeDef’?
All of your retarget.c. functions contain a check on STDIN_FILENO or STDOUT_FILENO and STDERR_FILENO – except for _lseek.
Is that correct? Why does _lseek not also include the test?
I have tested several examples without success. Your example works great. Thanks for your effort.